EasyManua.ls Logo

Silver Spring SC500-V3 User Manual

Silver Spring SC500-V3
8 pages
To Next Page IconTo Next Page
Page #1 background imageLoading...
Page #1 background image
Deluxe Steel Folding Scooter & Wheelchair Carrier
Instructions for Part # SC500-V3
Page 1Rev. 060518
DiscountRamps.com 1-888-651-3431
General Guidelines
It is the user’s responsibility to read and follow all instructions.
Keep these instructions with the product at all times and review before each use.
It is the responsibility of this product’s owner to furnish the instructions to any person that borrows
or purchases the product.
Inspect the product before use to ensure it is assembled properly and all parts are in safe working
order and free of defects.
Never modify this product in any way.
All circumstances cannot be addressed in these instructions. Please use common sense and
practice general safety measures when using this product.
Parts and/or instructions are subject to change without notice.
Safety
Follow all warnings and instructions marked on the product.
Do not occupy the mobility aid while loading the carrier.
Do not stand on the carrier.
Never exceed vehicle tongue weight rating.
The carrying capacity is 500 lbs.
Hitch adapters may a󰀨ect the weight capacity of the carrier. If using a hitch adapter, always check
its limitations before use.
Always store the carrier in a safe place.
Improper use, storage, or installation of the carrier could result in death or serious injury.
Do not put the product on any kind of trailer.
NOT recommended for tow-behind trailers including 5th wheel trailers and camping trailers.
Periodically check nuts and bolts for tightness.
Tools Required
17mm wrench
13mm or 1/2" wrench
19mm or 3/4" wrench
7/8" or 22mm wrench
Phillips screwdriver
10mm Allen wrench
Question and Answer IconNeed help?

Do you have a question about the Silver Spring SC500-V3 and is the answer not in the manual?

Silver Spring SC500-V3 Specifications

General IconGeneral
BrandSilver Spring
ModelSC500-V3
CategoryAutomobile Accessories
LanguageEnglish

Summary

General Guidelines

Safety Precautions

Tools Required

Parts List

Assembly Instructions

Step 1: Install Spring Pull Pin

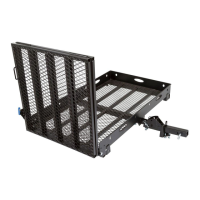
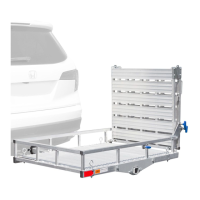
Install the spring pull pin into the front of the carrier basket and adjust for ramp lift.

Step 2: Secure Hitch Tube

Flip the carrier basket, slide the hitch tube into the center support tube, and secure with pin and bolts.

Step 3: Mount Ramp Bracket

Install the ramp bracket using carriage bolts and lock nuts, ensuring alignment with the ramp's spring pins.

Step 4: Attach Anti-Tilt Device

Slide the anti-tilt locking device onto the carrier hitch tube with the 3-bolt side facing the hitch.

Step 5: Secure Carrier to Hitch

Install the anti-tilt locking device or pinch bolt assembly for securing the carrier to the hitch receiver.

Step 6: Install Pinch Bolt Assembly

Insert the carrier into the hitch and install the pinch bolt assembly, aligning holes and tightening to secure.

Step 7: Adjust Pivot Bolt

Tighten the hex head pivot bolt to eliminate side-to-side wobble without over-tightening.

Step 8: Align and Secure Carrier

Adjust the leveler bolt to align pin holes for smooth pin insertion/removal, then secure the carrier vertically.

Step 9: Deploy Loading Ramp

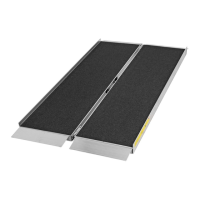
Unfold the loading ramp, load cargo, and secure the ramp vertically. Tie down cargo securely.

Product Warranty and Liability

General Product Warranty

Products are warranted free of defects in material and workmanship under normal use.

Warranty Period

Warranty is effective for one year from the date of product delivery.

Warranty Service

Authorized Dealer will replace defective parts at no charge; purchaser responsible for labor.

Warranty Limitations

Warranty excludes damage from misuse, accidents, alterations, or normal wear and tear.

Limited Liability

Dealer is not liable for indirect, incidental, or consequential damages arising from product use.

Related product manuals