GB
│
IE
│
NI
│
9 ■
SHAZ 22.2 B2
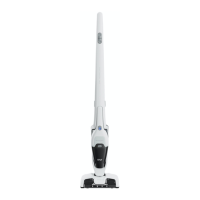
♦ Select a suitable mounting location for the wall bracket f:
You must be able to easily place the handheld vacuum cleaner into the
bracket or remove it, and the mains socket must be easily accessible.
Ensure that the appliance is not exposed to direct sunlight or other heat
sources.
♦ Mark two drill holes on the wall at a distance of approx. 154 mm from each
other. Ensure that there is a mains power socket in the immediate vicinity.
♦ Use a 5 mm drill bit to drill the required holes and insert the wallplugs.
♦ Screw in the screws so that the heads protrude a few millimetres. Hang
the wall bracket fon the two screws using the slotted holes on the rear.
Ensure that the screws slide into the two slots. The wall bracket f should lie
flush against the wall. You can adjust the distance to the wall and compen-
sate for any unevenness in the wall by screwing in or unscrewing the screws.
♦ You can place the nozzles on the accessories holder d on the side.
♦ Now plug the barrel plug h of the mains adapter into the top of the wall
bracket f and the mains adapter g into a wall socket.
Charging the batteries
■ The appliance runs on rechargeable lithium-ion batteries.
■ The indicator lamp 3 shows the charge level of the batteries (25%, 50%,
75%, 100%). If the batteries are empty, all of the bars start to flash for a
few seconds before the appliance switches itself off.
■ There are two ways of charging the batteries.
– Plug the barrel plug h of the mains adapter directly into the connection
1 on the appliance and the mains adapter g into a wall socket.
– Plug the barrel plug h of the mains adapter directly into the connection
on the wall bracket o and the mains adapter g into a wall socket.
Hang the appliance into the wall bracket f so that the plastic tab on
the wall bracket f slides into the recess between the hand element 4
and the dirt container t. The contacts should now be connected to
each other.
NOTE
► The appliance cannot be operated during charging.
■ Depending on the charge level, the current bar on the indicator lamp 3
will flash during charging. The charging process is completed when all four
bars light up.

 Loading...