44
GB
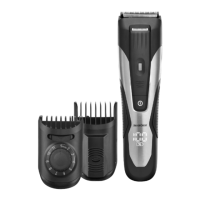
1. Select the appropriate comb attachment for the desired cutting
length:
2. Figure B: in order to attach the comb attachment
|
1
,|
2
or|
14 push it
carefully into the lateral guide rails of the comb attachment fasten-
er|21, until it locks into position on both sides.
3. Set the selector switch|11 according to the marking at the comb at-
tachment
|
1
,|
2
or|
14
.
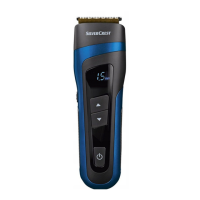
4. Switch the device with the on/off switch|7 into the standby mode.
The display of the battery capacity|16 appears. After approx. 2
seconds, the cutting length|17 will be displayed.
5. Only for comb attachments
|
1
and|
14
:
use the buttons ST|6 to set
the desired cutting length. You can press the buttons ST|6 either
briefly to adjust the cutting length always by one step or keep them
pressed in order to move the comb attachment faster.
NOTE: the setting of the cutting length is only possible in the standby
mode.
Remove the comb attachments
• In order to remove a comb attachment
|
1
,|
2
or|
14 carefully pull it
upwards out of the lateral guide rails of the comb attachment fasten-
er|21.
Cutting length
Comb attach-
ment
Marking
1.5 mm
Comb attach-
ment|2
0
4.0 - 22.0 mm
in 0.5-mm increments
Comb attach-
ment|1
1
23.0 - 41.0 mm
in 1.0-mm increments
Comb attach-
ment|14
2
__291948_Haarschneider_Autokamm_B8.book Seite 44 Dienstag, 19. Dezember 2017 7:42 19
 Loading...