EN
10
Unpacking Your Tool
• Carefullyunpackandinspectyourtool.Fullyfamiliariseyourselfwithallitsfeaturesand
functions
• Ensure that all parts of the tool are present and in good condition. If any parts are missing or
damaged, have such parts replaced before attempting to use this tool
Before Use
WARNING: Always disconnect the tool from the air supply before adjustment or maintenance
is carried out.
Fitting the quick connector
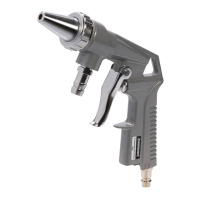
Thistoolissuppliedwithtwodifferentmaleairlinequickconnectors(Fig.I):
EQ-4–commonlyusedinEurope
EN-6–mainlyusedintheUK
• Please choose the connector that is compatible with the airline system you are using, and install
as outlined below:
1. ApplyPTFEtape(notincluded)tothescrewthreadsoftheQuickConnector(5).Thiswillhelpto
maintain an airtight seal
Note:ApplyPTFEtapetightlyandinaclockwisedirection,soitdoesnotcomeoffwhenthethread
is screwed into the tool.
2. Remove the protective plug from the air inlet
3. Usingaspanner(notincluded)screwthequickconnectorintotheairinletlocatedatthebaseof
the handle
4. Connect to airline, pressurise carefully and carry out a leak check (e.g. by spraying small amounts
of soapy water on to the outside of the connectors)
• Airlinesttedwithmatchingfemalequickconnectorswillnowbeapushttothetool
WARNING: Do not attach the tool to a hose and the hose to a compressor with only threaded
connections. Always use quick connectors so the tool can be removed from the air supply connection
when needed for safe operation.
WARNING: Nevertafemalequickconnectordirectlytotheleaderhose/whiphoseordirectly
to the tool. The stored pressurised air in the tool, even when detached from the main air supply, can
operate the tool unexpectedly.
Air supply connection
WARNING:Undernocircumstancescanthespraygunbeusedinacompressedairsystemwith
integrated oiler.
• Thistoolshouldbeconnectedtoaclean,dryairsupplywithwaterseparatorandlter.
• Donotallowsupplypressuretoexceedthemaximumstated(see‘Specications’)
• Ensure that water is drained from air system daily
• Ensure that all parts of the system (hoses, couplers, etc.) are correctly rated for the air pressure to
be used
• Useconductivehosestohelppreventbuild-upofelectrostaticcharge
Setting tool power
• The tool power can be adjusted by reducing/increasing the air supply pressure within the range
speciedin‘Specications’
Setting up the sandblasting gun assembly
1.Ensurethesandblastinggunhasbeencorrectlyassembled,andtheNozzleLockingRing(2)has
been securely tightened
2. Connect one end of the Rubber Hose (6) to the Suction Nozzle (7) and the other end of the hose
to the Material Hose Connector (3)
Note: It is recommended to use conductive hose to connect the sandblasting gun and
Suction Nozzle.
3.Fillasuitablecontainerwithabrasivematerial
4. Immerse the Suction Nozzle in the abrasive material, so that the tip of the Deaeration Pipe (9)
protrudes above the surface of the abrasive material
Preparing the workpiece
• Workpieces contaminated with oil and grease should be degreased prior to sandblasting
• Remove dirt and other encrustations (e.g. dried mud, soil) from surfaces before sandblasting
• Carefully cover areas of the workpiece that must not be sandblasted (e.g. insides of engine
blocks, cylinder bores, and other functional surfaces)
Operation
WARNING: Always wear personal protection equipment, including eye protection, suitable
gloves and adequate respiratory protection, when working with this sandblaster.
1. Connect the sandblasting gun to the air supply
2. Adjust the air supply pressure according to the workpiece and abrasive used
WARNING: Ensure the air supply pressure does not exceed the maximum operating pressure
statedin‘Specications’.
IMPORTANT: Ensure the pressure is suitable for the workpiece and does not damage the surface.
ALWAYStesttheeffectoftheabrasiveonascrappieceofmaterial,orbeginsandblastingatan
inconspicuous place on the workpiece before starting the main job.
3. DirecttheOutletNozzle(1)towardstheworkpieceandpresstheTrigger(4)tostarttheowof
abrasive
Note: When the Suction Nozzle (7) and Rubber Hose (6) are empty, it may take a few seconds for the
abrasivetostartowingintothesandblastinggun.KeeptheTriggerdepresseduntiltheabrasive
exits the Outlet Nozzle.
4. Release the Trigger to stop sandblasting
WARNING: Be aware that air tools may hold residual pressure after use. Always bleed air
pressure from the tool after shutting off air supply.
Nozzle blockage
Iftheowofthesandingmaterialisreducedorstopscompletely,theremaybeablockageinthe
nozzle:
1. Disconnect from the air supply
2. UndotheNozzleLockingRing(2)andremovetheOutletNozzle(1)
3. Check for and remove any clogged material in the Outlet Nozzle and the gun
4. Reconnect to the air supply
5. Remove the Suction Nozzle (7) from the abrasive container and activate the gun to blow through
thesystemuntilit’sclear
6. Disconnect from the air supply and replace the Outlet Nozzle
• If the Outlet Nozzle is clear but the sanding material is still restricted, check the Rubber Hose (6)
and the Suction Nozzle for clogging and remove any clogged material
• Seethe‘Troubleshooting’sectionforpossiblecausesofcloggingandtherelevantsolution
Maintenance
WARNING: Always disconnect from the air supply and depressurise before cleaning or carrying
out any maintenance.
IMPORTANT: There is very little that can go wrong with your air tool and it should be noted that
when an air tool fails to work it is generally because the internal workings have corroded due to
dirty, wet air and failure to follow the operating instructions.
Cleaning
• Keep your tool clean at all times. Dirt and dust will cause internal parts to wear quickly, and
shortenthemachine’sservicelife.Cleanthebodyofyourmachinewithasoftbrush,ordrycloth
1. Before disassembly, reconnect the sandblasting gun to the air supply
2. Remove the Suction Nozzle (7) from the abrasive container
3. Direct the Outlet Nozzle (1) towards a safe place, and blow it through with air until all remaining
abrasive is removed
4. Disconnect from the air supply
5. Remove the Rubber Hose (6) from the Material Hose Connector (3) and Suction Nozzle Hose
Connector (8)
6. RemovetheNozzleLockingRing(2)andOutletNozzle(1).Disassembleothercomponentsas
necessary,referringtothe‘AssemblyDiagram’
7. Clean the whole route of abrasive material thoroughly, taking care not to damage the Outlet
Nozzle (1) and other internal parts
8. Slightly lubricate all sealing surfaces and moving components with a suitable spray gun
lubricant
9. Reassemblethesandblastinggun,referringtothe‘AssemblyDiagram’
633629_OwnerManual.indd 10633629_OwnerManual.indd 10 07/02/2024 10:5007/02/2024 10:50
 Loading...