20 www.simplicitymfg.com
Service Air Filter
(Model 7800894)
WARNING
Never start or run the engine with the air cleaner
assembly (if equipped) or the air filter (if equipped)
removed.
!
!
NOTE: Do not use pressurized air or solvents to clean
the filter. Pressurized air can damage the filter and
solvents will dissolve the filter.
1. Remove the fastener (A, Figure 18) and the air
filter cover (B).
2. Remove the pre-cleaner (C) and the filter (D).
3. To loosen debris, gently tap the filter on a hard sur-
face. If the filter is excessively dirty, replace with a
new filter.
4. Wash the pre-cleaner in liquid detergent and
water. Then allow it to thoroughly air dry. Do not oil
the pre-cleaner.
5. Assemble the dry pre-cleaner to the filter.
6. Install the filter and pre-cleaner into the base (E).
Make sure filter fits securely in the base.
7. Install air filter cover and secure with fastener.
Make sure the fastener is tight.
Figure 18: Air filter and pre-cleaner
A
B
E
C
D
Clean Debris Off Mower
WARNING
DO NOT attempt any maintenance, adjustments or service
with engine and blade running. STOP engine and blade.
Disconnect spark plug wire and secure away from spark
plug. Engine and components are HOT. Avoid serious
burns, allow sufficient time for all components to cool. Wear
heavy leather gloves when handling or working around
cutting blades. Blades are extremely sharp and can cause
severe injury.
!
!
1. Clean dirt and debris from the top of the mower
deck.
2. Clean any debris buildup on or around the engine,
etc.
While cleaning, check components for wear or dam-
age. Replace worn or damaged components immedi-
ately.
Drive Control Adjustment
WARNING
DO NOT attempt any maintenance, adjustments or service
with engine and blade running. STOP engine and blade.
Disconnect spark plug wire and secure away from spark
plug. Engine and components are HOT. Avoid serious
burns, allow sufficient time for all components to cool.
!
!
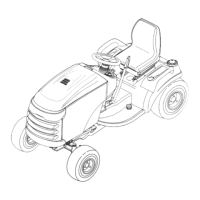
The drive handle (A, Figure 19) should engage the
transmission when the handle is pushed forward, and
should disengage the transmission when the handle is
pulled fully back.
Figure 19: Drive handle
A
If the transmission does not engage or disengage, take
the unit to an authorized dealer for service.
Maintenance