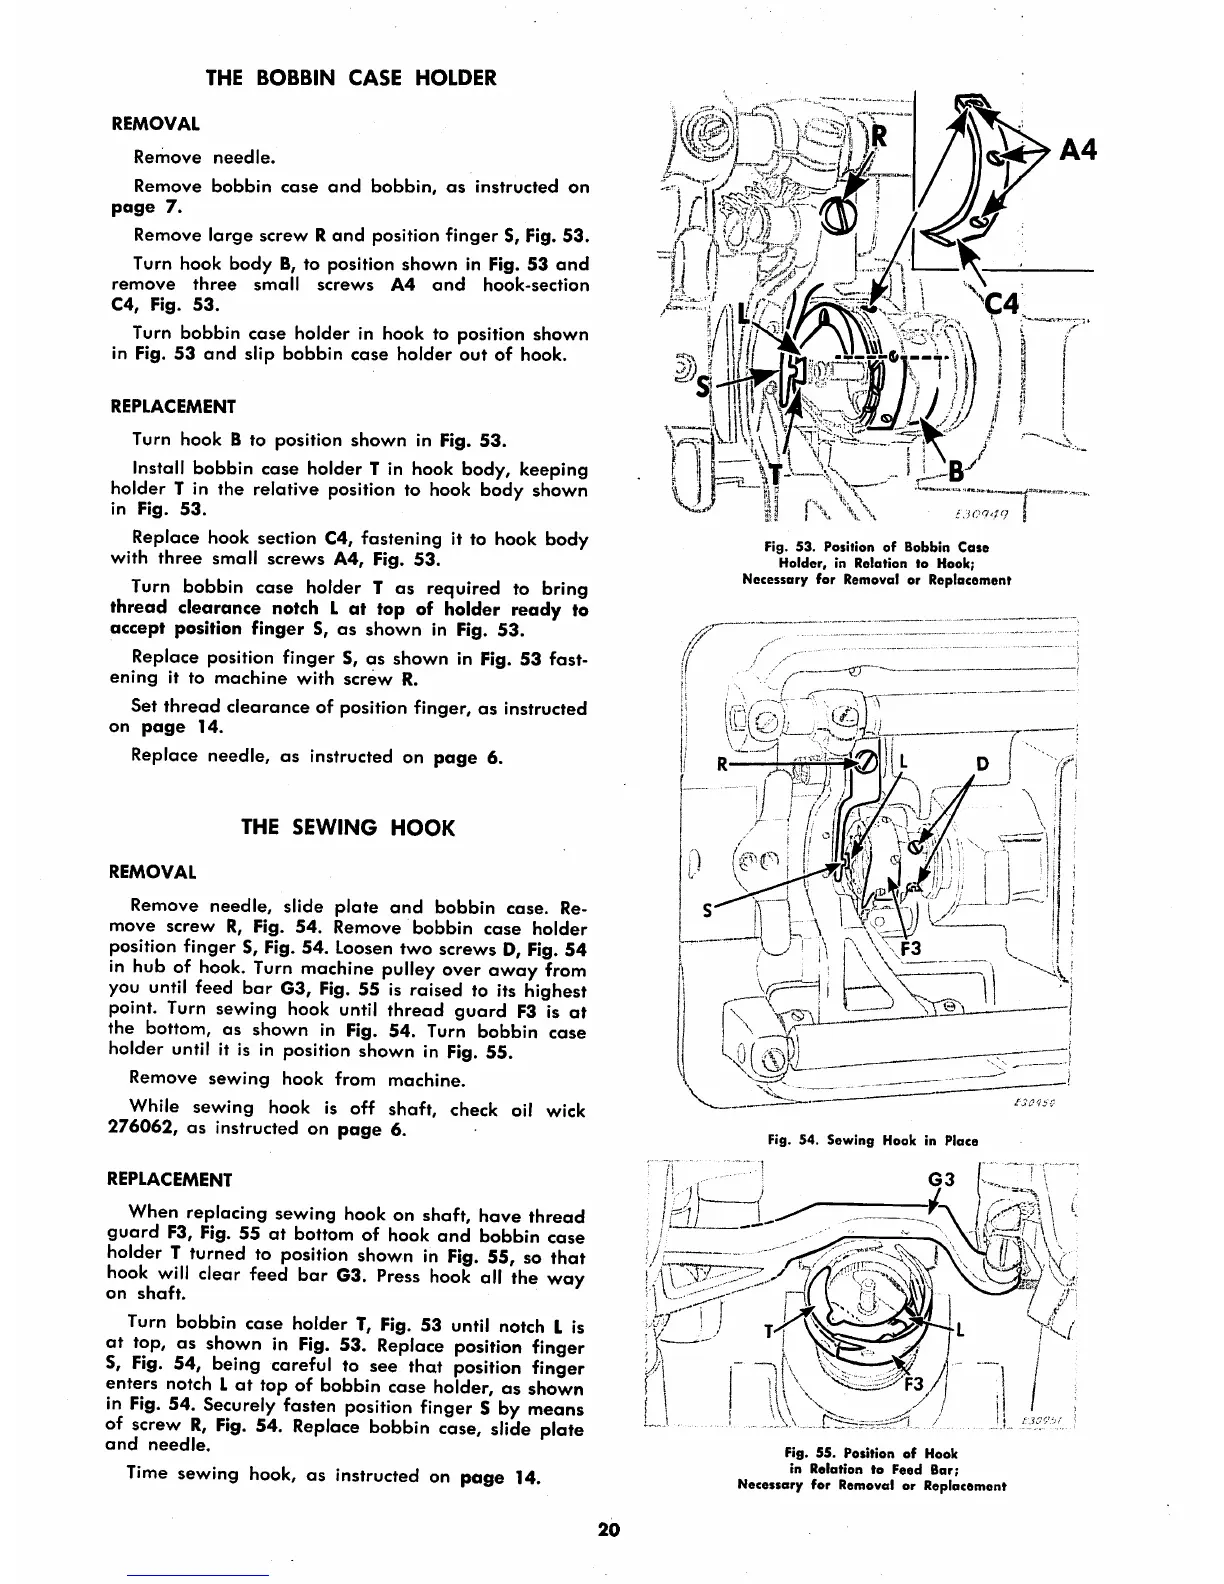
THE
BOBBIN
CASE
HOLDER
REMOVAL
Remove
needle.
Remove
bobbin
case
and
bobbin,
as
instructed
on
page
7.
Remove
large
screw
R
and
position
finger
S, Fig.
53.
Turn
hook
body
B, to position
shown
in Fig.
53
and
remove
three
small
screws
A4
and
hook-section
C4,
Fig.
53.
Turn bobbin cose holder in hook to position shown
in Fig. 53
and
slip
bobbin
case
holder
out
of hook.
REPLACEMENT
Turn hook B to position
shown
in Fig.
53.
Install bobbin case holder T in hook body, keeping
holder T in the relative position to hook body shown
in
Fig.
53.
Replace hook section C4, fastening it to hook body
with
three
small screws A4, Fig. 53.
Turn bobbin case holder T as required to bring
thread clearance notch L at top of holder ready to
accept position finger S,
as
shown in Fig. 53.
Replace position finger S, as shown in Fig. 53 fast
ening
it
to
machine
with
screw
R.
Set
thread
clearance of position finger,
as
instructed
on
page
14.
Replace needle, as instructed on page 6.
THE
SEWING
HOOK
REMOVAL
Remove
needle,
slide
plate
and
bobbin
cose. Re
move
screw
R, Fig.
54.
Remove
bobbin
case
holder
position finger S, Fig. 54.
Loosen
two screws D, Fig.54
in hub of
hook.
Turn
machine
pulley
over away from
you until feed
bar
G3,
Fig.
55 is raised to its highest
point. Turn sewing hook until thread
guard
F3 is
at
the bottom, as shown in Fig. 54. Turn bobbin case
holder until it is in position shown in
Fig.
55.
Remove
sewing
hook
from
machine.
While sewing hook is off shaft, check oil wick
276062, as instructed on
page
6.
REPLACEMENT
When replacing sewing hook on shaft, have thread
guard
F3, Fig. 55
at
bottom of hook
and
bobbin case
holder T turned to
position
shown
in
Fig.
55, so that
hook
will
clear
feed
bar
G3.
Press
hook
all
the
way
on
shaft.
Turn bobbin case holder T, Fig. 53 until notch L is
at top,
OS
shown in
Fig.
53.
Replace
position finger
S,
Fig.
54,
being
careful
to see that
position
finger
enters notch L
at
top of bobbin case holder, as shown
in
Fig.
54.
Securely
fasten
position
finger
S by
meons
of
screw
R,
Fig.
54.
Replace
bobbin
case,
slide
plate
and
needle.
Time
sewing
hook,
as instructed on page 14.
20
'f'i
•!
. / I
...
i
if I \ \ \ I
Fig.
53.
Position
of
Bobbin
Case
Holder,
in
Relation
to Hook;
Necessary for Removal or Replacement
'I V I
\y
1
fyf'
ij -Ji
^
A.
ih
Fig.
54.
Sewing
Hook
in
Place
Fig.
55.
Position
of
Hook
in Relation to
Feed
Bar;
Necessary for Removal or Replacement