35
EINLEITUNG FÜR ARBEIT MIT
DEM STREUER
Wenn haben Sie überhanpt der Streuer,
Anstellung und Montage bzw. Demontage
das Streuvorrichtung erkännt, lassen Sie
dann noch volgende Hinweise:
Bei der Landung müssen Sie aufpassen,
dass der Dung gleichnässig an
Laderaum und nich höcher als 10 cm
über die Wände verteilt ist, wass
besauder bedenten für feine und
gleichamässige Verteilung des Dunges
ist.
Streuen muss hinsichllich an
Geschwindigkeit und
Betriebsbesonderkeiten aufpassen.
Abschnitt einladenes Danges muss eine
Vorm von Trapez haben, und muss sich
10 cm vor dem Struvorrichtung wegen
der Betriebüberlastung beendet werden.
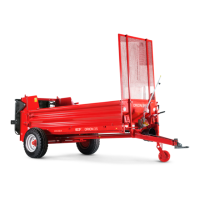
Bei Streuen des Dunges kontrolliren Sie
die Streubreite und Streulänge. Mit Hebel
wird der Schutz aufgehöben und mit
Bolzen versichert (Bild 6, Pos. 4).
Zuerst muss der Kratzboden
eingeschaltet werden und dann wird die
Gellenkwelle angeklopt. Wenn die
Streuvorrichtung in ganzene Breite den
Dung entnimmt, wird die Arbeit mit der
richtage Geschwirdigkeit begonnen.
Die Kuplung muss hinsichtlich an
Verlängerung der Lebensdauer Ruhig
enigeschaltet werden.
Die Menge gestreuertes Dunges ist von
Dungsrohdichte,
Kratzbodengeschwindikent,
Streuergeschwindikeit und
Ladungshöche abbängig. Arbeiten Sie
mit Drehzahen von 300 bis 540 um/min.
Bedinungshebel für die
Kraztbodensteuerung soll nur zwischen
der Arbeit verwendent werden. Mit der
Bedinungshebel kann man vier
Geschwindigkeiten für die Rückwerts-
und zwei für Vorwärtsbewegung (gegen
Schlepper) erreicht werden.
Bei einladetem Streuer darf
Vorwärtsbewegung nur kurtze Zeit dauet
weden, weil an Steuer kommt bis
Beschedikton.
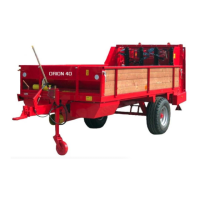
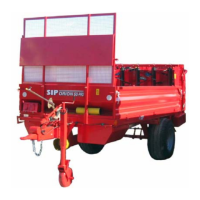
INSTRUCTIONS FOR WORK
By now you have to know the working units,
their adjustment and function, mounting and
dismounting of the spreading device. Let us
help you with some practicable advice:
When loading the spreader make sure
that manure does not lean over the side
boards. The manure must be evenly
loaded on the whole surface and the
height of it must not exceed 10 cm over
the side board in order not to cause
disturbances during spreading.
The load should also be adjusted to the
ground you work on.
The manure load should have trapezoid
form. It should end at least 10 cm before
the spreading cylinders to avoid
overloading of the engine when the
spreading cylinders become switched on.
While spreading take into consideration
the length and the width of spreading.
Stop some meters before the end of the
field. Lift the protection by the lever and
secure it by the pin (fig.6, pos.14).Switch
on the setting lever for the movement of
the chain conveyor, then switch on the
tractor outlet shaft. When the manure
reaches the cylinders over the whole
height, switch on the selected speed and
start off. Release the clutch slowly to
prolong the life period of the P.T.O. Shaft
and other drive units of the spreader.
Adjust the working speed to your needs.
The amount of spread manure depends
on manure
's specific weights, setting of
the chain conveyor, drive speed and
height of the load. Use medium to up to
maximum permitted revolutions of the
tractor outlet shaft (max. 540 rpm). After
a couple of days works with the spreader
you will find the most appropriate
settings.
When the distributor is loaded, move the
movement setting handle during
spreading only 4 conveyor speeds
backwards and 2 conveyor speed
forwards can be set by the setting lever.
When the spreader is loaded the
conveyor can move forward only for a
short period , otherwise the spreader can
get damaged.
 Loading...