EN
5. Installation
- 18 -
951-150-032-EN
Version 09
Avoid uncontrolled tightening of
the
piston detector.
This could cause damage. Adhere
to the tightening torque of 7
0.5
Nm.
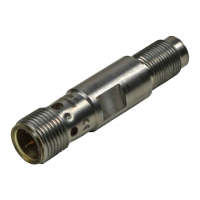
• Tighten the piston detector (8) with a
torque of 7
±
0.5
Nm
• Connect electrical connection cable
(provided by customer) (2) to the piston
detector (8)
In case of different cable connection:
• Remove old connection cable (2).
• In place of the previous connection cable,
connect the supplied adapter cable (9) to
the piston detector (8) and a customer-
provided port
• Attach the adapter cable (9) in a stress-
free position
• Clean the work area/metering device of
lubricant contamination
• Remove the drip pan.
5.3 Checking the signal
See Figure 2
On the subsequent metering device
strokes, the signal from the piston detector
must be received by the customer’s moni-
toring equipment.
• Carry out a few strokes of the metering
device, and check the metering stroke
signal from the piston detector on the
yellow piston detector LED (flashing) or
at the customer's signal connection
• Apply grease to the new packing ring (6)
and place it on the new adapter (7)
• Apply the adapter (7) to the metering
device (4) and tighten with the following
torque:
Torques for tightening the adapter
VP/PSG2 13 mm AF = 20+1Nm
VPK/PSG1 12 mm AF = 15+1Nm
PSG3 24 mm AF = 70±4Nm
SSV/SSVC/SSVD/SSVE 13 mm AF = 15±1Nm
SSVL/SSVDL 13 mm AF = 15±1Nm
SSVD/SSVD-E 13 mm AF = 15±1Nm
SLC1/SLC2 13 mm AF = 15±1Nm
VSG, VSL 13 mm AF = 15+1Nm
VPB 12 mm AF = 15+1Nm
• Apply new piston detector (8) to the
adapter (7) and tighten gently
See Figures 1 to 3
5.2 Installation of the new piston detector
 Loading...