Setting the Primary Address
Each SwitchLinc requires a primary address to operate. It ships from the factory with
“A1” as the default address; it will also have this address after performing a factory
reset. Any of the 256 PLC/X10 addresses can be programmed.
The SwitchLinc does not use code wheels or dials to set its primary address. Instead,
it will accept the first PLC address it finds on the powerline once the programming
mode is started. Any PLC/X10 transmitter can be used to set the primary address.
Important: If you plan on sending status requests to the
SwitchLinc 2-Way, make sure that each SwitchLinc 2-Way
is programmed with a different primary address. Otherwise,
their simultaneous responses to a status request will col-
lide with one another.
1. Using the tip of a very small screwdriver, press and hold
the Status LED/ Set Button for approximately 3 seconds
then release. The green Status LED/ Set Button will
begin blinking and the load will come on.
2. Within 30 seconds, transmit the desired primary address
(housecode and unit code) from any transmitter.
The light(s) controlled by the SwitchLinc will blink and
the Status LED/ Set Button will stop flashing.
3. Confirm that the address was accepted by turning it on or
off from a remote transmitter.
Setting the Preset On-Level (Optional)
The Preset On-Level is the brightness level that SwitchLinc will adjust to when activat-
ed or it receives a powerline carrier (PLC) ON-command to its primary address. It can
be set to resume to the same brightness level each time or to the previous brightness
level before it was turned off.
Setting a fixed brightness level:
1. Adjust the brightness of the load (at the SwitchLinc or remotely
with dim commands) to the desired level.
2. Tap the Status LED/Set Button ONCE.
The light(s) will blink indicating that it has set the new on-level.
Setting the Resume Dim mode:
1. Turn the light off.
2. Tap the Status LED/Set Button ONCE.
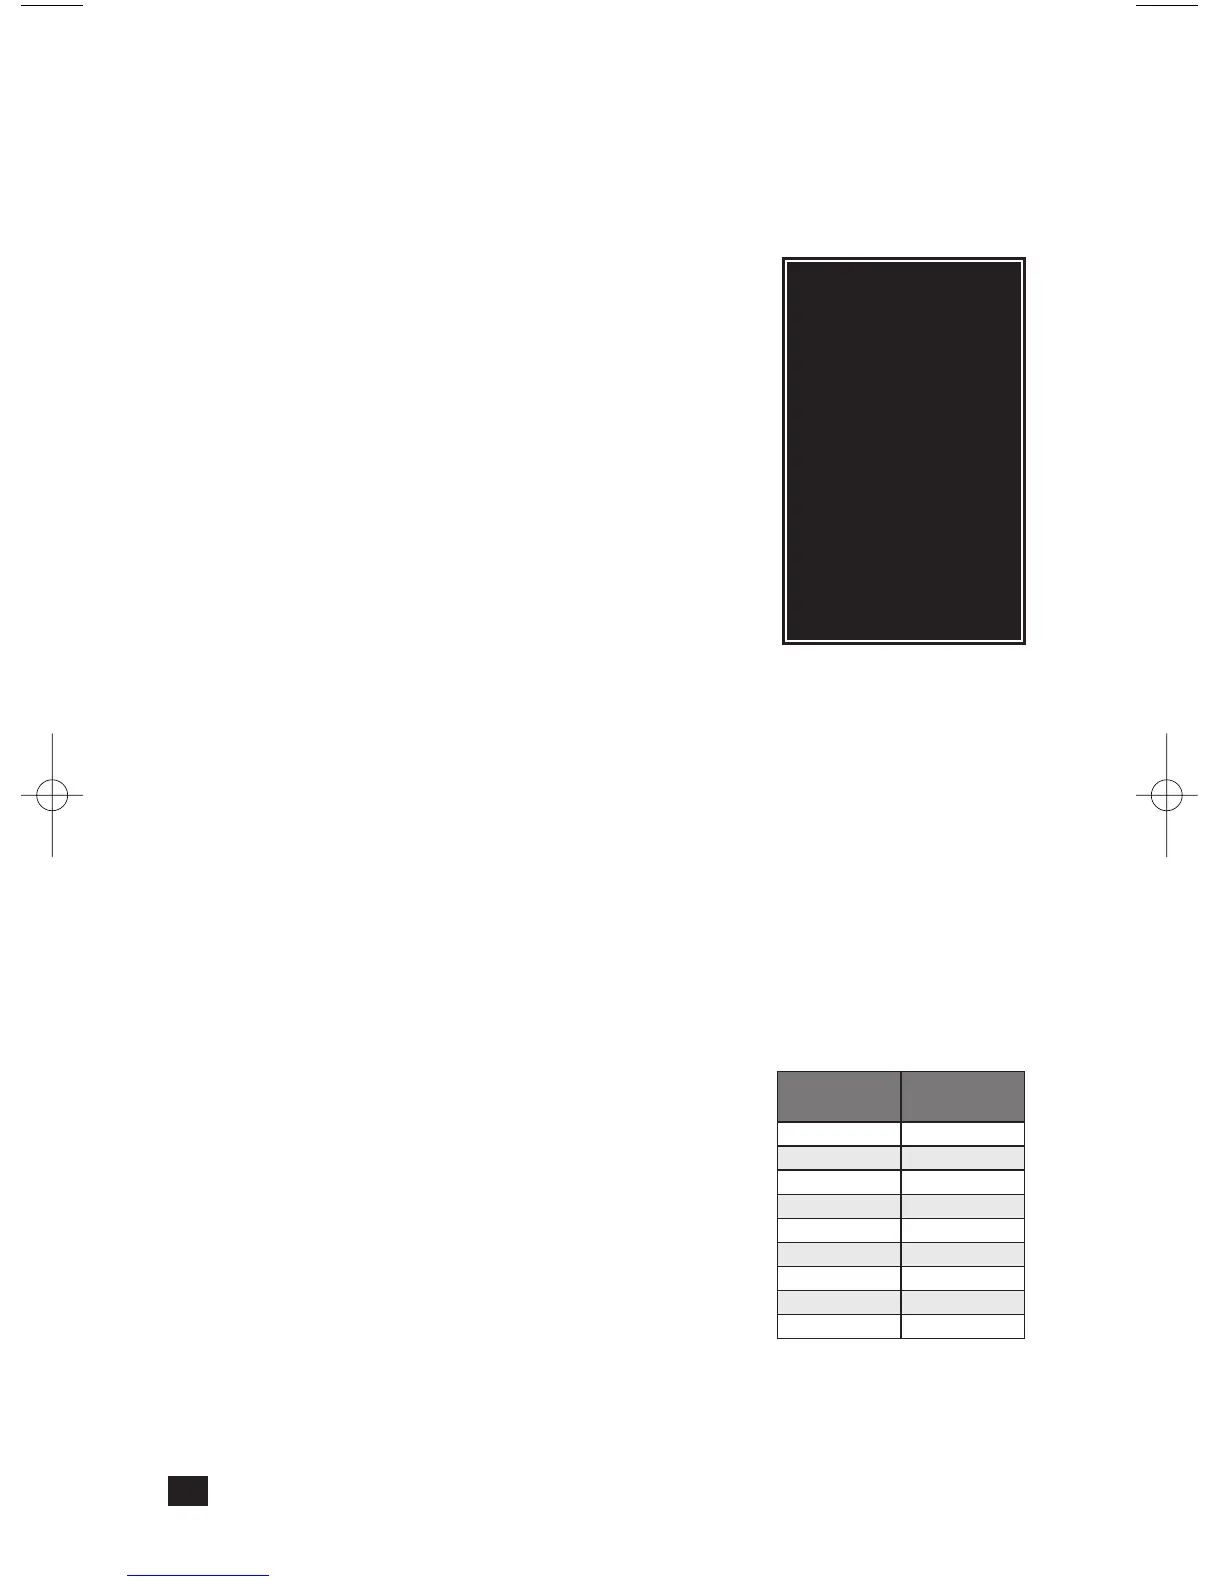
Setting the Fade-On Rate (Optional)
The "Fade-On Rate" is the speed that SwitchLinc brings the
brightness of the connected light(s) up or down when manu-
ally activated or it receives a powerline carrier (PLC) ON-com-
mand to its primary address. From the SwitchLinc, the rate
is adjustable between .1 and 9 seconds, (the factory default
rate is 2 seconds).
1. Adjust the brightness of the load (at the SwitchLinc or
remotely with dim commands) so that the brighter the
load, the faster the fade-on rate will be.
2. Tap the Status LED/Set Button TWICE.
The light(s) will blink indicating that it has set the new fade-on rate.
6
Tip:
If you have trouble
communicating to the
SwitchLinc, there may
be a lot of activity on
the powerline. Unplug
transmitters that might
be intercepted by
SwitchLinc during the
programming
sequences. RF
transceivers, computer
controllers, and X10
thermostats should be
unplugged to avoid
interference.
(See tthe AAdvanced PPrimary AAddress PProgramming ssection ffor iinstructions tto sset
a ffade-oon rrate ffor llonger tthan 99 sseconds aand rremotely ssetting tthe OON-llevel.)
Brightness
Level
Fade-on
Rate (sec.)
90-100% 0.1
77-87% 0.2
65-74% 0.3
52-61% 0.5
39-48% 2.0
26-35%
4.5
13-23% 6.5
1-10% 8.5
0% 9
 Loading...