
O
odixonAug 13, 2025
Why is my SnoMaster ZBC-15 Ice Maker not making ice?
- EErica BrooksAug 13, 2025
A possible cause is a gas leak. Another possible solution is to replace the filter drier.
Why is my SnoMaster ZBC-15 Ice Maker not making ice?
A possible cause is a gas leak. Another possible solution is to replace the filter drier.
What to do if the 'Water Low' light is on in my SnoMaster Ice Maker?
If the 'Water Low' indicator is illuminated, refill the ice-maker with water; it should then restart automatically. If you are using reverse osmosis water, consider adding a pinch of salt. You may also need to clean the water level sensor screws with fine grit sandpaper.
What to do if the 'Ice Full' light is on in my SnoMaster Ice Maker?
If the 'Ice Full' indicator is lit, start by removing some ice from the ice basket. Also, the temperature inside might be too low; move the unit to a warmer area, as it only deactivates above 10 degrees. You could also use lukewarm water.
Why is my SnoMaster Ice Maker compressor running but not making ice?
Check the filter for any blockages from debris. Also, verify that the fan is working. It's also possible that the solenoid valve needs to be replaced.
Why is my SnoMaster ZBC-15 Ice Maker only making small ice?
The unit might be in a warm environment. The first few cycles can take 13 to 16 minutes each, depending on the ambient temperature. Move the ice-maker to a cooler area, away from direct sunlight. It's also possible the water pump is faulty and needs repair or replacement.
What does it mean when the 'Ice Full' and 'Water Low' lights flicker on my SnoMaster Ice Maker?
Power off the ice-maker and inspect the interior for obstructions or ice blocking the ice pusher. Restart the appliance after 3 to 5 minutes. While it's off, gently push the ice pusher into its default resting position to recalibrate it, then restart after 3 to 5 minutes again. The water box motor may also be faulty and require repair or replacement.
Why is my SnoMaster Ice Maker compressor buzzing?
The buzzing noise indicates that the voltage is too low. Restart the ice-maker after 3 minutes to avoid damaging the compressor.
Why is my SnoMaster ZBC-15 Ice Maker making a solid block of ice?
The water temperature might be too low. Move the ice-maker to a warmer area or use lukewarm water. The ice timer could also be faulty. Additionally, the condenser sensor may need replacement. You can also select smaller ice size options.
Register your SnoMaster ZBC-15 for warranty and after-sales service via website.
Contact the service team for assistance via website, email, or phone.
Essential precautions for safe operation, positioning, and electrical handling.
Detailed technical specifications including dimensions, capacity, and voltage.
Guidance on unpacking, cleaning, placement, and air circulation for installation.
Advice on water quality, cleaning frequency, and descaling.
List and visual representation of items included with the ice maker.
Advises using a surge protector plug to prevent electrical surges.
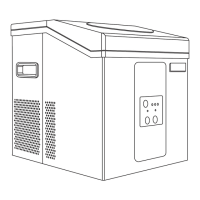
Labeled diagram identifying all parts of the ice maker.
Step-by-step guide on how to operate the ice maker.
Explanation of buttons, indicators, and their functions on the control panel.
Steps for cleaning the interior, including the water tank and filter.
Guidance on cleaning the appliance's outer surfaces and compressor.
Recommendations for optimal energy efficiency during operation.
Identifies common problems and their potential causes and solutions.
Detailed diagram and list of all components of the ice maker.
The SnoMaster ZBC-15 is a 15kg counter-top ice-maker designed for domestic indoor use, specifically for making ice. It is engineered for the African climate and is suitable for various applications such as offices, apartments, kitchens, B&Bs, home bars, and pubs.
Before using the appliance, it's crucial to ensure it's correctly positioned and installed. The incline angle of the appliance should not exceed 45° during transportation or operation. After positioning, it's recommended to wait about 12 hours before initial use. The appliance needs to be leveled for optimal operation, with adjustable feet allowing for +/- 10mm adjustment. The plug should be easily accessible, and users should avoid connecting or disconnecting it with wet hands. To disconnect, always grip the plug, not the cord. A dedicated power source is advised, and extension cords should be avoided.
For safety, always unplug or disconnect the power before cleaning, maintenance, or servicing. If the power supply cord is damaged, it must be replaced by SnoMaster, its approved agent, or a similarly qualified person. The circuit breaker size should not exceed 20 amps. This appliance operates on a single-phase voltage of 230V/50Hz, and a surge protector plug is recommended to avoid electrical surges (purchased separately). Cleaning and maintenance should be supervised by adults if children are involved.
The appliance must be placed on a flat, unobstructed surface, with at least 150mm clearance around it for proper ventilation. It should be kept away from direct sunlight and heat sources like stoves, heaters, or radiators. Unless specifically recommended in the manual, do not attempt to repair or replace any parts; all servicing should be referred to a qualified technician. Flammable fluids should never be used for cleaning, and petroleum or other flammable vapors and liquids should not be stored near the appliance due to fire and explosion hazards. Solvent-based cleaning detergents or abrasives should be avoided on the interior or exterior as they can cause damage or discoloration.
The SnoMaster ZBC-15 contains CYCLOPENTANE and R600a refrigerant, which are flammable and can cause a fire or explosion. When disposing of the appliance, ensure it's out of reach of children, damage the body, and follow local regulations.
The appliance is portable and features a stainless steel exterior. The control panel allows users to:
Water treated with reverse osmosis purification may cause a false water indicator. Adding a pinch of salt can correct this, or using filtered mineralized water is an alternative. Ice cycle time is dependent on water temperature. If the water temperature is too low, ice may form a solid block; moving the ice-maker to a warmer area or using lukewarm water can help. If ice is not forming, it could indicate a gas leak or a need to replace the filter drier. If the condenser sensor or ice timer is faulty, they may need replacement. Selecting smaller ice size options can also help if ice is forming a solid block.
Place the appliance in the coolest area of the room, away from heat-producing appliances and direct sunlight.
The manual provides a detailed troubleshooting guide for common issues:
The SnoMaster ZBC-15 comes with a 5-year warranty on the compressor, 3 years on the unit, and 1 year on all parts not listed, from the date of purchase. Warranty does not cover products not used according to the user guide or outside the warranty terms and conditions (available at https://snomaster.co.za/warranty/). Warranty registration can be done on the SnoMaster website (www.snomaster.co.za) under the 'Warranty' tab, requiring warranty information and proof of purchase. For service and support, visit the SnoMaster website (www.snomaster.co.za) under the 'Support' tab to find a repair agent, or contact via email (info@snomaster.co.za) or phone (+27 11 392 5315). Johannesburg Lifestyle Centre & Service Centre: 49 Koornhof Road, Meadowdale, Germiston, 1614. Phone: 011 392 5315 / 3147. Cape Town Lifestyle Centre & Service Centre: 31 Stella Road, Montague Gardens, Cape Town, 7441. Phone: 021 100 5695.