EasyManua.ls Logo

Solaxx RetroJet - User Manual

Solaxx RetroJet
11 pages
Print Icon
To Next Page IconTo Next Page
Loading...
Retro Jet Salt Chlorine Generator
Tech Troubleshooting Guide
TO COMPLETE WARRANTY CLAIM OR REPLACE PARTS:
To complete the warranty claim or replace parts you will need to have the Part Numbers and
Serial Numbers from the Power Supply and Cell. The power supply information is on the left
side label, P/N begins with CLG, and Serial Number under bar code. The cell information is on
the bottom of the cell on a sticker.
The Retro Jet has a 1 year warranty. To process a warranty claim, please submit a claim on
www.fastrma.com. Then send the invoice to support@solaxx.com or fax to 561-455-0257.
Question and Answer IconNeed help?

Do you have a question about the Solaxx RetroJet and is the answer not in the manual?

Summary

Warranty Claim and Parts Replacement

Information Required for Warranty

Part Numbers and Serial Numbers from Power Supply and Cell are needed for warranty claims.

Processing a Warranty Claim

Submit claim on www.fastrma.com and send invoice to support@solaxx.com or fax to 561-455-0257.

System Error Light Troubleshooting

Getting Correct Error Code

Ensure ON/OFF button light is OFF to get the correct Error Code.

Error Code 1: No;Low Salt

Check salt level, air bubbles, connections, and bypass cell to diagnose.

System Error Light Troubleshooting

Error Code 2: Over Current

Check blades for debris, connections, and cell blades. Bypass cell to diagnose.

Power Supply Replacement Error Codes

Error Codes 3-7

Temp Sensor Connections, System Error Codes 3-7 indicate power supply issues.

No Power on Display Board

Troubleshoot pump, breakers, and power supply if display board is off.

Check Cell Light Indicators

Solid Check Cell Light

Indicates end of life, critical salt, need for cleaning, or blade damage.

Salt Generator Tech Mode

Entering Tech Mode

Tap Chlorine Level Button to turn on all LEDs, then hold Super Chlor/Boost Button.

Checking Amps and Volts

Learn to read amps and volts using LED indicators for cell health.

Checking Hours

Determine cell operating hours using LED indicators.

Check Cell Light Indicators

Flashing Check Cell Light

Warning for 8,000 hours of operation; requires reprogramming or indicates end of life.

Low Salt Light Indicators

Flashing Low Salt Light

Indicates critically low salt, need for cell cleaning, worn blades, or incorrect power supply programming.

Low Salt Light Indicators

Checking Volts for Low Salt

Learn to read volts for salt levels and cell condition.

Checking and Correcting Programming

Match power supply programming to cell size (15K, 25K, 40K).

Not Producing Chlorine

Troubleshooting Steps

Check run hours, salt levels, cell cleaning, and water chemistry.

Checking Amps and Volts

Verify system operation by checking amps and volts if chlorine is not produced.

System Reprogramming

Procedure for New Cell

Steps to reset power supply programming when installing a new cell.

Overview

This document provides a comprehensive troubleshooting guide for the Retro Jet Salt Chlorine Generator, detailing various error codes, operational checks, and maintenance procedures. The device is designed to produce chlorine for pools, utilizing salt as the primary input.

Function Description:

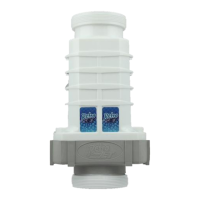
The Retro Jet Salt Chlorine Generator converts salt (sodium chloride) into chlorine, which then sanitizes pool water. The system features a power supply unit and a cell, both of which are crucial for its operation. The power supply manages the electrical input and controls the chlorine generation process, while the cell, containing blades, is where the electrochemical reaction takes place. The device includes an LED display board that indicates system status, error codes, and chlorine output levels. It also has a "Boost" function for increased chlorine production and an ON/OFF button for basic control.

Important Technical Specifications:

The system operates with specific salt level requirements, ideally between 3500ppm and 4500ppm. Critical salt levels (too low or too high) can trigger a "Check Cell" light. The optimal amperage range for the cell is between 5.8 and 6.0 amps. Voltage levels vary based on the system size (15K, 25K, 40K) and salt concentration. For instance, at 3500ppm salt, 13-14 volts are good for a 15K system, 18-20 volts for a 25K system, and 25-27 volts for a 40K system. Lower salt levels result in higher voltage readings, while higher salt levels lead to lower voltage readings. The cell has an estimated lifespan, with a "Check Cell Flashing" light indicating approximately 8,000 hours of operation. The power supply units are identified by part numbers starting with CLG (e.g., CLGx15A for 15K, CLGx25A for 25K, CLGx40A for 40K).

Usage Features:

The Retro Jet system is user-friendly, with an LED display for monitoring. The "Chlorine Output" bar graph shows the current chlorine production level. The "System Error" light indicates a problem, and by tapping the ON/OFF button, users can reveal specific error codes through the number of lit LEDs. The "Boost" button allows for a temporary increase in chlorine output. The system also includes indicators for "Check Cell," "Low Salt," and "Water Flow." To ensure proper operation, the pump must be running.

Maintenance Features:

Regular maintenance is crucial for the longevity and efficiency of the Retro Jet Salt Chlorine Generator.

  • Salt Level Adjustment: Users must regularly check and adjust the salt level to maintain the recommended 3500ppm minimum.
  • Cell Cleaning: Calcium buildup on the cell blades can impair performance. The cell should be cleaned by soaking it in a solution of 1 part muriatic acid and 4 parts water until foaming stops (typically 5-10 minutes). This process may need to be repeated 2-3 times depending on the extent of buildup.
  • Debris Removal: Any debris stuck between the cell blades should be removed using a high-pressure hose, avoiding direct contact with the blades.
  • Connection Checks: All electrical connections should be regularly checked and cleaned if necessary to ensure proper contact and prevent errors.
  • Water Chemistry Testing: Regular testing of pool water chemistry, including Free Chlorine (1-3ppm), pH (7.2-7.6ppm), Alkalinity (80-120ppm), Cyanuric Acid (50-80ppm), Phosphates (0ppm), Nitrates (0ppm), Calcium Hardness (250-300ppm), and TDS (less than 1500ppm after subtracting salt level), is recommended to ensure optimal pool health and system performance.
  • Warranty Claims: For warranty claims or part replacements, users need to provide the Part Numbers and Serial Numbers from both the power supply and the cell. Claims are submitted via www.fastrma.com, and the invoice should be sent to support@solaxx.com or faxed to 561-455-0257. The Retro Jet has a 1-year warranty.
  • Troubleshooting Error Codes: The guide provides detailed steps for diagnosing and resolving various error codes:
    • System Error Code 1 (No/Low Salt Light): Check salt level, inspect for air in the cell, turn off the pump and Retro Jet, check and clean connections, and bypass the cell to determine if the cell or power supply needs replacement.
    • System Error Code 2 (Over Current): Turn off the pump and Retro Jet, check for debris between blades, clean connections, inspect cell blades for damage, and disconnect one end of the cell to diagnose if the cell or power supply is faulty.
    • System Error Codes 3, 4, 5, 6, 7 (Temp Sensor Connections, etc.): These codes generally indicate a need to replace the power supply.
    • No Power on Display Board: Verify the pump is running, check all breakers, and confirm power is going to the unit. If these are in order, the power supply likely needs replacement.
    • Check Cell Light (Solid): This can indicate the cell has reached the end of its usable life (potentially qualifying for a 40% discount on a new cell if less than 2 years old), critical salt levels, a need for cell cleaning, or damaged blades. It can also appear when a new cell is installed, as the system calibrates every 40 minutes.
    • Check Cell Light (Flashing): This is a warning that the cell has been running for 8,000 hours. After checking amps and volts, the power supply may need to be reprogrammed to turn off this light.
    • Low Salt Light (Flashing): This indicates critically low salt, a need for cell cleaning, worn-down cell blades due to usage, or incorrect power supply programming for the cell size.
    • Not Producing Chlorine: This could be due to insufficient run time, incorrect salt levels, a dirty cell, or issues with water chemistry.
  • Tech Mode: The system can be put into "Tech Mode" to check amps, volts, and hours of operation, providing diagnostic information.
    • Checking Amps: Tap the Chlorine Level Button until all 8 LEDs are on, then hold the Super Chlor/Boost Button for 3 seconds. The alternating LEDs indicate amperage.
    • Checking Volts: Tap the Chlorine Level Button once in Tech Mode; the low salt light will come on, and alternating LEDs will indicate voltage.
    • Checking Hours: Tap the Chlorine Level Button twice in Tech Mode; the system error light will come on, and alternating LEDs will indicate hours of operation.
  • Reprogramming the System: To reset the power supply's programming for a new cell, users must follow a specific sequence of button presses and power cycles, including holding the Chlorine Level Button until 4 LEDs light up, tapping it twice, holding it again, and then unplugging and replugging the system.

Solaxx RetroJet Specifications

General IconGeneral
BrandSolaxx
ModelRetroJet
CategoryLaboratory Equipment
LanguageEnglish