EasyManua.ls Logo

Solo 526L - User Manual

Solo 526L
67 pages
Print Icon
To Next Page IconTo Next Page
Loading...
FLAIL MOWER
WITH HONDA GX 270 ENGINE
MODEL 526L
OPERATING AND SAFETY INSTRUCTIONS
REF. : G08000 16/12/2003

Questions and Answers

  • S
    Sandra MooreAug 15, 2025
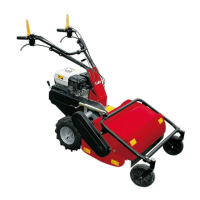
    Why is the grass ejection insufficient on my Solo 526L Lawn Mower?
    • S
      stephensonjoshuaAug 15, 2025
      If your Solo Lawn Mower isn't ejecting grass effectively, several factors could be at play. First, ensure the grass isn't wet; wait for it to dry. If the grass is too long, try going over it twice, adjusting the cutting height. Also, check that the cutting height isn't too low and increase it if needed. Make sure the engine is running at maximum speed and that your forward speed isn't too high—decrease it if it is. Finally, inspect the flail housing for any grass build-up and clean it out.
  • S
    Shannon MeyerAug 18, 2025
    What to do if my Solo 526L Lawn Mower does not cut the grass completely?
    • S
      Steven GonzalezAug 18, 2025
      If your Solo Lawn Mower is not cutting grass completely, there might be a few reasons. Check if your forward speed is too high and decrease it. Ensure the engine speed is at maximum. If the grass is too long, try going over it twice, changing the cutting height. Also, examine the flails for wear or breakage and replace them if necessary. Lastly, check for any grass build-up inside the flail housing and clean it.
  • S
    Samuel LiuAug 21, 2025
    Why does the engine overload during work operations with my Solo 526L?
    • R
      Ruth FergusonAug 22, 2025
      If your Solo Lawn Mower engine overloads during operation, several factors could be the cause. First, ensure the engine speed is set to maximum. If the flails are worn, either invert or replace them. Check that your forward speed isn't too high and decrease it if necessary. Remove any grass snarls or build-up from the rotor. If the grass is too long, go over it twice, adjusting the cutting height. Lastly, ensure the cutting height isn't too low and increase it if needed.
  • M
    michaeldukeAug 25, 2025
    How to prevent my Solo Lawn Mower from scalping the ground?
    • C
      Colleen ClarkAug 26, 2025
      If your Solo Lawn Mower is scalping the ground, the cutting height might be too low; increase it. If you are mowing on undulating terrain, try changing your cutting pattern, such as altering the direction. Also, if the ground is uneven, raising the cutting height can help.
  • N
    nancy91Aug 28, 2025
    Why does my Solo 526L Lawn Mower vibrate excessively?
    • J
      Jennifer LewisAug 28, 2025
      If your Solo Lawn Mower is vibrating excessively, start by checking for any grass build-up inside the flail housing and clean it. Inspect the belt for damage and replace it if needed. Examine the flails for bends or breaks and replace them if necessary. Lastly, if the flail rotor is warped, replace it.
  • E
    Erik PerezSep 1, 2025
    Why does the cutting unit of my Solo 526L project objects outwards?
    • K
      Kathryn HernandezSep 1, 2025
      If the cutting unit of your Solo Lawn Mower is projecting objects outwards, make sure the front guard is lowered. Ensure the front cover is firmly closed. Only operate the machine in forward gear.
  • A
    Alan JonesSep 4, 2025
    What to do if the belt slips on my Solo 526L?
    • C
      Christopher CookSep 4, 2025
      If the belt on your Solo Lawn Mower is slipping, first adjust the belt tension. If there's a build-up of grass inside the flail housing, clean it out. If the belt is worn, replace it.
  • K
    Kimberly RodriguezSep 7, 2025
    Why does my Solo Lawn Mower tend to run away on steep banks?
    • G
      Gregory ScottSep 7, 2025
      If your Solo Lawn Mower tends to run away on steep banks, it could be due to the ground being too soft; wait until it dries. Also, ensure you are working in the direction of the bank, not at right angles to it.
  • B
    Brandon Allen MDSep 12, 2025
    Why is the engine sluggish at switch on for my Solo 526L?
    • R
      Ricky Hall DDSSep 12, 2025
      If your Solo Lawn Mower engine feels sluggish when you switch it on, make sure the accelerator is in the start-up position. If the engine is cold, close the choke. Check the fuel tank and remove any water or sediment. Ensure that the feed cock is open to eliminate air bubbles or water in the petrol lines. Use oil with a viscosity suited to the temperature to prevent thick oil from hindering rotation. If the winding or start mechanism is faulty, replace it. Finally, inspect the spark plug, and clean or replace it, adjusting the electrode distance.

Summary

1. USE OF THE MANUAL

FOREWORD

2. NOTICES ON THE MACHINE

3. TECHNICAL DATA

4. LIFTING AND TRANSPORTATION

5. MAIN PARTS OF THE MACHINE

6. CONTROLS AND ADJUSTMENTS

A) FORWARD CLUTCH CONTROL LEVER

Lever for engaging/disengaging forward motion and its connected service brake.

B) ACCELERATOR CONTROL LEVER

Lever for adjusting engine speed according to operational needs.

C) EMERGENCY BRAKE LEVER

Lever for engaging the emergency brake if the main brake fails.

D) FLAIL ROTOR CLUTCH CONTROL LEVER

Lever for engaging/disengaging the flail rotor and its connected brake.

E and E1) WHEEL RELEASE LEVERS

Levers to ease directional changes and maneuvering of the machine.

G) FRONT WHEELS

Front support wheels involved in adjusting the cutting height.

6. CONTROLS AND ADJUSTMENTS

H) FRONT GUARD

Guard that opens/closes automatically, essential for preventing object projection.

I) CUTTING HEIGHT ADJUSTMENT LEVER

Lever used to set the cutting height, with consequences for low settings.

L) HANDLEBAR ADJUSTMENT LEVER

Lever for adjusting handlebar height and width for user comfort.

M) ON SWITCH

Two-position switch for starting and stopping the engine.

N) SPEED SELECTOR LEVER

Lever to select forward speed settings (1st, 2nd, 3rd) and neutral.

O) GEAR LEVER

Lever to select forward, neutral, or reverse motion, used with speed selector.

7. ASSEMBLY INSTRUCTIONS

8. SAFETY INFORMATION

A) GENERAL INSTRUCTIONS

Prohibitions and essential safety rules for operating the flail mower.

B) TRAINING

Requirements for operator training, age, and physical/psychological capabilities.

C) PREPARATION

Steps to take before switching on the machine, including area checks and lever positions.

8. SAFETY INFORMATION

D) WORKING USE

Guidelines for safe operation, including distances, engine care, and handling fuel.

8. SAFETY INFORMATION

E) AFTER USE.

Procedures to follow after finishing work, including engine shutdown and neutral gear selection.

9. TRANSPORTATION OF THE MACHINE

LOADING AND UNLOADING FROM A VEHICLE

Detailed instructions for safely loading and unloading the flail mower onto a vehicle.

10. SAFETY AND GUARD SYSTEMS

11. OPERATIONS BEFORE SWITCHING ON

12. STARTING AND DRIVING

12. STARTING AND DRIVING

DRIVING THE MACHINE

Instructions on initial driving, gear selection, and operating controls.

13. CUTTING TIPS

14. CHECKS

A) TYRE PRESSURE

Regular checks for proper tire inflation to ensure stable operation.

B) CABLE CONTROL ADJUSTMENT

Procedure for adjusting control cables for proper function.

14. CHECKS

B1) WHEEL RELEASE CABLES

Inspection and adjustment of wheel release cables for proper play.

14. CHECKS

B2) FLAIL HOLDER ROTOR CONTROL CABLE

Adjustment of the flail rotor control cable and its brake function.

14. CHECKS

B3) FORWARD CONTROL CABLE

Adjustment of the forward control cable and service brake wire play.

B4) HANDLEBAR ADJUSTMENT CABLES

Ensuring proper play in handlebar adjustment cables for snug fit.

B5) BRAKE ENGAGEMENT LEVER

Operation of the emergency brake lever and its adjustment.

C) BRAKE ADJUSTMENT

Procedure for adjusting brake cables for effective stopping.

14. CHECKS

C1) ROTOR BRAKE

Adjusting the rotor brake for proper safety function.

B3) FORWARD BRAKE

Adjusting the forward brake if the machine doesn't stop immediately.

14. CHECKS

D) BELT REPLACEMENT AND ADJUSTMENT

Procedures for replacing and adjusting drive belts.

14. CHECKS

D2) FORWARD BELT

Steps for replacing the forward drive belt and ensuring alignment.

D3) ROTOR ENGAGEMENT BELT

Procedure for replacing and adjusting the rotor engagement belt.

E) CHECKING AND REPLACING THE FLAILS

E) CHECKING AND REPLACING THE FLAILS

F) SHARPENING THE FLAILS

Instructions on how to sharpen the flails to maintain rotor balance and performance.

15. MAINTENANCE AND STORAGE

15. MAINTENANCE AND STORAGE

G) TRANSMISSION OIL CHECK AND REPLACEMENT

Procedure for checking and replacing the transmission oil level and quantity.

16. CLEANING THE MACHINE

17. SEASONAL LONG-TERM STORAGE

18. DECOMMISSIONING AND SCRAPPING

19. TECHNICAL ASSISTANCE

20. WARRANTY

21. CE MARKING

22. TROUBLESHOOTING

Solo 526L Specifications

General IconGeneral
BrandSolo
Model526L
CategoryLawn Mower
LanguageEnglish

Related product manuals