27
REMOTE CONTROL OF THE GATE AND/OR PEDESTRIAN GATE
In order to remote control your gate/pedestrian gate, please make sure that the video door phone call station is
correctly wired to the gate motor, or the pedestrian gate's electric latch. Otherwise, it will not be controllable via the
“Somfy Protect” app. If this is not the case, please follow the instructions below:
CONNECTING TO A SOMFY GATE DRIVE
In compliance with standard EN 12453 on safe use of motorised doors and gates, using a video door phone to
control an automatic gate or garage door that may not be visible to the user necessarily requires the installation
of a photoelectric cell-type safety device on this automated system.
Failure to comply with these instructions absolves Somfy of any liability resulting from damage that may be
caused.
[1].
Switch o the power supply to your Somfy gate motor.
[2].
Remove the cover from the control cabinet or from the motor containing the electronics.
[3].
Connect the call station dry contact output (COM and NO) to the drive electronics. If connecting the call station is not
explained in the drive manual, follow the instructions for connecting a key switch.
Call station Somfy drive electronics
M- M+ L- L+ NO COMNC
Connect... to the START terminal
blocks
to the BUS terminal
blocks
to the numbered terminal
blocks
COM 5 3 3
NO 6 4
5 for complete opening
6 for pedestrian opening
If the drive is solar-powered, the wired controls are deactivated. It can only be controlled by RTS/io radio control via the indoor
monitor.
To connect the call station to another gate drive model, please refer to the relevant installation guide.
[4].
Power on the gate motor and the video door phone.
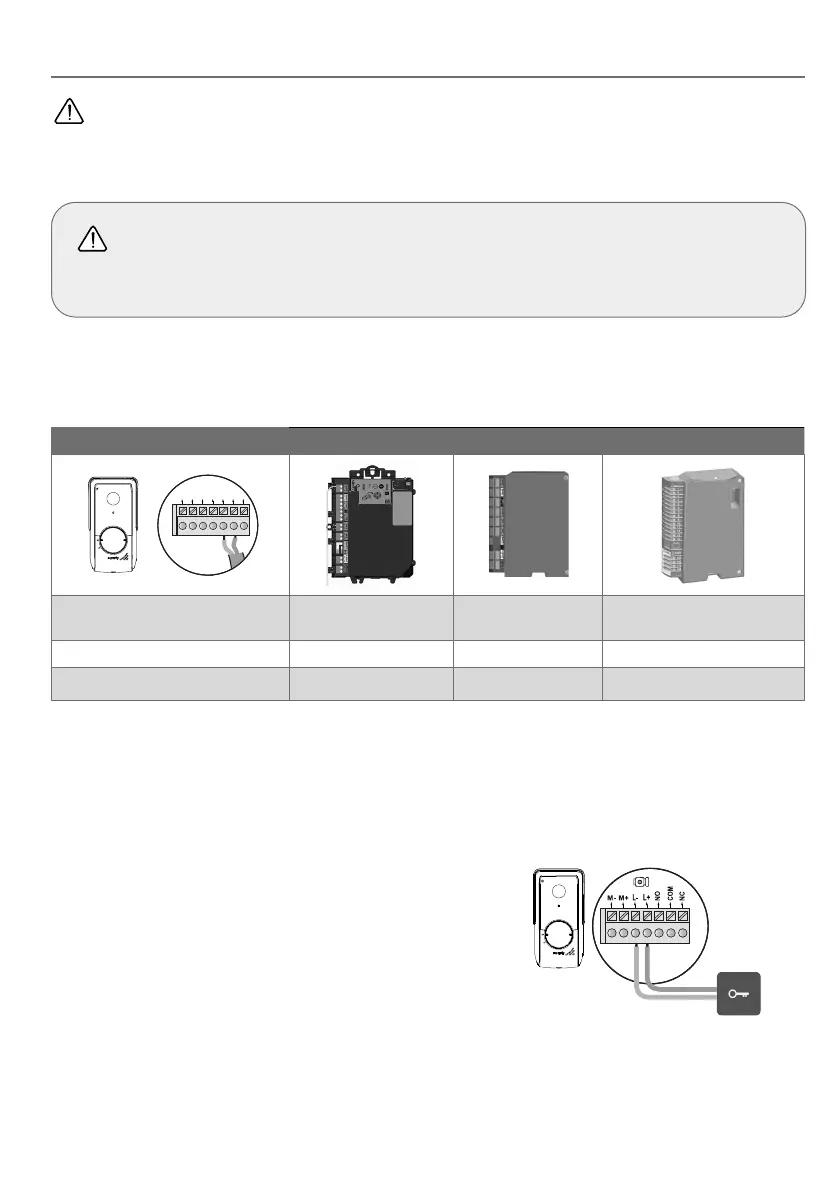
CONNECTING TO AN ELECTRIC LATCH (PEDESTRIAN GATE)
[1].
Switch o the power supply to the electric latch and the video door
phone.
[2].
Connect the call station terminal blocks L- and L+ to the electric latch.
Observe the correct polarity: refer to the electric latch instructions.
[3].
Power on the electric latch and the video door phone.
The latch activation time (2, 5 or 10 seconds) is configured via the “Settings”
menu on the indoor monitor.
12V 800 mA max