EasyManua.ls Logo

Sony ECM-W2BT - User Manual

Sony ECM-W2BT
25 pages
Print Icon
To Next Page IconTo Next Page
Loading...
Help Guide
Wireless Microphone
ECM-W2BT
Use this Help Guide when you have issues or questions on how to use your wireless microphone.
Compatible cameras
The Wireless Microphone ECM-W2BT (referred to below as “this unit”) is compatible with a camera
that has a Multi Interface Shoe such as a Sony Interchangeable Lens Digital Camera (referred to
below as “camera”).
- Even if your camera has a Multi Interface Shoe, you may be unable to use it with this unit or some
functions may not work.
- The receiver and the microphone are factory-set to communicate with each other. Therefore,
operations usually needed for Bluetooth devices such as pairing and passkey input are not
necessary. Communication is not possible with a receiver and microphone not sold as a pair,
multiple microphones, or any other Bluetooth device such as a smartphone, computer, etc.
For camera models compatible with this unit, view here. (Another window will open.)
Locating parts and controls
Preparations
Unpacking
Charging the receiver
Charging the microphone
Attaching the receiver to a camera
Attaching the microphone to clothing
Attaching the wind screen
Storing the receiver and the microphone all together
Recording
About the mode switch
Recording
Recording with an external microphone
Lamp indications
About this unit
Notes on use
1
Question and Answer IconNeed help?

Do you have a question about the Sony ECM-W2BT and is the answer not in the manual?

Summary

Compatible Cameras

Locating Parts and Controls

Receiver Overview

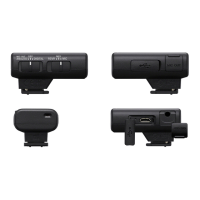
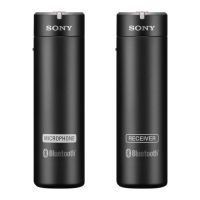
Details the parts and controls of the receiver unit.

Microphone Overview

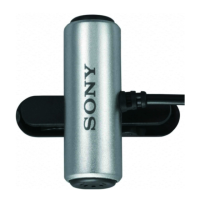
Details the parts and controls of the microphone unit.

Unpacking the Wireless Microphone

Charging the Receiver Unit

Charging the Microphone Unit

Attaching Receiver to Camera

Attaching Microphone to Clothing

Attaching the Wind Screen

Storing Components Together

Understanding Mode Switch Settings

Recording Audio

Recording with External Microphone

Interpreting Lamp Indicators

Important Usage Notes

Bluetooth Wireless Communication

Technical Specifications

Trademarks and Copyright

Overview

The Sony Wireless Microphone ECM-W2BT is a wireless microphone system designed for use with cameras equipped with a Multi Interface Shoe, such as Sony Interchangeable Lens Digital Cameras. This system comprises a receiver and a microphone (transmitter) that are factory-set to communicate with each other using Bluetooth® wireless communication technology, eliminating the need for manual pairing or passkey input.

Function Description

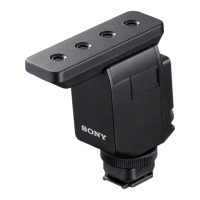
The ECM-W2BT system facilitates high-quality audio recording for various scenarios. The receiver attaches to the camera's Multi Interface Shoe, while the microphone can be clipped to the subject's clothing.

The receiver features a slide switch (MIC OUT ANALOG/Power OFF/DIGITAL) to select the audio output mode. When connected to a camera compatible with the digital audio interface of the Multi Interface Shoe, setting the switch to "DIGITAL" enables digital audio transmission, minimizing noise insertion. For cameras that do not support digital audio output, the "MIC OUT ANALOG" option can be selected, which requires connecting the receiver to the camera via the supplied recording cable through the microphone out jack. An "OFF" position is available to conserve battery power when the receiver is not in use.

A mode switch on the receiver (RCVR/MIX/MIC) allows users to select the desired recording mode:

  • MIC mode: Records only the sound picked up by the microphone. This is ideal for clearly capturing the voice of the subject wearing the microphone, especially when the camera is positioned farther away.
  • MIX mode: Records both the sound from the microphone and the surrounding sound picked up by the receiver's internal microphone, mixed together.
  • RCVR mode: Records only the surrounding sound picked up by the receiver's internal microphone. In this mode, the auto power-off function of the receiver is disabled.

The microphone (transmitter) is equipped with an internal microphone and an external microphone input jack. Connecting an external microphone (not supplied) to this jack automatically switches the audio input source to the external microphone, turning off the internal microphone. The microphone also has a power switch to turn it on or off, conserving battery when not in use. An ATT (attenuator) switch allows users to adjust the audio recording volume to suit different sound levels. Options like "20dB" are for loud sounds to minimize distortion, "0dB" for quiet sounds to amplify them, and "10dB" is recommended for human voices. It is advised to monitor the volume level meter on the camera to determine the optimal setting.

Usage Features

Charging: Both the receiver and the microphone have built-in lithium-ion batteries and can be charged by connecting them to an activated computer using the supplied micro USB cable. The power lamp on each device indicates the charging status (orange while charging, off when fully charged). It is crucial to turn off both devices before charging to ensure proper power supply and charging.

Attaching to Camera: The receiver is attached by aligning its Multi Interface foot with the camera's Multi Interface Shoe and sliding it in firmly. Before attaching or removing, both the receiver and camera should be turned off. Ensure the receiver's battery is sufficiently charged before attachment. If the camera's built-in flash is popped up, it should be put down.

Attaching Microphone to Clothing: The microphone can be clipped to clothing, such as a breast pocket, at a location best-suited for recording conditions. Prior to attachment, ensure the microphone's battery is sufficiently charged. A note of caution is provided for users of medical electrical devices like pacemakers, advising against attaching the microphone near such devices to avoid adverse effects.

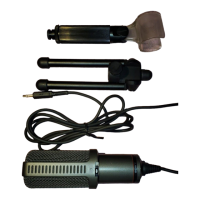
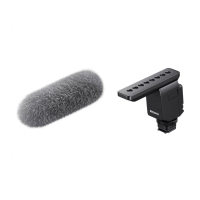
Attaching the Wind Screen: A wind screen is supplied to reduce "pop" noise caused by breath or strong wind. It is attached by fitting its projected portion into the external microphone input jack on the microphone. If the wind screen becomes wet, it should be removed and dried in the shade.

Storing the System: The supplied connector protect holder allows for convenient storage of both the receiver and the microphone together. The receiver's Multi Interface foot slides into the holder, and the microphone's clip hooks onto the other side of the holder. This protects the connectors from damage when not in use or during transport.

Recording Process:

  1. Turn on the camera and set it to standby mode.
  2. Turn on both the receiver and the microphone.
  3. Select the desired audio output mode on the receiver (MIC OUT ANALOG/Power OFF/DIGITAL) and the power switch to "ON" on the microphone.
  4. Initially, the LINK lamps on both devices will blink slowly in blue as they attempt to connect. Once a communication connection is established and clear audio recording is available, the LINK lamps will stop blinking and stay lit in blue. If connection issues occur, bring the devices closer.
  5. Ensure the LINK lamp on the receiver is lit, then press the record start button on the camera.

Important Recording Notes:

  • If an unsupported audio output is selected on the receiver, a cautionary message may appear on the camera's screen, prompting selection of a supported output.
  • Changing the receiver mode or ATT switch setting while recording is in progress may cause recording failures, noise, or disconnected communication. Always stop recording before making such adjustments.
  • To prevent confirmation beeps (audio signals) at the start of recording from being picked up, it is recommended to set [Audio signals] to [Off] on the camera.
  • In MIX mode, if the receiver and microphone pick up the same sound, it can cause echo or clipping noise. Position the microphone farther from the receiver to avoid this.
  • Ensure LINK lamps are lit in blue before starting recording in MIX mode; otherwise, noise or no sound may be recorded if the microphone is off or not connected.
  • The receiver can receive power from the camera, though camera compatibility for this feature varies.

Recording with an External Microphone:

  1. Ensure the microphone (transmitter) is turned off.
  2. Connect an external microphone (not supplied) to the external microphone input jack on the microphone. The internal microphone will automatically turn off.
  3. Use an external microphone compatible with plug-in power, as the microphone provides power to it.
  4. If the wind screen is attached, remove it before connecting an external microphone.

Lamp Indications: The system provides clear lamp indications for both the power and LINK status on both the receiver and microphone.

  • Power Lamp: Lights up green when powered on and sound can be recorded clearly. Blinks orange when the built-in battery is running out or when charging is in progress (while off). Goes out when the device is turned off.
  • LINK Lamp: Blinks blue slowly when powered on (standby mode) and attempting to connect. Stays lit in blue when a connection is established and sound can be recorded clearly. Blinks blue quickly if audio is interrupted due to bad communication conditions. Goes out when the device is turned off. If the standby state continues for 5 minutes, the auto power-off function activates (unless in RCVR mode for the receiver).

Maintenance Features

The manual emphasizes several points for proper handling and care:

  • Always remove the receiver from the camera to use the camera's built-in flash.
  • Avoid touching the unit or operating the camera/lens while recording to prevent recording operation/handling noises.
  • If a howling effect occurs when an earphone is near the microphone, reposition the earphone or lower its volume.
  • Do not hold the camera solely by the receiver to prevent damage or drops.
  • When carrying the receiver, remove it from the camera, attach it to the supplied connector protect holder, and store both in the supplied pouch to protect the Multi Interface foot connector.
  • When not in use, slide the Multi Interface foot connector into the connector protect holder for damage prevention.
  • Battery performance may decrease at low temperatures, resulting in shorter operating times.
  • In case of radio interference with other devices, stop using the wireless function to prevent malfunction or accidents.
  • If noise or no sound occurs due to deteriorating communication (LINK lamp blinks blue quickly), ensure devices are not too far apart and there are no obstacles. Continue use once the LINK lamp is constantly lit in blue.

Sony ECM-W2BT Specifications

General IconGeneral
TypeWireless Microphone
Frequency Band2.4 GHz
Wireless TechnologyBluetooth
Battery LifeUp to 9 hours
Microphone TypeElectret Condenser
Directional CharacteristicsOmnidirectional
PowerBuilt-in Rechargeable Battery
ChargingUSB Type-C
Operating DistanceUp to 200 meters
CompatibilityMulti Interface Shoe
ConnectivityMulti Interface Shoe
Charging TimeApprox. 3 hours
WeightSender: 27g, Receiver: 28g

Related product manuals