GTK-XB5
13
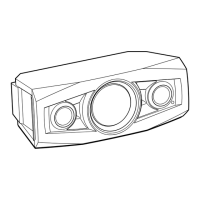
2-9. FRONT PANEL BLOCK-1
• Continued on 2-10 (page 14).
2 Align the front panel block and speaker
cabinet around the boss from the side,
insert a jig between them, and open a
gap of about 3 to 5 mm (perform at the
top, bottom, left, and right).
Note 1: When using a jig, please work carefully
so as not to damage the front panel
block and speaker cabinet.
total eight bosses
about
3 to 5 mm
boss
front panel block
bottom side
top side
bottom side
top side
1 four screws
(M4 u 16)
1 two screws
(M4 u 16)
front panel block
speaker cabinet
rear side
– Top view –
– Bottom view –
4 Insert a thick screwdriver into the bottom side
and widen the gap (perform at two places).
Note 2: Be careful because if a screwdriver is
inserted too far in, the speaker unit (WF)
may get damaged.
3 Insert a thick screwdriver into the top side and
widen the gap (perform at two places).
Note 2: Be careful because if a screwdriver is
inserted too far in, the speaker unit (WF)
may get damaged.

 Loading...