4
1.3 Module Installation
In most instances your SmartLink module will be pre- tted under your spa cabinet by
your spa manufacturer. Dependant on spa location, orientation, number and type of walls
between spa and router, router signal output quality, insulation material used on spa
cabinet and other factors, the wi signal received under the spa cabinet may or may not be
strong enough for reliable operation.
The SmartLink module has been designed as an external unit so if WiFi signal strength is
weak, or your module has not been pre- tted to your spa follow the steps below to mount
the module external to the spa cabinet:
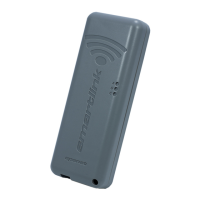
Step 1. Determine module location
Select a suitable position on or near the
spa cabinet that will allow the WiFi module
to receive the best signal reception from
your WiFi router. i.e. on spa side closest
to house, in a position with best line of
sight from module to router. NOTE: The
module MUST be positioned in a vertical
orientation for best signal strength, with
the wifi symbol at the top to maintain
waterproofi ng (Fig 1).
TIP: It may be wise to proceed through app
setup process BEFORE affi xing module to
cabinet to ensure optimal signal strength
position has been determined.
Step 2: Open SmartLink module
Remove screw from bottom right corner of
module. Depress front cover clip at bottom
of module then remove cover by pulling
the bottom of the front cover out and
upwards in a swift motion. The top clip is a
snap lock style which requires swift action
to release. Do not open the cover slowly.
Pull it out and upwards in a 45-degree
angle quickly. It will then release easily
(Fig 2).
Fig. 1
smartlink
Fig. 2
smartlink
smartlink
smartlink
smartlink