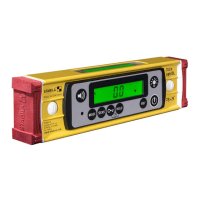
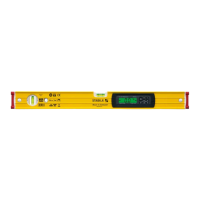
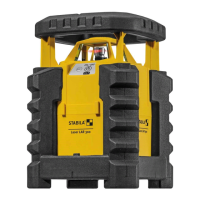
The STABILA TECH 196 / 196 M / Dark Shadow is a digital measuring tool designed for accurately determining inclinations and angles, making it suitable for professional use where precise measurements are critical. This device is equipped with an electronic module that features two digital displays, ensuring clear readability of measurements.
Function Description:
The primary function of the STABILA TECH 196 / 196 M is to measure angles and inclinations. It incorporates both vertical and horizontal vials for traditional spirit level applications, which are also effective in reverse positions. The electronic module provides digital readings, enhancing accuracy and ease of use.
A key feature is its visual guidance system. Within a range of ±15° to the horizontal (0°) or vertical (90°), arrows on the display indicate the direction in which to turn the digital protractor to reach the desired 0° or 90° position. Two "centre display" bars illuminate to signal when the precise 0° or 90° position has been achieved.
Acoustic guidance is another useful feature, which can be activated or deactivated via a dedicated "Loudspeaker" button. As the device approaches the 0° or 90° position within a ±2° range, the tone sequence speeds up. A change in pitch indicates that these positions have been exceeded, while a continuous tone confirms the exact 0° or 90° point.
For overhead measurements, the device offers automatic display inversion, ensuring that readings are always upright and easy to read, regardless of the device's orientation.
The MODE unit of measurement can be adjusted by pressing the "MODE" button multiple times. Users can select between various units:
- ° Fine: Displays in 0.01° steps.
- ° Rough: Displays in 0.1° steps.
- %: Displays in 0.1% steps.
- mm/m: Displays in 1 mm/m steps.
- in/ft decimal: Displays in 0.01 in/ft steps.
- in/ft fraction: Displays in 1/8 in/ft steps.
The selected unit is retained even after the device is switched off.
The HOLD function allows users to lock the current measurement by pressing the "HOLD" button. The visual guidance indicator flashes, and the measurement remains continuously displayed. This locked measurement can be cleared by pressing "HOLD" again or by switching the unit off.
A freely selectable zero position (REF) can be set using the "REF" button. Any angle can be designated as the 0° reference, and subsequent measurements will be displayed relative to this new reference angle, with the value flashing to indicate this setting. The reference angle value is displayed for 2 seconds when briefly pressing "REF". To delete the reference angle, the "REF" button must be pressed and held for 3 seconds (the key lock must be released first). The reference is also deleted upon switching off the unit or through the automatic switch-off function. It is crucial not to change the alignment of the digital protractor during the reference function, as this can lead to display errors.
Lighting for the display can be activated by briefly pressing the "Lighting" button, which turns on the light for approximately 60 seconds. Pressing and holding the "Lighting" button for 5 seconds makes the lighting darker and keeps it on permanently. The lighting can be switched off by pressing the "Lighting" button again or by turning off the unit.
A key lock feature prevents inadvertent activation of buttons. When activated, a key symbol appears on the display. This lock applies to the "MODE", "CAL", "HOLD", and "REF" buttons and remains active even after the unit is switched off and on again. To disable the key lock, press and hold the "Key" button for 3 seconds.
The automatic switch-off time (Auto OFF) can be adjusted by simultaneously pressing the "Lighting" and "Acoustic guidance" buttons. Options range from 1/8 of an hour (approx. 7.5 minutes) to 2 hours. The set switch-off time is saved and briefly displayed when the unit is switched on.
The tilt function ensures accurate measurements by requiring the measuring surfaces of the electronic spirit level to be precisely positioned. If the device is tilted at too great an angle, the display will not show any measurements, preventing incorrect readings.
Important Technical Specifications:
- Accuracy (Electronic module):
- 0° / 90° / 180° / 270°: ±0.05°
- In intermediate areas: ±0.2°
- Accuracy (Spirit level):
- In normal position: 0.5 mm/m = 0.029°
- In reverse position: 0.5 mm/m = 0.029°
- Batteries: 2 x 1.5 V alkaline, Mignon, AA, LR6, MN1500
- Operating life: ≥ 150 hours
- Operating temperature range: -10 °C to +50 °C (14 °F to 122 °F)
- Storage temperature range: -20 °C to +65 °C (-4 °F to 149 °F)
- Protection class: IP 65 (dust-proof and waterproof)
- TECH 196 M specific: Extra-strong rare-earth magnets for secure attachment.
Usage Features:
- Commissioning: To insert or replace batteries, unscrew the battery compartment lid and insert new batteries according to the symbol. The device uses 2x 1.5V Alkaline AA, LR6, Mignon MN1500 batteries. A low battery charge indicator (LCD) signals when new batteries are needed. Used batteries should be disposed of at suitable collection points and not left in the unit if it will be unused for an extended period.
- Switching on: Pressing the "ON/OFF" button initiates an automatic test, displaying all segments. After the test, the software version and automatic switch-off time are briefly shown. An acoustic signal confirms readiness for operation, and the display shows the measured angle.
- Error messages:
- "Cal. /temperature": Indicates that the sensor needs adjustment due to temperature changes or calibration issues.
- "Err": Appears if the unit is moved or subjected to vibrations during calibration/sensor adjustment, which can lead to measurement errors.
- "- - - -": Signifies that the unit's inclination around its longitudinal axis exceeds 10°.
Maintenance Features:
- Accuracy Check: Regular accuracy checks are essential, especially before starting work or after impacts or significant temperature changes.
- Switch on the electronic spirit level. Use the vial to align the unit accurately against a wall until the bubble is centered between the vial rings.
- Wait 10 seconds. If the displayed value is > 0.05°, recalibration is required. This check can also be performed with the vertical vial for vertical measurements.
- Calibration:
- Switch on the unit and align it accurately against a wall using the vial until the bubble is centered.
- Hold the unit in this position and press the "CAL" button. The display will show "CAL" to indicate calibration mode.
- Press "CAL" again to start calibration.
- If a newly calibrated value shows a deviation of ≥ 1° from the factory setting or if vibration occurs during calibration, the spirit level needs to be recalibrated.
- "rdy" indicates successful calibration.
- The reverse test checks calibration, and an angle ≤ 0.1° to the normal position indicates the spirit level is ready.
- Adjusting the Sensor: Sensor adjustment in 4 positions is necessary if:
- The reverse test angle is ≥ 0.1° to the normal position (too great a deviation).
- There's a change in internal reference.
- There's a significant temperature change since the last calibration.
The electronic spirit level is calibrated by consecutively turning it 90° / 180° each time.
- Step 1: Simultaneously press "MODE" and "CAL". Align the unit accurately against a wall using the vial and press "CAL" to confirm. This synchronizes the spirit level, horizontal vial, and sensor. Flashing segments indicate positions still to be calibrated, while non-flashing segments show already calibrated positions.
- Step 2: Turn the unit 180° and align it horizontally using the displayed arrows. The "centre display" bars indicate the precise horizontal position. Confirm with "CAL".
- Step 3: Turn the unit 90° and align it vertically using the displayed arrows. The "centre display" bars indicate the precise vertical position. Confirm with "CAL".
- Step 4: Turn the unit 180° and align it vertically using the displayed arrows. The "centre display" bars indicate the precise vertical position. Confirm with "CAL".
- The "rdy" display confirms that calibration in all 4 positions is successfully completed.