EasyManua.ls Logo

Star DW1 - User Manual

Star DW1
20 pages
Print Icon
To Next Page IconTo Next Page
Loading...
Model DW1
DRAWER
WARMERS
with thermostatic controls
MODEL
DW1, DWN1
DW2, DWN2
DW3, DWN3
Installation and
Operation
Instructions
2M-Z19504 Rev. - 1/02/15
Question and Answer IconNeed help?

Do you have a question about the Star DW1 and is the answer not in the manual?

Summary

Safety Information

Safety Symbols

Symbols alert users to important operating and maintenance instructions.

Manual Retention Notice

Instructions to keep the manual for future reference and disclaimers.

Service and Support

Authorized Service Agent Listing

Information on locating authorized service agents and contact details.

Service Help Desk

Contact details for the service help desk, including hours and phone.

Product Specifications

Technical Specifications

Technical specifications for different models, including voltage, wattage, and amperage.

Overall Dimensions

Provides physical dimensions (height, width, depth) for various models.

Features and Controls

Features and Operating Controls

Identifies key components and controls of the drawer warmer.

General Information and Setup

General Information

Intended use, safety precautions, and handling of shipping damage.

Unpacking and Inspection

Instructions for unpacking the appliance and checking components.

Components List

Lists the main components included with the unit.

Installation Procedures

Setup Requirements

Guidance on placing and leveling the appliance on a suitable surface.

Electrical Requirements

Electrical requirements, including plug types and voltage considerations.

Electrical Safety Warning

Warning against modifying the power cord's ground prong.

Operation Guide

Heating Options

Details on moist and dry heat operation methods.

Operating Settings Chart

Chart providing recommended settings for different food types and heat modes.

Operation Details

Operating Instructions

Step-by-step guide to operating the warmer.

Usage Dos and Donts

Important guidelines for proper usage and common mistakes to avoid.

Operational Caution

Warning about splashing water on the control panel or wiring.

Cleaning and Maintenance

Cleaning Precautions

Steps to take before cleaning, including turning off controls and removing parts.

Cleaning Frequency and Tools

Recommended frequency for cleaning and list of required tools/agents.

Cleaning Procedure

Detailed instructions for disassembling, cleaning, and reassembling the unit.

Troubleshooting Guide

Troubleshooting Symptoms and Solutions

Common issues, their possible causes, and suggested remedies.

Periodic Maintenance

Adjustments and Lubrication

Procedures for adjusting and lubricating components for optimal performance.

Maintenance Frequency and Tools

Recommended frequency for lubrication and adjustments, and required tools.

Maintenance Steps

Detailed steps for checking and maintaining various parts of the unit.

Wiring Diagram

Electrical Wiring Diagram

Electrical schematic showing the internal wiring for different models.

Warranty and Support

Limited Equipment Warranty

Details of the one-year limited warranty for parts and labor.

Services Not Covered by Warranty

List of services and issues not covered under the warranty.

Portable Equipment Service

Identifies portable equipment and how service should be handled.

Contact for Assistance

Contact information for obtaining assistance with operation or maintenance.

Exploded Views

Exploded View: DW1, DW2, DW3

Visual breakdown of the drawer warmer components for models DW1, DW2, DW3.

Drawer Assembly Diagram

Exploded view of the drawer assembly, common to all HD versions.

Cavity and Cabinet Interior Diagram

Exploded view of the interior cavity and cabinet, common to all HD versions.

Parts List: DW1, DW2, DW3

Parts List Details

Detailed list of part numbers and descriptions for DW1, DW2, DW3 models.

Exploded Views: DWN1, DWN2, DWN3

Exploded View: DWN1, DWN2, DWN3

Visual breakdown of the drawer warmer components for models DWN1, DWN2, DWN3.

Narrow Drawer Assembly Diagram

Exploded view of the drawer assembly, common to all "Narrow" RWN-Series drawers.

Narrow Cavity and Cabinet Interior Diagram

Exploded view of the interior cavity and cabinet, common to all "Narrow" versions.

Parts List: DWN1, DWN2, DWN3

Parts List Details

Detailed list of part numbers and descriptions for DWN1, DWN2, DWN3 models.

Overview

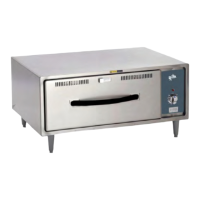
This document describes the Star Drawer Warmers (Models DW1, DWN1, DW2, DWN2, DW3, DWN3) with thermostatic controls, providing installation, operation, and maintenance instructions.

Function Description:

The Star Drawer Warmer is designed for commercial use to keep prepared foods warm. It utilizes thermostatic controls to maintain desired temperatures and offers options for both moist and dry heat environments. The unit can accommodate standard-size steam table pans and, when ordered with the Humitrol Rack, can provide moist heat by allowing water vapor to circulate through the stored product. The air vent control allows for adjustment between fully closed and half-open settings, depending on the desired humidity level for the food being warmed.

Important Technical Specifications:

  • Models and Electrical Specifications:
    • DW1, DWN1:
      • 120 VAC, 50/60 Hz, 1Ø: 450 W, 3.8 Amps, NEMA-5-15P power cord.
      • 208/240 VAC, 50/60 Hz, 1Ø: 338/450 W, 1.6/1.9 Amps, NEMA 6-15P power cord.
    • DW2, DWN2:
      • 120 VAC, 50/60 Hz, 1Ø: 900 W, 7.5 Amps, NEMA-5-15P power cord.
      • 208/240 VAC, 50/60 Hz, 1Ø: 676/900 W, 3.3/3.8 Amps, NEMA 6-15P power cord.
    • DW3, DWN3:
      • 120 VAC, 50/60 Hz, 1Ø: 1350 W, 11.3 Amps, NEMA-5-15P power cord.
      • 208/240 VAC, 50/60 Hz, 1Ø: 1014/1350 W, 4.9/5.6 Amps, NEMA 6-15P power cord.
  • Overall Dimensions (Height "A" w/o Legs, Width "B", Drawer Open "C", Drawer Closed "D"):
    • DW1, DWN1: Height 10.875", Width (DW1: 29.25", DWN1: 20.25"), Drawer Open 35.875", Drawer Closed 21.5".
    • DW2, DWN2: Height 21", Width (DW2: 29.25", DWN2: 20.25"), Drawer Open 35.875", Drawer Closed 21.5".
    • DW3, DWN3: Height 41.125", Width (DW3: 29.25", DWN3: 20.25"), Drawer Open 35.875", Drawer Closed 21.5".
  • Power Cord: The ground prong of the power cord is a critical safety feature to prevent electric shock. It must not be cut off or altered.
  • Heating Element: The units are equipped with heating elements (e.g., 120V 450W for DW1/DWN1).
  • Temperature Control: Features a thermostatic temperature control knob and a heating indicator light.

Usage Features:

  • Installation:
    • Requires a firm, level, non-combustible surface.
    • Adjustable legs or optional casters are installed on each corner. The unit must be level and all four legs must firmly contact the floor.
    • Drawers are installed by engaging the roller on the drawer with the cabinet drawer slide, raising the drawer to the horizontal position, and sliding it in until the catch engages.
    • Avoid storing flammable or combustible materials near the appliance.
  • Heating Options:
    • Moist Heat with Humitrol Rack (Optional): Remove the Humitrol Rack, pour approximately 2 quarts of water (1½" depth) into the drawer insert pan, then reinstall the rack. Place food directly on the rack. Periodically check and add water. Set the front air vent between fully closed and half-open.
    • Moist Heat with Pans: Place a small amount of water in the drawer pan, then place steam table pans containing food into the drawer pan. Periodically check and add water.
    • Dry Heat: Place food directly into the empty drawer pan (no water).
  • Operation:
    • Determine the food type and refer to the operating chart for recommended storage temperature, heat type, and air vent settings.
    • Rotate the thermostat knob to the desired temperature setting and adjust the air vent control.
    • Allow the warmer to pre-heat for approximately 30 minutes before use.
    • DOs: Always use a drawer pan, check water level frequently for moist operation, use a Humitrol Rack or insets for moist operation, and use warm water when adding to the pan.
    • DON'Ts: Do not place food directly into the warmer cavity, do not put ice into a warmer pan (condensation will occur and is not covered by warranty).
  • Safety: Exposed surfaces can be hot and cause burns. Do not splash or pour water onto the control panel or wiring. All servicing requiring access to non-insulated electrical components must be performed by a factory authorized technician.

Maintenance Features:

  • Cleaning (Minimum - Daily):
    • Turn control knob to OFF and allow drawers to cool. Remove drawer pans and Humitrol racks.
    • Remove drawers: Pull the drawer out fully, press down on the latches located at the front end of the cabinet-mounted rails, and pull the drawer away.
    • Clean drawers, drawer pans, Humitrol Racks, and/or insets with warm water and mild detergent. Rinse thoroughly and dry all components before reinstalling.
    • Sweep crumbs and debris from the warmer cavity.
    • Clean the outside of the unit with a clean cloth or sponge, warm water, and mild detergent. Wipe with a polish formulated for stainless steel.
    • Keep slide rails clear and free from debris; periodic cleaning is necessary for smooth drawer operation.
    • Check drawer rollers for free movement and ensure slide rails are free from debris.
    • Ensure the cabinet-mounted drawer catch roller is "up" before reinstalling drawers.
    • Caution: Disconnect the appliance from electric power before cleaning.
  • Adjustments and Lubrication (Minimum - Monthly, Every 2 weeks recommended):
    • Turn control knob to OFF, unplug warmer, allow drawers to cool, and remove drawer pans and Humitrol racks.
    • Tools required: Screwdrivers (Phillips and flat blade), nut drivers (3/8" and 7/16"), and food-grade lubricant.
    • Check slides and rollers on cabinet and drawers for cleanliness and tightness. Lubricate rollers.
    • Check cabinet drawer stops for positive "snap" down operation. Clean and adjust as needed.
    • Check heating element fasteners for tightness.
    • Check cabinet drawer catches for tightness and operation. Lubricate and ensure the roller is "out" before installing a drawer.
    • Check the thermostat thermobulb and capillary tube for condition; ensure the thermobulb is securely mounted. Arrange repairs for damaged components.
    • Check drawer faceplate and handle fasteners for tightness.
    • Check drawer catch clip for tightness.
    • For drawers with gaskets, examine their condition and arrange repairs for torn or damaged gaskets.
    • Reinstall drawers and check for proper operation.

Star DW1 Specifications

General IconGeneral
BrandStar
ModelDW1
CategoryFood Warmer
LanguageEnglish

Related product manuals