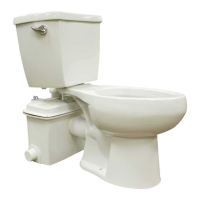
The PowerFlush Optima is a sophisticated wastewater and sewage removal system designed to facilitate the addition of a bathroom in various locations where traditional gravity-fed plumbing might be challenging or impossible. This innovative system is ideal for basements, new homes, cabins, additions, workshops, garages, slab construction, and commercial buildings, offering flexibility in bathroom placement.
At its core, the PowerFlush Optima utilizes a patented grinder/tank system to efficiently move waste water and sewage up to existing sewer lines. This capability makes it suitable for installations with a total dynamic head of up to 20 feet, providing significant vertical lift for discharge. The system is engineered to handle human waste and toilet paper exclusively. It is crucial to note that the unit is not designed for other materials such as feminine sanitary products, condoms, cotton balls and swabs, baby wipes, or paper towels, as these can cause product damage and impair functionality.
One of the key usage features of the PowerFlush Optima is its ability to accommodate multiple fixtures. In addition to the toilet, users can connect a bath or shower and a vanity sink directly to the grinder/tank unit. This allows for a complete bathroom setup, enhancing convenience and utility in previously unplumbable areas. When adding these additional fixtures, they must be on the same floor level as the PowerFlush Optima system. The side inlets for these connections are sealed by the factory to prevent leaks when not in use and must be drilled out using a 1½ inch hole saw before installation. For incoming lines from additional fixtures, a check valve must be installed to ensure proper operation.
The system offers two primary installation configurations: exposed and hidden. In an exposed installation, the grinder/tank unit is visible behind the toilet. For a hidden installation, the grinder/tank unit is concealed behind a wall, requiring an optional extension kit (P/N 023260) which is sold separately. This flexibility allows for aesthetic integration into different bathroom designs. Proper leveling of the grinder/tank unit is essential, requiring it to be within 1/8 inch for length and width, using hydraulic cement or similar material. It is explicitly cautioned not to use wooden shims for leveling to prevent tank puncture from nails, screws, or other sharp objects.
Installation involves several critical steps, beginning with the toilet assembly. The toilet tank gasket must be correctly installed over the flush valve threads, ensuring the tapered side faces the bowl. Care must be taken not to use pipe dope on plastic or rubber parts and to avoid overtightening bolts or nuts against the china to prevent cracking. The water supply hookup requires connecting the water supply line to the ballcock shank, again with a caution against overtightening to prevent damage and voiding the warranty.
For the grinder/tank unit installation, whether exposed or hidden, precise positioning is vital. In exposed setups, the unit should be a minimum of 1/8 inch from the wall, with the inlet facing forward. The rubber coupling connects the toilet discharge to the grinder/tank unit, secured with worm drive clamps. For hidden installations, the toilet assembly is placed a minimum of 1/2 inch from the wall, and a 3½ inch length of Schedule 40 PVC pipe from the extension kit connects the toilet to the grinder/tank unit. Due to the top-heavy nature of the toilet assembly, special precautions are advised to prevent tipping and breakage.
Piping is a crucial aspect of the PowerFlush Optima's functionality. A 1-inch diameter discharge pipe (which may be reduced to ¾ inch if codes permit) and a 1½ inch vent pipe are required. Proper venting is essential for the toilet to flush correctly, and mechanical type vents should not be used. The discharge and vent piping connections utilize a 2-step PVC gluing system. When applying glue to the discharge fitting, it is imperative to prevent any glue from entering the check valve assembly, which is integrated into the grinder/tank unit's cover. For hidden installations, a straight discharge pipe with a 2-inch straight coupling reduced to 1 inch can simplify the setup and improve performance compared to the 90° discharge fitting provided for exposed configurations.
Once the physical installation is complete, the electrical connection is made by plugging the pump's power cord into a GFCI outlet. The system requires a properly grounded receptacle or control box protected by a ground fault circuit interrupter in accordance with national and local electrical codes. Extension cords are strictly prohibited due to potential safety hazards and insufficient voltage delivery. The pump's electrical supply circuit should be equipped with fuses or circuit breakers of proper capacity, and a separate branch circuit is recommended. Before handling the pump, always disconnect it from its power source.
Maintenance features are primarily focused on troubleshooting and part replacement. The manual provides a comprehensive troubleshooting guide for common issues such as the pump not starting or running, starting too soon, not shutting off, or delivering little to no water. These issues can stem from low voltage, blown fuses, impeller binding, motor shorts, float switch problems, air locks, blockages, or incorrect float adjustments. Many remedies involve checking electrical circuits, removing debris, adjusting float stops, or ensuring proper venting. For more complex issues, contacting the Technical Service Department or a qualified licensed electrician is recommended.
The PowerFlush Optima is designed for long-term reliability, but proper care is essential. It is explicitly stated that cleaning products containing bleach should not be used in the toilet tank, toilet, or attached fixtures, as they will degrade the pump seals. Repair and service should only be performed by an Authorized Service Station. A detailed replacement parts list is provided, allowing users to identify and order specific components such as the pump unit, tank cover, seals, float switch assemblies, toilet bowls, and various fittings. For any missing or damaged parts during initial inspection or for technical help, a dedicated customer service number is provided.
The warranty covers defects in material and workmanship for one year from the date of purchase by the end user or 18 months from the date of original manufacture, whichever comes first. However, the warranty is void if the product has been disassembled without prior approval, subjected to misuse, neglect, alteration, accident, or acts of God, or if it has not been installed, operated, or maintained according to instructions. Exposure to abrasive or corrosive substances, including sand, gravel, cement, mud, tar, hydrocarbons, and certain sanitary products, also voids the warranty. In instances of alleged pump failure, the homeowner must retain possession of the pump for investigation purposes.