Maintenance
AVOID A MALFUNCTION. Repeatedly charging the system with helium gas
rather than locating and repairing gas leaks may cause a malfunction. Impurities
are introduced at an abnormal rate and can freeze in the cold head.
AVOID GAS LEAKS. Check the condition of the gasket seal on the male half of
each Aeroquip coupling. Be sure the gasket seal is in place and the sealing
surfaces on both the male and female halves are clean before connecting.
Replace the gasket seal if it is damaged or missing.
AVOID A MALFUNCTION. Do not allow air to get into the system. Moisture from
the atmosphere can seriously degrade cold head performance.
Adsorber Replacement
Tools required: Open end wrenches 17 mm, 1", 1 1/8", 1 3/16"
#2 Phillips screwdriver
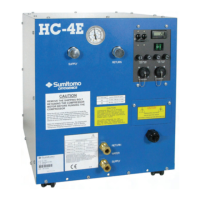
The absorbers in the HC-4E compressors must be replaced every 30,000 operating hours. A
used adsorber has no salvage or repair value. Venting the compressor is not required when
replacing the adsorber because the gas line couplings are self-sealing.
Adsorber Removal
1. Stop the compressor and disconnect the power from the compressor.
2. Disconnect the supply gas line from the supply coupling on the compressor. Screw a dust
plug into the disconnected gas line.
Always hold the stationary nut on the gas line coupling with one wrench while turning
the moveable coupling nut with the other wrench.
3. Remove the compressor’s top panel and the side panel nearest the gas supply coupling.
Trace the outline of the adsorber base on the compressor base to help locate the
proper position for the new adsorber.
4. Disconnect the self-sealing coupling on the inlet side of the adsorber. Use two wrenches.
5. Elevate the compressor to gain access underneath the bottom panel. Remove the M10
hex-head bolt and lock washer holding the adsorber to the base. Use a 17-mm wrench.