EasyManua.ls Logo

Sunmi K2 - User Manual

Sunmi K2
12 pages
Print Icon
To Next Page IconTo Next Page
Loading...
K2
Kiosk User Manual Book
Before using this product, please read this manual carefully and keep it properly.
Question and Answer IconNeed help?

Do you have a question about the Sunmi K2 and is the answer not in the manual?

Summary

K2 Kiosk User Manual Book

Installation Styles Overview

Quick Setting

Steps to enable the smart commercial device K2 and configure internet modes (LAN/Wi-Fi).

App Download and Usage

Guidance on downloading and using relevant apps for the self-checkout kiosk.

Quick Start Guide

Paper Changing Steps for Printer

Self-Service Kiosk Component Introduction

Face Camera

Camera used to shoot human face.

Touch Screen

Touchable screen applied for customer usage.

Printer

Used to print receipt.

NFC Module

Supports reading and writing of M1\ID\CPU card.

Code Scanner

Used to read codes.

System and Host Switches

Controls host power, boot, standby, shutdown, and restart functions.

Kiosk Interfaces and Covers

Mainboard Protection Cover

Covers mainboard external interfaces like USB port, TF card port.

Camera Maintain Cover

Used to cover the face camera inside the host.

Network and Debug Ports

Wired network socket and Micro-USB debug port for updates.

USB and Power Interfaces

Interfaces for external hardware equipment and power connection.

Installation Components

Wall-mounted Components

Lists components for the wall-mounted installation type.

Floor-standing Components

Lists components for the floor-standing installation type.

Floor-standing with Table Components

Lists components for the floor-standing with table installation type.

Eco-service Expansion Components

Lists components for the eco-service expansion installation type.

Wall-mounted Installation Steps

Prepare Wall Mounting Area

Drill Ø10 holes according to height and spacing in the reference drawing.

Install Wall-mounted Rack

Firmly fix the wall-mounted rack on the wall using expansion bolts and screws.

Attach Host Hangers and Cables

Fix host back hangers with screws; plug in power and network cables.

Hang Host onto Rack

Firmly hang the host back hangers on the wall-mounted rack.

Floor-standing Installation Steps

Assemble Stand on Baseplate

Preassemble stand on baseplate using screws, do not overtighten.

Secure Stand to Baseplate

Twist screws from the bottom of the plate and fasten them.

Install and Fix Host Back Support

Insert host back support into stand and fix with screws.

Mount and Secure Host

Hang the host onto the back support and fix with screws.

Attach Covers and Route Cables

Assemble mainboard cover, plug lines, and fix line cover.

Floor-standing with Table Installation Steps

Preassemble Table Support Screws

Twist two M6X12 screws into the stand for 5-10 rounds.

Preassemble the Table

Hang the table support onto the two screws.

Fix the Table to Stand

Fix the table with stand by four M6X12 screws and fasten.

Eco-service Expansion Installation Steps

Separate the Stand Components

Separate the plastic front shell from the metal stand carefully.

Mount Stand on Baseplate

Fix the stand on the baseplate by four M10X20 screws.

Install Host Back Support

Insert the host back support into the stand.

Secure Back Support to Stand

Fix the back support to the stand using six M6x25 screws.

Attach Plastic Front Shell

Fix the plastic front shell onto the metal stand again by clips.

Mount and Secure Host

Hang the host onto the back support and fix them by four M6X25 screws.

Install Mainboard Cover and Route Lines

Fix mainboard cover, plug lines, and fix back plug cover.

Secure Line Cover

Twist the screws to fix the metal line cover.

Product Specifications and Parameters

Safety and Compliance Information

Safety Warnings

Important safety precautions for using the kiosk, including electrical and environmental hazards.

Power Supply Precautions

Guidelines for plugging in and accessing the power supply socket.

Important Safety Instructions

Advice on avoiding use during thunderstorms and handling unusual conditions.

CE Certification Information

Details on SAR compliance and body-worn operation requirements.

FCC Statement

Information regarding FCC compliance, interference, and radiation exposure limits.

Disclaimer and Statement

Company statement on responsibility for product usage and document interpretation rights.

Overview

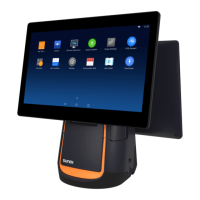
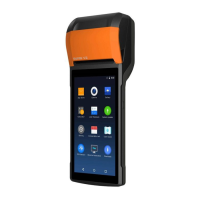
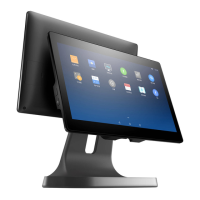
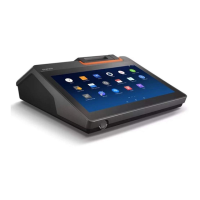
The K2 Self-service Kiosk is a versatile commercial device designed to streamline various customer-facing operations across a range of industries, including catering, retail, and information services. It offers multiple installation styles to adapt to different environments and user needs, ensuring flexibility in deployment.

Function Description:

The K2 Kiosk serves as a self-checkout and interactive information point, enabling customers to perform tasks independently, thereby enhancing efficiency and reducing wait times. Its core functionalities include:

  • Self-Checkout: Facilitates the process of scanning items, calculating totals, and processing payments, ideal for supermarkets, convenience stores, and department stores.
  • Information Kiosk: Provides interactive multimedia content, information sites, and scenic spot guides, making it suitable for public spaces and tourist attractions.
  • Order Placement: In catering environments, it allows customers to browse menus, place orders, and make payments without requiring staff intervention.
  • Receipt Printing: Equipped with an internal thermal printer, it generates receipts for transactions, ensuring customers have a record of their purchases.
  • Code Scanning: Features a code scanner to read both 1D and 2D codes from mobile phone screens or paper, supporting various loyalty programs, coupons, and product identification.
  • NFC Support: Supports reading and writing of M1, ID, and CPU cards, enabling contactless payments and identification.
  • Face Camera: Integrates a face camera for potential applications such as facial recognition for payment, loyalty programs, or security purposes.
  • Connectivity: Offers both LAN and Wi-Fi connectivity options to ensure reliable network access for transactions and data synchronization.

Usage Features:

The K2 Kiosk is designed for ease of use and quick setup, making it accessible for both operators and customers.

  • Quick Setting: The device can be enabled in a few simple steps. Upon powering on, the screen lights up, guiding the user through the initial boot interface.
  • Network Configuration:
    • LAN Setting: After plugging in a network cable, users can navigate to "Setting" and "Wired Network" to enable the connection. It supports both automatic IP address acquisition and manual entry.
    • Wi-Fi Setting: Users can access "Setting" and "WLAN" to search for available Wi-Fi hotspots, select the desired network, and connect by entering the access password if required.
  • App Download and Usage: The kiosk is designed to run various applications. Users can turn on the kiosk and download relevant apps from an app market on the internet, tailoring its functionality to specific business needs.
  • Intuitive Interface: The touch screen allows for easy navigation and interaction, providing a user-friendly experience for customers.
  • Power Management:
    • System Switch: In standby mode, a short press boots the device, and another short press returns it to standby. In service state, a long press (2-3 seconds) allows for shutdown or restart. A prolonged press (11 seconds) in power-on state will shut down the host.
    • Host Switch: Controls the host power supply.
  • Installation Flexibility: The K2 Kiosk offers four distinct installation styles:
    • Wall-mounted: Ideal for spaces where floor space is limited, providing a compact and secure setup.
    • Floor-standing: A standalone option suitable for open areas, offering a prominent presence.
    • Floor-standing with Table: Combines the floor-standing unit with an integrated table, providing a convenient surface for customers to place items or bags during transactions.
    • Eco-service Expansion: A modular design that allows for additional components or configurations, offering scalability and adaptability for evolving service requirements.

Maintenance Features:

Maintaining the K2 Kiosk is straightforward, with accessible components for routine tasks like paper changes and general upkeep.

  • Paper Changing Steps for the Inside Printer:
    1. Open Flip Panel: Press the buttons on both sides of the host simultaneously to open the flip panel.
    2. Open Paper Storage Cover: Toggle the printer driving lever downward to open the paper storage cover.
    3. Put in Paper: Insert an 80mm thermal sensitive paper roll, ensuring a section is pulled out beyond the printer exit.
    4. Close Covers: Press both sides of the paper storage cover to close it. The printer will automatically cut paper if powered on. If powered off, manual tearing of excess paper is required before closing the flip panel.
  • Accessible Interfaces: The device features a protection cover on the mainboard, which, when opened, exposes external interfaces like USB ports and a TF card port for maintenance or upgrades.
  • Camera Maintain Cover: A dedicated cover for the face camera inside the host ensures its protection and allows for easy access if maintenance is needed.
  • Micro-USB Debug Port: Located on the mainboard, this port is used for software updates and debugging, facilitating easy troubleshooting and system enhancements.
  • Cleaning: The design encourages a clean and dust-free environment to prevent small items from dropping into the terminal, contributing to the device's longevity.
  • Safety Warnings: Users are advised to unplug the power supply completely when disconnecting the device, avoid installation or use during thunder and lightning, and immediately cut off power if unusual odor, overheat, or smoke is detected. The paper knife is sharp and should be handled with care.

Sunmi K2 Specifications

General IconGeneral
RAM2GB
Operating SystemAndroid
Touch ScreenCapacitive
Storage16 GB
ConnectivityWi-Fi, Bluetooth
Supported Payment MethodsNFC

Related product manuals