EnglishEnglish
6
Connecting the DVR
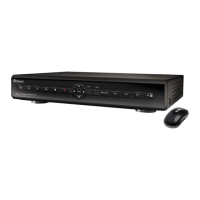
Front Panel of the DVR
1) USB 2.0 Port: For connecting USB external storage to the
DVR for backup, or for applying new rmware.
2) Play/Pause: Opens the playback interface from the live
viewing mode. Pauses playback or resumes playback from
paused.
3) Quad (4ch)/All (8ch or 9ch): Enters split-screen view, where
the screen shows one, four (“quad” mode 2 x 2) or all eight/nine
(8ch or 9ch only - 3 x 3) video feeds at once.
4) Menu: Opens the DVR’s menu, or goes back one step from
a submenu.
5) Select: As the name suggests, it selects an option or item
from a menu.
6) D-pad: For navigating around menus when you’re not using
the mouse. (Why aren’t you using the mouse? It’s awesome.)
7) IR Receiver: Where the DVR will pick up signals from the IR
remote control. If this is obstructed, the remote will not work.
8) Power LED: Will be lit whenever the DVR is supplied power
and turned on.
9) HDD LED: Will ash whenever the DVR is writing to/reading
from the installed hard drive.
2
1
3
4
7
5
8
6
9
 Loading...