Activating
cyclical
printing/programming
a
measuring
program:
The main menu is open, Menu is displayed.
1 cyc.Print .
2 Press / to select Off (deactivated) or On (activated) and confirm
with . The measuring cycle is set in the order: minutes/hours.
3 Press / to set the measuring cycle in minutes and confirm with
.
4 Perform the setting for hours as described in step 3.
5 Press / to set the number of readings and confirm with .
- The instrument returns to measurement view.
- The measurement series is programmed and cyclical print can be
started with .
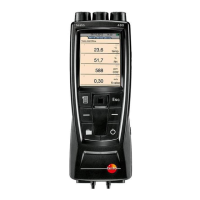
7. Measuring
This chapter describes the steps that are required to perform measurements
with the product.
Particular probes must be plugged in or switched on and registered (radio
probes) according to the variable that is to be measured.
Some probes require a warming-up phase until they are ready to measure.
For some variables additional calculation parameters have to be set if correct
measurements are to be obtained.
See PARAMETER /AREA, p. 24.
For the calculation of the U-value, please refer to the documentation included
with the U-value temperature probe (0614 1635).
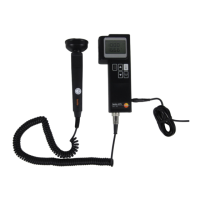
Required for the calculation of the heating/cooling performance of assemblies:
· A vane probe (for determining the volume flow) must be connected.
· 2 wireless humidity probes (for determining enthalpy at the input and output
of the assembly and for calculating tightness).
· The parameter pressure (for the calculation of tightness) must be entered.
· The calculation factor enthalpy must be activated. The enthalpy is integrated
in the calculation of performance, an enthalpy value cannot be displayed..
· The wireless humidity probe allocated to radio channel 1 must be positioned
next to the vane probe, as its readings are automatically used to calculate
the mass flow.
OK
OK
OK
OK
6. Setting the instrument26