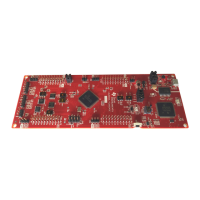
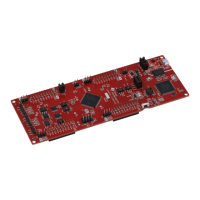
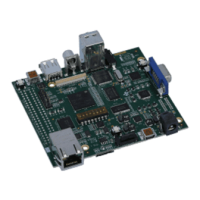
The C2000 LED BoosterPack (BOOSTXL-C2KLED) is an add-on board designed to enhance the capabilities of C2000 LaunchPads and other 40-pin based LaunchPads, providing a robust solution for controlling LED strings. This device allows users to precisely manage a series of LED strings while efficiently regulating the power stages necessary for LED operation. The board is structured with a subsystem approach, which facilitates easier debugging and testing of individual stages.
Function Description
The primary function of the LED BoosterPack is to enable accurate and efficient control of LED lighting applications. It achieves this by utilizing C2000 devices to manage a separate DC supply for each LED string. Brightness control is implemented by independently varying the output power of each DC/DC stage, which in turn controls the average current flowing through each LED string. Since average current is roughly proportional to lumen output, this method effectively controls the brightness of each LED string.
The board incorporates several key subsystems to achieve its functionality:
- Power Supplies: Power is delivered to the board via a 12V AC/DC wall adapter. This input power is then stepped down by a Buck regulator to generate 5V, which powers a 3.3V LDO. The 3.3V LDO supplies power to the 3.3V device on the BoosterPack. Both the 3.3V and 5V power domains can be selectively jumpered (via J2 and J8) to supply power to the LaunchPadXL headers, offering flexibility in power distribution.
- Boost Converters: These converters are crucial for stepping up the 12V input voltage to a level sufficient to forward bias the LEDs. The boost converters are driven by the EPWM peripheral present on the F28027 device on the C2000 LaunchPad, allowing for dynamic control of the LED strings.
- Current Feedback: Shunt resistors are strategically placed at the base of each LED string. These resistors convert the LED current into a measurable voltage. This voltage is then passed through a set of op-amps for amplification and filtering, providing a clean current feedback signal. These signals are subsequently driven to the analog-to-digital converter (ADC) inputs of the C2000 device, enabling precise monitoring and control of the LED current.
- MSP430 Capacitive Touch: The LED BoosterPack integrates an MSP430 device and includes headers for connecting a Capacitive Touch BoosterPack. This feature allows for touch-based control of the LEDs, demonstrating how an OEM lighting company might implement intuitive user interfaces. A switch (S1) is provided to connect or disconnect the MSP430's serial peripheral to the F28027 device's serial peripheral on the C2000 LaunchPad. Advanced users can also reprogram the MSP430 on the LED BoosterPack using J5.
Usage Features
The LED BoosterPack offers multiple modes of operation and demonstration examples to facilitate evaluation and experimentation:
- PC GUI Demo: This kit includes a graphical user interface (GUI) named LED_BOOST_PC_GUI.exe, which provides a user-friendly way to evaluate the kit's functionality and the F28027 device without needing to delve into the underlying project software. The GUI features sliders, buttons, and textboxes for interactive control of LED lighting. To set up the GUI demo, users need to ensure specific jumper and switch settings on both the LED BoosterPack and the C2000 LaunchPad. The LaunchPad is inserted into designated headers on the BoosterPack, and the BoosterPack is connected to a 12V power adapter. The LaunchPad is then connected to a PC via a USB cable. The GUI requires Microsoft .NET framework 3.0 to run. Once connected, users can select the serial COM port, adjust the baud rate, and then use the GUI's color presets or manually adjust current levels for each LED string to vary the color and brightness.
- Capacitive Touch Demo: This demo allows users to control the LEDs using a Capacitive Touch BoosterPack, which can be plugged into the LED BoosterPack's J6 and J7 headers. This feature is particularly useful for demonstrating touch-based control without the need for an external PC. For this demo, specific jumper and switch settings are required on both the LED BoosterPack and the C2000 LaunchPad. The LaunchPad is inserted into the BoosterPack, and the Capacitive Touch BoosterPack is then inserted. The BoosterPack is powered by the included adapter, and the LaunchPad is connected to the PC via USB (optional, for debugging). Once running, users can press the Center button twice to turn the LEDs ON, spin a finger around the touch wheel to cycle through the color spectrum, and press the Center button again to turn the LEDs OFF.
- Powering Modes: The board supports two main powering modes:
- Non-Isolated: This mode is ideal for quickly demonstrating the board's functions with the supplied firmware. In this configuration, power for the LaunchPad is supplied via USB from the PC, while the LED BoosterPack is powered by the 12V AC/DC adapter. This setup ensures that the PC's USB port shares a common ground with both the LaunchPad and the LED BoosterPack.
- Isolated/Standalone: This mode is designed to protect the host PC when debugging applications that might present dangerous voltages, or for running standalone applications with a single supply. In this mode, power for the entire system (both LaunchPad and LED BoosterPack) is supplied from the 12V AC/DC wall adapter. The USB connection is optional and used only for debugging, with power for the emulator supplied via USB. This mode provides 2500 Vrms of isolation to protect the computer from transient voltages.
- Boot Modes: The board supports different boot options, including Emulation Boot, Boot From FLASH, and Boot From SCI, which are configured using specific switch settings on the LaunchPad.
Maintenance Features
The design of the LED BoosterPack incorporates features that simplify maintenance, debugging, and experimentation:
- Subsystem Approach: The board is divided into functional groups (subsystems), which makes it easier to debug and test individual stages of the power electronics. This modularity helps in isolating issues and understanding the board's operation.
- Jumper and Connector Mapping: The board provides clear mapping of jumpers, connectors, and switches, which are detailed in the user guide. This includes J1 for main power, J2 and J8 for connecting BoosterPack 3.3V and 5V to LaunchPad headers, J3, J9, J4, J10, and J11 for the LaunchPadXL socket, J6 and J7 for Capacitive Touch BoosterPack headers, S1 for MSP430 Serial Disconnect, and J5 for MSP430 Programming. This clear labeling and documentation aid in proper setup and troubleshooting.
- Resource Allocation Table: A detailed table outlines the PWM and ADC resource allocation, mapping net names to PWM/ADC channels and providing descriptions of their functions (e.g., input voltage sense, boost PWM signals, output voltage sense, output current sense). This information is invaluable for advanced users who wish to customize or debug the underlying control algorithms.
- Documentation and Software Support: The kit comes with a Quick Start Guide and comprehensive documentation (User's Guide) that explains the hardware details, jumper functions, and step-by-step instructions for demo examples. The underlying reference software is available within controlSUITE, allowing users to explore deeper into the project and potentially reprogram the devices. This extensive support facilitates both initial setup and advanced development.
- Reprogrammability: The MSP430 on the LED BoosterPack can be reprogrammed using J5, offering flexibility for custom applications or updates. The C2000 LaunchPad also allows for programming and debugging via Code Composer Studio, enabling users to modify and optimize the embedded software.