EasyManua.ls Logo

ThermoPro TP-12 - User Manual

ThermoPro TP-12
6 pages
Print Icon
To Next Page IconTo Next Page
Loading...
-1-
Remote Food Thermometer with Dual Probe
Model No. TP-12
Introduction
Components
1. 1– Receiver unit.
2. 1– Transmitter unit.
3. 1– Detachable stainless steel FOOD probe.
4. 1– Detachable stainless steel BARBECUE probe with clip.
5. 2– 2*AAA batteries.
Receiver Features
LCD (Liquid Crystal Display) – Displays all icons, temperature and time.
Battery compartment – Holds 2 AAA batteries.
Stand – Swings out and allow you to stand the receiver on tabletop.
EN
Congratulations on your purchase of the Professional Remote Food Thermometer, a
progr ammab le r adio frequency food thermometer. You will now be able to remotely
monitor the temperature of cooking food and the temperature inside your grill, oven or
smoker from anywhere in your home.
SIDE
LCD
Stand
Battery Compartment
1
2
3
4
5
6
7
Question and Answer IconNeed help?

Do you have a question about the ThermoPro TP-12 and is the answer not in the manual?

Summary

Introduction

Components

Receiver Features

LCD Display

Displays all icons, temperature, and time on the receiver unit.

Receiver Buttons

Receiver Button Functions

Details the operation of each button on the receiver unit for various modes.

Transmitter Features

Transmitter Button Function

Explains how to turn on/off and select temperature display units (°C/°F) on the transmitter.

Setup and Operation

Battery Installation

Instructions for inserting AAA batteries into both the receiver and transmitter units.

Powering On and Off

Guides on how to turn the receiver and transmitter units on and off.

Pairing Transmitter and Receiver

Step-by-step guide for synchronizing the transmitter and receiver for data communication.

Troubleshooting

Loss Link Alert and Recovery

Explains alerts for lost signal and how to re-establish communication.

Thermometer Mode Settings

Setting HI (Maximum) FOOD Temperature

Instructions to set the high temperature alert for the FOOD probe.

Setting HI (Maximum) BARBECUE;Oven;Smoker Temperature

Instructions to set the high temperature alert for the BARBECUE probe.

Setting LO (Minimum) BARBECUE;Oven;Smoker Temperature

Instructions to set the low temperature alert for the BARBECUE probe.

Temperature Alarm Activation

How to enable or disable temperature alarms for FOOD and BARBECUE probes.

Timer Mode Operation

Timer Mode - Count Down

How to set and use the countdown timer function for cooking tasks.

Timer Mode - Count Up

How to set and use the count-up timer function for cooking tasks.

Advanced Usage

Simultaneous Timer and Temperature Monitoring

How to use both timer and temperature monitoring features concurrently.

Typical Outdoor Barbecue Procedure

Setting Up for Barbecue

Steps for pairing, probe placement, and transmitter positioning for barbecue use.

Monitoring in Thermometer Mode

Detailed steps for setting temperature alerts for food and barbecue.

Timer Mode Usage Example

Example of setting the timer for a 2-hour cooking task.

Helpful Hints and Cautions

Probe Contact Issues

Troubleshooting tips for LLL/HHH readings or false temperatures due to probe contact.

General Cautions

Safety warnings regarding probe handling, cleaning, and unit water resistance.

Technical Specifications and Compliance

Temperature Range

Specifies the device's temperature measurement limits and display indicators.

FCC Compliance

Information regarding compliance with FCC rules for digital devices and interference.

Warranty and Customer Service

Limited 90 Days Warranty

Details the warranty period and conditions for the product.

Customer Service Information

Provides contact details for warranty service and support.

Meat Temperatures & Doneness Chart

Overview

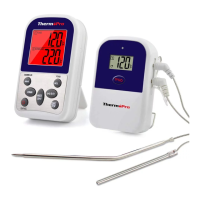
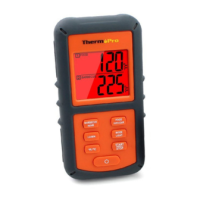
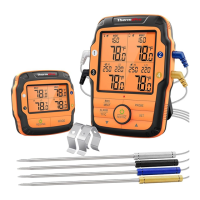
This document describes the ThermPro TP-12, a professional remote food thermometer with dual probes. This device allows users to remotely monitor the temperature of cooking food and the internal temperature of a grill, oven, or smoker from anywhere within their home.

Function Description

The ThermPro TP-12 operates in two primary modes: Thermometer Mode and Timer Mode, which can also be used simultaneously.

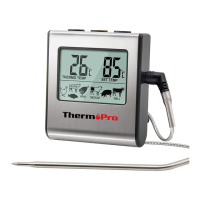
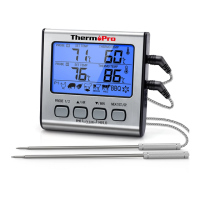
In Thermometer Mode, the device monitors the temperature of food and the barbecue environment using two stainless steel probes: a FOOD probe (6 inches long with a pointed end) and a BARBECUE probe (3 inches long with a grill rack clip). Users can set maximum and minimum temperature alarms for both food and barbecue. The receiver will beep and flash if the actual food temperature exceeds the set maximum, if the barbecue temperature exceeds the set maximum, or if it falls below the set minimum. The unit retains these temperature settings even when turned off. The device displays temperatures in either Celsius or Fahrenheit, selectable by the user.

In Timer Mode, the device functions as a countdown or count-up timer. Users can set a countdown timer for up to 24 hours (displayed as hours and minutes for settings under 10 hours, and only hours for settings over 10 hours). When the countdown reaches 0:00, it starts counting up and beeps for 30 seconds. A count-up timer can also be initiated, which will beep for 30 seconds when it reaches 9:59. The timer settings are retained even after the unit is turned off.

When Timer Mode and Temperature Mode are used simultaneously, the receiver provides distinct alarms for each function. For temperature alarms, it beeps once per second for barbecue temperature and twice per second for food temperature, with corresponding icons and probe temperatures blinking. For timer alarms, it beeps three times per second, with an upward or downward arrow blinking to indicate count-up or countdown.

The device also features a Loss Link Alert. If the receiver loses connection with the transmitter for over 4 minutes (due to being out of range or external interference), it will beep once every 4 seconds to indicate signal loss. Pressing any button on the receiver will stop this alert. To restore the connection, the receiver should be moved closer to the transmitter.

Usage Features

The ThermPro TP-12 consists of a receiver unit and a transmitter unit, each powered by two AAA batteries.

Receiver Unit Features:

  • LCD (Liquid Crystal Display): Displays all icons, temperature, and time.
  • HI/HR Button: In Thermometer Mode, displays the maximum set BARBECUE/oven/smoker temperature. Press and hold to make digits flash, then press to increase temperature (or hold for 2 seconds for faster increase by 10°F/second). In Timer Mode, increases the Hour (or hold for 2 seconds for faster increase by 10 hours/second).
  • LO/MIN Button: In Thermometer Mode, displays the minimum set BARBECUE/oven/smoker temperature. Press and hold to make digits flash, then press to increase temperature (or hold for 2 seconds for faster increase by 10°F/second). In Timer Mode, increases the MINUTE (or hold for 2 seconds for faster increase by 10 minutes/second).
  • MODE/LIGHT Button: Press once to turn on the LCD backlight for 5 seconds. Press and hold for 2 seconds to select Thermometer Mode or Timer Mode. Press once to save selected temperature.
  • HI/CLEAR Button: In Thermometer Mode, displays the current FOOD temperature setting. Press and hold to make digits flash, then press to increase temperature (or hold for 2 seconds for faster increase by 10°F/second). In Timer Mode, clears the timer setting to 0:00.
  • START/STOP Button: In Timer Mode, starts or stops the timer countdown or count-up.
  • ن/SYNC Button: Press once to turn ON/OFF the receiver. Press and hold for 2 seconds to synchronize/pair with the transmitter.
  • °F/°C Button: Press once to activate/deactivate the temperature alarm. Press and hold for 2 seconds to select receiver temperature display in °C or °F.
  • Stand: Swings out to allow the receiver to stand on a tabletop.
  • Battery Compartment: Holds 2 AAA batteries.

Transmitter Unit Features:

  • TX LED: Indicates transmission.
  • LCD: Displays temperature of both FOOD and BARBECUE, automatically switching between displays.
  • °F/°C/ن Button: Press once to turn ON/OFF the transmitter. Press and hold for 2 seconds to select transmitter temperature display in °C or °F.
  • FOOD Plug-in: For the stainless steel FOOD probe.
  • BARBECUE Plug-in: For the stainless steel BARBECUE probe.
  • WIRE STAND: Allows the transmitter to stand on a tabletop or be reversed and used as a hanger.
  • Battery Compartment: Holds 2 AAA batteries.

Installation and Synchronization:

To begin, insert two AAA batteries into both the receiver and transmitter, ensuring correct polarity. The transmitter and receiver must be synchronized or paired. This can be done by inserting the probes into the transmitter, turning on the transmitter (which will display current temperature and send readings), then turning on the receiver (which enters synchronization mode for 120 seconds). The display will show "---" and flash until the temperature reading appears, indicating successful pairing. This pairing is only required once, or whenever batteries are replaced in either unit.

Setting Temperatures and Alarms:

  • Setting HI (Maximum) FOOD Temperature: Press HI/CLEAR to display the current setting. Press and hold HI/CLEAR until digits flash, then press to adjust (or hold for faster increase). Confirm with LIGHT/MODE.
  • Setting HI (Maximum) BARBECUE/Oven/Smoker Temperature: Press HI/HR to display the current setting. Press and hold HI/HR until digits flash, then press to adjust (or hold for faster increase). Confirm with LIGHT/MODE. The unit prevents setting BARBECUE temperature below the minimum BARBECUE temperature.
  • Setting LO (Minimum) BARBECUE/Oven/Smoker Temperature: Press LO/MIN to display the current setting. Press and hold LO/MIN until digits flash, then press to adjust (or hold for faster increase). Confirm with LIGHT/MODE. The unit prevents setting BARBECUE temperature above the maximum BARBECUE temperature.
  • Activating/Deactivating Alarms: Press the °F/°C button to activate or deactivate temperature alarms for BARBECUE and FOOD. Alarm icons will appear below the respective temperature displays. The minimum BARBECUE temperature alarm will only activate once the actual BARBECUE temperature rises above the set minimum.

Typical Use in Outdoor Barbecue:

  1. Pair the receiver and transmitter.
  2. Place meat on the barbecue grill rack.
  3. Insert the FOOD probe sensor into the thickest part of the meat, avoiding bone or heavy fat.
  4. Clip the BARBECUE probe to the grill rack.
  5. Position probe wires to avoid contact with flames and ensure they are not pinched by the cover.
  6. Stand or hang the transmitter away from the barbecue's heat source. The transmitter is rainproof but not watertight.

Maintenance Features

Helpful Hints:

  • If the receiver or transmitter displays LLL or HHH (indicating temperatures below 32°F/0°C or above 572°F/300°C respectively) or a false temperature, ensure probes are firmly inserted and twisted to make good contact. Persistent issues may indicate a shorted internal probe wire.
  • Do not immerse probes in water during cleaning.
  • Keep probes and wires away from direct flames.
  • If a probe is defective within the warranty period, it can be returned for a free replacement.
  • If temperature readings seem too high or increase too quickly, check that the probe tip is fully inserted into the center of the thickest part of the food, avoiding bone or heavy fat.

Cautions:

  • Always wear heat-resistant gloves when handling stainless steel probe sensors or wires during or after cooking. Do not touch with bare hands.
  • Keep probe sensors and wires away from children.
  • Clean stainless steel probes thoroughly after each use.
  • Do not use the receiver in the rain as it is not rainproof. The transmitter is rainproof but not watertight; do not immerse it in water.
  • Do not expose probe plugs or transmitter plug holes to water or any liquid, as this can cause faulty readings.
  • Do not expose the receiver or transmitter to direct heat or surfaces.
  • Do not use stainless steel probes in a microwave oven.
  • Do not use the stainless probe sensor above 572°F (300°C), as this will deteriorate the wire.
  • Not intended for use by persons under 12 years of age.

Cleaning:

  1. Always wear heat-resistant gloves when handling stainless steel probe sensors or wires during or after cooking.
  2. Keep probe sensors and wires away from children.
  3. Wash metal probe tips with hot soapy water and dry thoroughly. Do not immerse probes in water while cleaning.
  4. Wipe the transmitter and receiver with a damp cloth. Do not immerse either unit in water.

FCC Compliance:

The device complies with part 15 of the FCC Rules. Users are warned that changes or modifications not expressly approved by the responsible party could void their authority to operate the equipment. The device is designed to provide reasonable protection against harmful interference in a residential installation. If interference occurs, users are encouraged to try measures such as reorienting the receiving antenna, increasing separation between equipment, connecting to a different circuit, or consulting a dealer or experienced technician.

ThermoPro TP-12 Specifications

General IconGeneral
DisplayLCD
Power Source2x AAA batteries
Wireless Range300 feet
Probe MaterialStainless steel
Auto Shut-offYes
WaterproofNo
Resolution
FeaturesAlarm, Timer
Cable LengthNot applicable
Probe Length6.5 inches

Related product manuals