EasyManua.ls Logo

THOMSON RR520CD - annexe 2 User Manual

THOMSON RR520CD - annexe 2
18 pages
To Next Page IconTo Next Page
Page #1 background imageLoading...
Page #1 background image
Safety Information
EN
MAINS CONNECTIONS (FOR UNITED KINGDOM ONLY)
CAUTION:
Do NOT under any circumstances plug the severed plug
into any mains socket as this could result in electric
shock.
Do NOT make any connection to the terminal in the
plug which is marked by the letter E or by the earth
symbol or coloured green and yellow.
A fuse plug must be fitted with a 3A fuse approved by
ASTA or BSI to BS 1362 and fuse covers must always be
securely replaced. If your unit does not work, the fuse
may be blown.
Connect the
power cord into
a mains power
socket
WARNING:
TO PREVENT FIRE
OR ELECTRICAL
SHOCK HAZARD,
DO NOT EXPOSE THIS PRODUCT
TO RAIN OR MOISTURE.
SEE MARKING ON BOTTOM / BACK OF PRODUCT
CAUTION
RISK OF ELECTRIC SHOCK
DO NOT OPEN
THE EXCLAMATION
POINT WITHIN THE
TRIANGLE IS A
WARNING SIGN
ALERTING YOU OF
IMPORTANT
INSTRUCTIONS
ACCOMPANYING
THE PRODUCT.
THE LIGHTNING
FLASH AND ARROW-
HEAD WITHIN THE
TRIANGLE IS A
WARNING SIGN
ALERTING YOU OF
"DANGEROUS
VOLTAGE" INSIDE
THE PRODUCT.
CAUTION: TO REDUCE THE
RISK OF ELECTRIC SHOCK,
DO NOT REMOVE COVER
(OR BACK). NO USER-
SERVICEABLE PARTS IN-
SIDE. REFER SERVICING
TO QUALIFIED SERVICE
PERSONNEL.
C_RR520CD EN 5/20/04, 1:06 PM1
Question and Answer IconNeed help?

Do you have a question about the THOMSON RR520CD - annexe 2 and is the answer not in the manual?

THOMSON RR520CD - annexe 2 Specifications

General IconGeneral
BrandTHOMSON
ModelRR520CD - annexe 2
CategoryStereo System
LanguageEnglish

Summary

Safety Information

Mains Connections (UK)

Instructions for connecting the unit to the mains power supply in the UK.

Safety Information

Laser Safety Precautions

Warnings and precautions regarding the use of the Class 1 laser product.

Environmental Compliance and Rating

Information on unit's compliance with electrical safety and electromagnetic compatibility standards.

Safety Information

Operational and Environmental Safety

Advises on avoiding condensation, keeping away from water/heat, and battery handling.

Ecology and Maintenance Advice

Recommendations for battery disposal and basic unit cleaning methods.

Before You Begin

Before Plug-In and Time Zone Selection

Guides on initial setup, including selecting the correct time zone before powering the unit.

Before You Begin

Plugging In For Power

Instructions on how to connect the unit to the power supply.

Daylight Saving Time Adjustment

How to activate or deactivate the daylight saving time feature.

General Controls

Front and Top View Controls

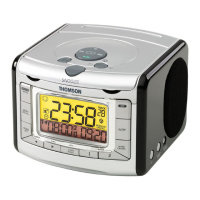
Identifies and explains the function of buttons on the front and top of the unit.

General Controls

Side View Controls and Features

Details the functions of buttons on the side of the unit, including display brightness and volume.

Display

Clock Display and Indicators

Explains the main clock display and various status icons shown on the screen.

Alarm Display Information

Describes how alarms are indicated and shows the format for alarm settings.

Setting the Clock

Weekday Setting Procedure

Step-by-step guide to setting the current day of the week.

Clock Time Setting Procedure

Instructions on how to manually set the current time on the clock.

Operating the Radio

Radio Reception Features

Explains AFC, MW and FM antennas for optimal radio reception.

Tuning and Band Selection

How to switch between FM/MW bands and tune into radio stations.

Operating the Radio

Radio Memory Operations

Covers storing radio stations, recalling them, and cancelling memory entries.

CD Player Operations

Details on CD playback, track skipping, and playback options like random.

Alarm Settings

Setting Alarm Time and Source

Guide to setting alarm times and choosing the wake-up source (Tone, Radio, CD).

Alarm Tone and Radio Alarm Setup

Details on selecting alarm tones, GRAD-U-WAKE, and setting radio alarms.

Alarm Settings

CD Alarm and Alarm Cancellation

Instructions for setting a CD alarm and how to cancel alarm settings.

Turning Off and Snoozing Alarms

Procedures for stopping the alarm and using the snooze function.

Operating the Clock

Sleep Mode Functionality

How to set the unit to turn off automatically after a specified time.

Nap Mode Functionality

Instructions for setting a short-term wake-up alarm.

Operating the Clock

Snooze, Weekend Cancel, and Display

Details on snooze operation, disabling weekend alarms, and adjusting display brightness.

Back-up Batteries

Battery Back-Up and Installation

Information on the battery backup function, how to install batteries, and power failure indicators.

Care and Maintenance

Disc Handling, Cleaning, and Lens Care

Guidelines for handling and cleaning CDs, and caring for the CD lens.

Exterior Cleaning and General Precautions

Instructions for cleaning the unit's exterior and important safety precautions.

Related product manuals