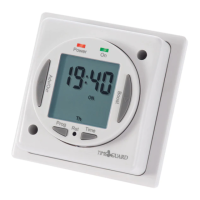
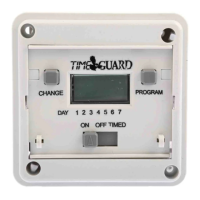
This document describes the Timeguard NT M02 7 Day Digital Time Switch, a programmable timer module designed for controlling electrical loads.
Function Description:
The Timeguard NT M02 is a 7-day digital time switch that allows users to program ON/OFF times for connected electrical appliances over a weekly cycle. It features 4 independent ON/OFF periods per day and offers various programming options including 7 days the same (24 hours), 5 + 2 days (weekdays the same, weekend days the same), and 7 individual days. The device includes an Advance/Override button for temporary changes to the programmed schedule and a Boost button for temporary ON periods. It has a factory-fitted rechargeable battery to maintain clock operation and program memory during power loss.
Important Technical Specifications:
- Supply Voltage: 230V AC 50 Hz
- Switch Rating:
- 16A Resistive (3.68kW)
- Immersion Heaters
- 2400W incandescent and halogen lighting
- 750W fluorescent lighting
- 100W compact fluorescent lighting
- 100W LED lighting
- LED Switching Capabilities: Can be increased to 200W by adding the Timeguard ZV900 Automatic switch load controller (sold separately).
- Switch Type: 16A Relay
- Voltage: Voltage free contacts
- Contact Type: Single pole change over
- Manual Override: Permanent ON or OFF
- Boost Times: 1 or 2 hour options
- Power Status LED Indicator: Red
- Output LED Indicator: Green
- 7 Day Time Period: (7 Day, 5 + 2 Days or Individual Day) – 4 ON/OFF switching programmes per day
- Operating Temperature: 0°C to +40°C
- CE Approved: Yes
- Compatibility Note: Not suitable for use with Discharge Lighting.
- Battery Reserve: Approximately 720 hours (30 days)
Usage Features:
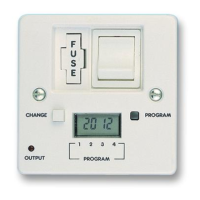
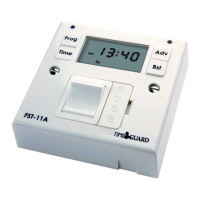
- Display: The device features an illuminated screen that shows the current time, day, and program status. It has dedicated indicators for Power (Red LED) and Output (Green LED).
- Buttons:
- Advance button (Adv/Ovr): Used for increasing values during setting, and for advancing/overriding the program in normal operating mode.
- Boost button: Used for decreasing values during setting, and for activating temporary 1 or 2-hour ON periods.
- Programme button (Prog): Used for entering and navigating programming modes.
- Reset button (Rst): Used to reset the device before initial programming or after prolonged discharge.
- Time button: Used for setting the clock (year, month, day, hour, minute) and exiting time/date entry mode.
- Setting the Clock:
- Press and hold the Time button for 3 seconds; "Hold" will appear.
- After 3 seconds, release the Time button; the screen will show the year (e.g., "20:10").
- Use Adv/Ovr (increase) or Boost (decrease) to set the correct year.
- Press Time once to save the year and show the month.
- Use Adv/Ovr or Boost to set the correct month.
- Press Time once to save the month and show the day.
- Use Adv/Ovr or Boost to set the correct day.
- Press Time once to save the day and show the time (e.g., "12:00"). Note: Time is in 24-hour format.
- Use Adv/Ovr or Boost to adjust the correct hour.
- Press Time once to save the hour; minutes can then be adjusted.
- Use Adv/Ovr or Boost to adjust the correct minutes.
- Press Time once to exit the Time/date entry mode. The display will show the correct time/day of the week.
- Modifying Date and Time: To modify only the time of day, press and hold the Time button for 3 seconds, then release it. Press the Time button repeatedly until the minutes are shown. Use Adv/Ovr or Boost to change the minutes. Press the Time button once to return to operating mode.
- Programming ON/OFF Times:
- Press and hold the Prg button for 3 seconds; "Hold" will appear.
- After 3 seconds, release the Prg button; the MODE screen will be displayed (e.g., "Mo Tu We Th Fr Sa Su"). This will automatically display the mode in which it was last programmed.
- Use Adv/Ovr or Boost to change the day grouping mode (24hour – Mo Tu We Th Fr Sa Su, 5 day – Mo Tu We Th Fr, Individual day – Mo).
- Once the desired day grouping is selected, press Prg once to set and move to programming the ON/OFF times.
- The display will show "Prog 1" with dashes for hours and minutes (e.g., "--:-- ON Mo Tu We Th Fr").
- Use Adv/Ovr or Boost to set the hour for the first ON period.
- Press Prg once to set and move to minutes.
- Use Adv/Ovr or Boost to set the minutes for the first ON period.
- Press Prg once to set and move to Programme 1 OFF time.
- Use Adv/Ovr or Boost to set the hour for the first OFF period.
- Press Prg once to set and move to minutes.
- Use Adv/Ovr or Boost to set the minutes for the first OFF period.
- Press Prg to scroll through Programme 2 ON, Programme 2 OFF, Programme 3 ON, Programme 3 OFF, Programme 4 ON and Programme 4 OFF. If further times are not required, leave dashes in place and scroll past using Prg.
- After Programme 4 has been entered, the next day grouping will follow (e.g., "Sa Su Programme 1 ON" if 2-day grouping was selected).
- To exit programming, press and hold the Prg button for 3 seconds at any stage. The timer will return to normal operating mode.
- Programming Across Midnight:
- Set Programme 1 ON time.
- Set Programme 1 OFF time to 00:00 (midnight).
- Set Programme 2 ON time to 00:00.
- Enter the required Programme 2 OFF time for the next day.
- Modifying or Adding Programmes:
- Press and hold the Prg button for 3 seconds.
- After 3 seconds, release the Prg button; the MODE screen will be displayed.
- Review programmed times for this mode by pressing Prg.
- To change the mode, press Adv/Ovr or Boost, then press Prg to review the times. Note: Changing the mode will result in programmes being lost and needing re-entry.
- Review and adjust times as necessary.
- Advance/Override Button (Adv/Ovr):
- First push: If output is OFF, it changes to ON ADVANCE until the next programmed OFF time.
- Second push: If output is ON, it changes to OFF ADVANCE until the next programmed ON time.
- Third push: Selects a permanent ON mode (ON OVERRIDE), where the output is ON irrespective of programming.
- Fourth push: Selects a permanent OFF mode (OFF OVERRIDE), where the output is OFF irrespective of programming.
- Fifth push: Returns the unit to normal operating mode, conforming to the programming.
- Boost Button:
- One press: Provides 1 hour of boost, after which the output will turn OFF.
- Two presses: Provides 2 hours of boost, after which the output will turn OFF.
- Third press: Cancels any boost period and returns to normal operating mode.
Maintenance Features:
- Battery: The time switch has a factory-fitted rechargeable battery.
- Before initial programming, connect the unit to the mains for at least 15 minutes.
- If the display is not visible or very faint, charge for 4 hours prior to pressing Rst and programming.
- The battery provides approximately 720 hours of reserve.
- Reset: The time switch must be reset before initial programming, or after subsequent discharge for more than 5 days, and following a 4-hour charging period.
- Press the Rst button using a pointed object (e.g., pencil or paper clip).
- The display will show "AS:CO" (ASCO = Automatic Summer/Winter Change Over).
- Use the Adv/Ovr button to change between ON and OFF for automatic summer time adjustment and proceed to section 10. (Note: Section 10 is not provided in the given document, but this indicates a setting related to daylight saving).
- Before installation or maintenance, ensure the mains supply to the time switch is switched off and the circuit supply fuses are removed or the circuit breaker turned off.
- Installation should be performed by a qualified electrician in accordance with current IEE wiring and Building Regulations.
- Check that the total load on the circuit, including when this time switch is fitted, does not exceed the rating of the circuit cable, fuse, or circuit breaker.
Installation and Connection:
- Ensure the mains supply is switched off and circuit supply fuses are removed or the circuit breaker turned off.
- Connect the installation wiring to the module according to the legend printed on the rear side of the time switch.
- Connections:
- L: Live Supply (Brown or Red)
- N: Neutral Supply (Blue or Black)
- 1↑: COM (Common)
- 2↑: Normally Open
- 3↑: Normally Closed
- The device needs to be left to charge for a minimum of 15 minutes once powered up before it will operate.
Mounting Details:
The document provides a diagram with dimensions for mounting the device:
- 54 CTS (Cut-out to Cut-out Spacing)
- 62.5 Dia. (Diameter)
- 3.3 Dia. (Diameter)
- 60 Sq. (Square)
- 21 (Depth from front face)
- 35 (Overall depth)
Guarantee:
The product comes with a 3-year guarantee against defective material or manufacture. Within 3 years of the date of purchase, return it to your supplier in the first year with proof of purchase for free replacement. For years 2 and 3, contact the helpline. Proof of purchase is required for all eligible replacements. Shipping costs are to be paid in advance before a replacement is sent.