19
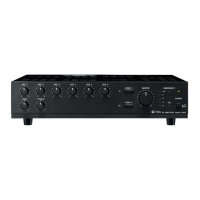
2-1. When mounting a single unit
Use the optional MB-15B-BK hardware set.
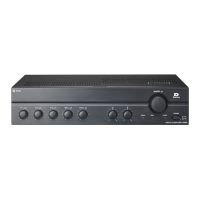
2-2. When mounting 2 units
Use the optional MB-15B-J hardware set
Machine screw M3 x 10*
2
(supplied with A-5006/5012)
Machine screw M3 x 10*
2
(supplied with A-5006/5012)
Fiber washer (for M5)*
1
Plain washer (for M3)*
2
(supplied with A-5006/5012)
Plain washer (for M3)*
2
(supplied with A-5006/5012)
Tapping screw 3 x 14*
1
Rack mounting bracket*
1
Blank bracket*
1
Rack mounting screw 5 x 12*
1
*
1
Component parts of MB-15B-BK
*
2
Note
Never use the screws supplied with the
MB-15B-BK to mount the bracket.
The screws supplied with the MB-15B-BK
are so long as to damage the internal
parts, possibly causing the unit to fail.
Machine screw M3 x 10*
4
(supplied with A-5006/5012)
Machine screw M3 x 10*
4
(supplied with A-5006/5012)
Plain washer (for M3)*
4
(supplied with A-5006/5012)
Plain washer (for M3)*
4
(supplied with A-5006/5012)
Ooval head screw M3 x 6*
3
Coupler*
3
Rack mounting bracket*
3
Fiber washer (for M5)*
3
Rack mounting screw 5 x 12*
3
*
3
Component parts of MB-15B-J
*
4
Note
Never use the screws supplied with the
MB-15B-J to mount the bracket.
The screws supplied with the MB-15B-J
are so long as to damage the internal
parts, possibly causing the unit to fail.
Step 3. Lift up the YA-706 until they hold the component, then secure them.
 Loading...