8. Wipe the dipstick clean with a clean cloth.
9. Insert the dipstick into the oil-ll tube, screw it in,
then remove the dipstick.
10. Read the oil level on the dipstick ( Figure 29 ).
• If the oil level on the dipstick is too low ,
carefully pour a small amount of oil into the
oil-ll tube, wait 3 minutes, and repeat steps
8 through 10 until the oil level on the dipstick
is correct.
• If the oil level on the dipstick is too high,
drain the excess oil until the oil level on the
dipstick is correct.
Important: If the oil level in the engine is too
low or too high and you run the engine, you
may damage the engine.
1 1. Install the dipstick into the oil-ll tube securely .
12. Recycle the used oil properly .
Replacing the Blade
Service Interval : Y early —Replace the blade or have
it sharpened (more frequently if the
edge dulls quickly).
Important: Y ou will need a torque wrench to
install the blade properly . If you do not have a
torque wrench or are uncomfortable performing
this procedure, contact an Authorized Service
Dealer .
Examine the blade whenever you run out of fuel. If the
blade is damaged or cracked, replace it immediately .
If the blade edge is dull or nicked, have it sharpened
and balanced, or replace it.
W ARNING
The blade is sharp; contacting the blade can
result in serious personal injury .
W ear gloves when servicing the blade.
1. Disconnect the spark-plug wire from the spark
plug; refer to Preparing for Maintenance ( page
19 ) .
2. T ip the machine onto its side with the air lter up.
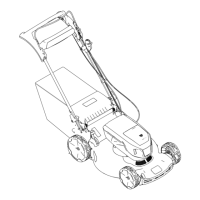
3. Remove the 2 blade nuts and the stif fener
( Figure 31 ).
g003134
Figure 31
1. Blade nuts 4. Blade driver
2. Stif fener
5. Anti-scalp disk
3. Blade 6. Blade-stop system shield
4. Remove the blade ( Figure 31 ).
5. Install the new blade ( Figure 31 ).
6. Install the stif fener you previously removed.
7. Install the blade nuts and torque them to 20
to 37 N∙m (15 to 27 ft-lb).
21
 Loading...