ElectricalSystem
Maintenance
ServicingtheBattery
ServiceInterval:Monthly
WARNING
CALIFORNIA
Proposition65Warning
Batteryposts,terminals,andrelated
accessoriescontainleadandleadcompounds,
chemicalsknowntotheStateofCalifornia
tocausecancerandreproductiveharm.
Washhandsafterhandling.
DANGER
Batteryelectrolytecontainssulfuricacidwhichisa
deadlypoisonandcausessevereburns.
Donotdrinkelectrolyte,andavoidcontactwith
skin,eyes,orclothing.Wearsafetyglassestoshield
youreyesandrubberglovestoprotectyourhands.
RemovingtheBattery
WARNING
Batteryterminalsormetaltoolscouldshortagainst
metalmachinecomponentscausingsparks.Sparks
cancausethebatterygassestoexplode,resulting
inpersonalinjury.
•Whenremovingorinstallingthebattery,donot
allowthebatteryterminalstotouchanymetal
partsofthemachine.
•Donotallowmetaltoolstoshortbetween
thebatteryterminalsandmetalpartsofthe
machine.
WARNING
Incorrectbatterycableroutingcoulddamagethe
machineandcablescausingsparks.Sparkscan
causethebatterygassestoexplode,resultingin
personalinjury.
•Alwaysdisconnectthenegative(black)battery
cablebeforedisconnectingthepositive(red)
cable.
•Alwaysreconnectthepositive(red)batterycable
beforereconnectingthenegative(black)cable.
1.Disengagethebladecontrolswitch(PTO),movethe
motioncontrolleverstotheneutrallockposition,and
settheparkingbrake.
2.Stoptheengine,removethekey,andwaitforallmoving
partstostopbeforeleavingtheoperatingposition.
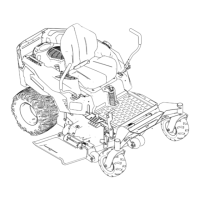
3.Removethewingnutsecuringthebatteryclamp
(Figure47).
Figure47
1.Removethewingnutand
clamp
3.Removethepositive
batterycable
2.Removethenegative
batterycablebeforethe
positive
4.Removethebattery
4.Removetheclamp(Figure47).
5.Firstdisconnectthenegativebatterycable(black)from
thenegative(-)(black)batteryterminal(Figure47).
6.Slidetheredterminalbootoffthepositive(red)battery
terminalandremovethepositive(+)(red)batterycable
(Figure47).
7.Removethebattery.
InstallingtheBattery
1.Positionthebatteryinthetraywiththeterminalposts
oppositefromthefueltank(Figure47).
2.Installthepositive(red)batterycabletothepositive
(+)batteryterminal.
3.Installthenegativebattery(black)cabletothenegative
(-)batteryterminal.
4.Securethecableswith2bolts,2washers,and2locknuts
(
Figure47).
5.Slidetheredterminalbootontothepositive(red)
batterypost.
6.Installtheclampandsecureitwiththewingnut
(
Figure47).
38

 Loading...