Do you have a question about the Toshiba e-studio 2802am and is the answer not in the manual?
Details the physical components of the e-STUDIO 2802A/2802AM, including ADF, toner, and covers.
Explains the layout and functions of the control panel, LCD screen, and operational buttons.
Instructions for turning the equipment on and off using the power switch.
Describes elements like paper size, copy quantity, and reproduction ratio on the main copy screen.
Guides on how to load paper into the drawer and bypass tray for printing.
Instructions for installing drivers and connecting the computer via USB or network cable.
Steps for making copies, including placing originals and setting copy quantity.
How to print from applications and scan documents, including scanning to USB.
How to register and recall custom settings as templates for copy or scan jobs.
This document serves as a Quick Guide for the TOSHIBA e-STUDIO 2802A/2802AM multifunctional digital systems, covering components, preparations, basic operations, and troubleshooting. It emphasizes the importance of reading the Safety Information (Printouts) before using the equipment and notes that a DVD with PDF manuals is bundled with the device.
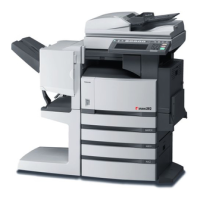
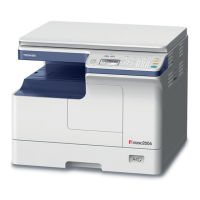
The e-STUDIO 2802A/2802AM is a versatile device equipped with several key components for its various functions.
Reversing Automatic Document Feeder (RADF): Included as standard in the e-STUDIO2802AM model, this feeder allows for efficient scanning and copying of multi-page documents by automatically flipping them to scan both sides. When placing long originals (A3, B4, A4-R, LD, LG, COMP, or 8K), the original holder should be opened to ensure correct size detection.
Platen Cover: Included as standard in the e-STUDIO2802A model, this cover protects the original glass and helps hold documents flat for scanning or copying.
Original Glass: This flatbed surface is used for scanning or copying single pages, books, or delicate originals that cannot be fed through the RADF. An original scale is provided to help align documents correctly.
Scanning Area: This is the designated region on the original glass or within the RADF where documents are placed for scanning.
Receiving Tray: After processing, printed or copied documents are delivered to this tray. A paper exit stopper helps keep the stack neat.
Toner Cartridge: This replaceable component holds the toner powder essential for printing. The manual includes troubleshooting steps for when the toner is empty, indicating a need for replacement.
Front Cover: This cover provides access to internal components, including the toner cartridge, for maintenance and troubleshooting, such as clearing paper misfeeds.
Drawer: This is the primary paper tray for loading various paper sizes. When paper is loaded, a pop-up window appears, prompting the user to set the paper size and type. The "POP UP" function must be enabled for this feature to work.
Bypass Tray: This auxiliary tray is used for loading special paper types, envelopes, or larger paper sizes like A3 (LD) that may not fit in the main drawer. Similar to the drawer, pop-up instructions guide the user in setting the paper size and type when loading.
Side Cover: This cover provides access to internal areas for clearing paper misfeeds, particularly those occurring within the device's paper path.
USB Port: Located on the side, this port allows for direct scanning to a USB storage device and can also be used for connecting the device to a computer via a USB cable.
USB Terminal (4-pin): Located at the rear, this terminal is another point for USB connectivity, typically for connecting to a computer.
Network Interface Connector: This port allows the device to be connected to a network, enabling multiple users to print from their computers.
AC-IN Terminal (rear): This is where the power cord is connected to supply electricity to the device.
Drawer: This is the primary paper tray for loading various paper sizes. When paper is loaded, a pop-up window appears, prompting the user to set the paper size and type. The "POP UP" function must be enabled for this feature to work.
The control panel is the user interface for operating the e-STUDIO 2802A/2802AM, featuring an LCD screen and various buttons.
LCD Screen: Displays messages, settings, and options. The main screen for copying shows paper size, messages, copy quantity, reproduction ratio, exposure settings, and the current original mode. A scroll icon indicates more options are available.
[SCAN] Button: Initiates the scanning function. [COPY] Button: Initiates the copying function. [USER FUNCTIONS] Button: Accesses user-defined functions. [JOB STATUS] Button: Displays the status of current and pending jobs. [TEMPLATE] Button: Allows users to register, recall, and manage templates for frequently used settings. [SETTINGS] Button: Accesses various device settings. [ENERGY SAVER] Button: Activates power-saving modes. [FUNCTION CLEAR] Button: Resets all settings to default and clears the LCD screen after copying. [START] Button: Begins the selected operation (copying, scanning, etc.). [CANCEL] Button: Stops the current operation. [OK] Button: Confirms selections or settings. Digital Keys: Used to enter numerical values, such as the number of copies. Alert Lamp: Illuminates to indicate warnings or errors. [DATA] Button: Likely related to data management or transfer. [CLEAR/STOP] Button: Functions as both a clear and stop button, similar to [FUNCTION CLEAR] and [CANCEL].
Turning On: Press the power switch to "|" (on) to power up the device. Turning Off: Press the power switch to "O" (off) to power down the device.
Templates allow users to save and recall frequently used settings for copying or scanning.
| Brand | Toshiba |
|---|---|
| Model | e-studio 2802am |
| Category | All in One Printer |
| Language | English |