5
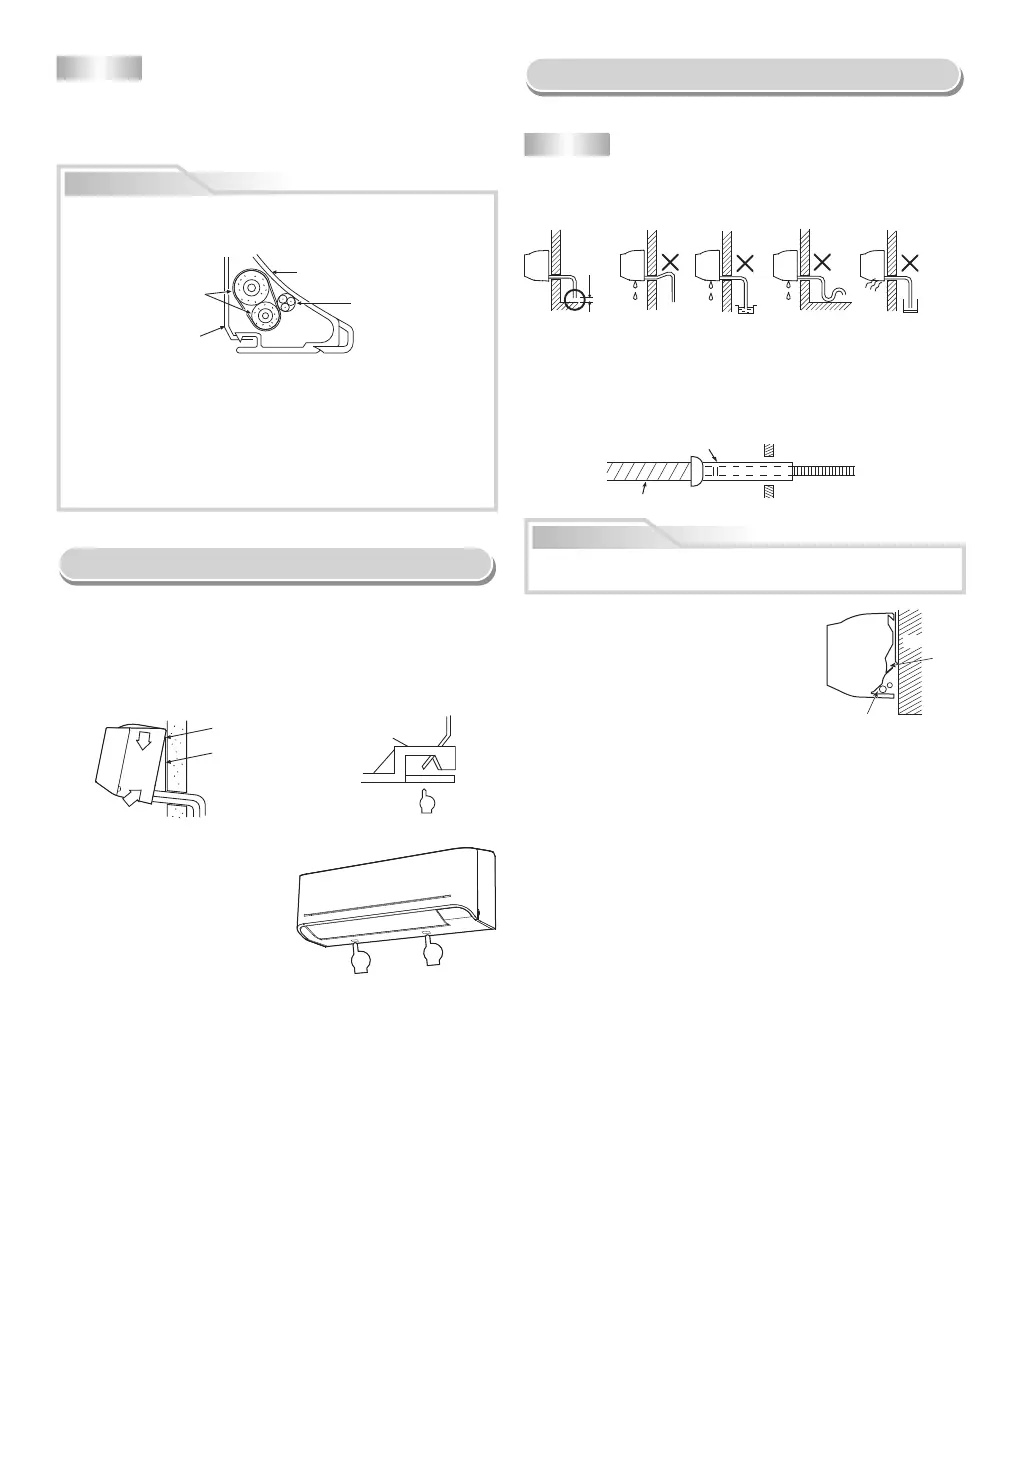
Arrange the drain pipe for proper drainage from the unit.
Improper drainage can result in dew-dropping.
CAUTION
This air conditioner has the structure designed
to drain water collected from dew, which forms
on the back of the indoor unit, to the drain pan.
Therefore, do not store the power cord and other
parts at a height above the drain guide.
Drain
guide
Space for pipes
Wall
Push
Push
Indoor Unit Fixing
• For detaching the indoor unit from the
installation plate, pull the indoor unit
toward you while pushing its bottom
up at the specifi ed parts.
1. Pass the pipe through the hole in the wall and hook the indoor unit on the
installation plate at the upper hook.
2. Swing the indoor unit to right and left to confi rm that it is fi rmly hooked up
on the installation plate.
3. While pressing the indoor unit onto the wall, hook it at the lower part on
the installation plate. Pull the indoor unit toward you to confi rm that it is
fi rmly hooked up on the installation plate.
Drainage
1. Run the drain hose sloped downwards.
NOTE
• The hole should be made at a slight downward slant on the outdoor side.
Do not form the
drain hose into
a wavy shape.
Do not rise the
drain hose.
50 mm
or more
Do not put the
drain hose end
into water.
Do not put the
drain hose end
in the drainage ditch.
2. Put water in the drain pan and make sure that the water is drained out of
doors.
3. When connecting extension drain hose, insulate the connecting part of
extension drain hose with shield pipe.
Shield pipe
Inside the room
Drain hose
Extension drain hose
1
Hook here.
Installation plate
Hook
Press
(unhook)
1
2
NOTE
If the pipe is bent incorrectly, the indoor unit may unstably be set on the wall.
After passing the connecting pipe through the pipe hole, connect the
connecting pipes to the auxiliary pipes and wrap the facing tape around
them.
CAUTION
• Bind the auxiliary pipes (two) and connecting cable with facing tape
tightly. In case of leftward piping and rear-leftward piping, bind the
auxiliary pipes (two) only with facing tape.
Indoor unit
Connecting cable
Auxiliary pipes
Installation plate
• Carefully arrange pipes so that any pipe does not stick out of the rear
plate of the indoor unit.
• Carefully connect the auxiliary pipes and connecting pipes to one
another and cut off the insulating tape wound on the connecting pipe
to avoid double-taping at the joint; moreover, seal the joint with the
vinyl tape, etc.
• Since dewing results in a machine trouble, make sure to insulate both
connecting pipes. (Use polyethylene foam as insulating material.)
• When bending a pipe, carefully do it, not to crush it.



 To Next Page