12-2-6.
Refrigerant piping
CAUTION
Install in rooms that are 13 m3 or larger. If
a leak of refrigerant gas occurs inside the
room, an oxygen deficiency may occur.
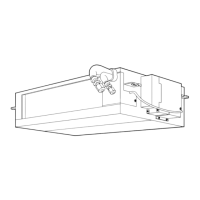
Detaching the Front Panel
Remove the 5 screws.
• Pull out the front panel according to the direction of the arrows on the
illustration below.
Refrigerant Piping Connection
Flaring
1. Cut the pipe with a pipe cutter.
2. Remove the burr inside of the pipe.
When removing the burr, be careful so that chips do not fall into the pipe.
3. Remove the flare nuts attached to the outdoor/indoor unit, then insert the
into each of the pipes.
4. Flare the pipes.
See the following table for the projection margin (A) and flaring size (B)
90°
Roughness
Obliquity Warp
Die
Pipe
A
B
Pipe A B Flare Nut
Outside
diameter
Thickness
Rigid
(clutch
type)
R32
tool
Imperial
(wing
nut type)
R32
tool
Width
across
fla
Tighten
torque
mm mm mm mm mm mm N•m kgf•m
6.35 0.8 0 to 0.5
1.5 to
2.0
9.1 17
14 to
18
1.4 to
1.8
9.52 0.8 0 to 0.5
1.5 to
2.0
13.2 22
33 to
42
3.3 to
4.2
12.7 0.8 0 to 0.5
2.0 to
2.5
16.6 26
50 to
62
5.0 to
6.2
CAUTION
• Do not scratch the inner surface of the
flared part when removing burrs
• Flare processing under the condition of
scratches on the inner surface of flar
processing part will cause refrigerant gas
leak.
1. Piping connections to the outdoor unit should be
arranged in the sequence A, B, C, D, E (5 rooms)
starting from the bottom.
(For each piping connection, the gas pipe is on the
bottom and the liquid pipe is on the top.)
2. When multiple indoor units are to be connected to the
outdoor unit, make the ends of the pipes and wires from
each indoor unit to ensure that they will be connected to
the outdoor unit correctly.
(Problems caused by indoor units being con-nected to
the outdoor unit incorrectly are very common in
multiple-unit installations.)
3. The length and height difference of the connect-ing
pipes between the indoor and outdoor units must be
within the ranges indicated below.
• Total piping length :
Non. Additional refrigerant ....................... 40 m
Additional refrigerant .............................. 80 m
..................... 41 to 80 m
Additional 20 g of refrigerant ..... Per every 1 m
• Minimum piping length :
A or B or C or D or E(5 rooms) = 3 m or more
•
•
Maximum indoor piping length :
A or B or C or D or E(5 rooms) = 25 m or less
Maximum piping height difference :
A or B or C or D or E(5 rooms) = 15 m or less
• Maximum piping/height difference between 2
units = 15 m or less
Fig. 10-2-2
4. If the outdoor units is to be mounted on a wall, make
sure that the platform supporting it is sufficiently strong.
The platform should be designed and manufac-tured to
maintain its strength over a long period of time, and
sufficient consideration should be given to ensuring that
the outdoor unit will not fall.
5. When the outdoor unit is to be mounted high on a wall,
take particular care to ensure that parts do not fall
installer is protected.
6. When doing installation work on level ground, it is
usual to wiring and piping connections to the indoor
units. And/then make to the outdoor unit. However if
outdoor work is difficult it is possible instead to make
changes to the procedure.
For example by making adjustments to the wiring and
piping length on the inside
(rather than the outside).
Outdoor
unit
15 m or less
A
B
C
D
E
15 m or less
15 m or
less
(5 rooms)
Pipe connecting
 Loading...