Installer's Guide
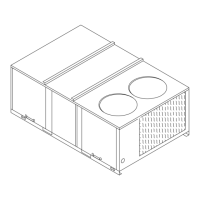
Figure 8 Mounting Installation Options
for Horizontal Applications
HORIZONTAL LEFT
a.
b.
c.
For maximum efficiency and Customer ease of
filter maintenance, it is recommended that a
properly sized remote filter and grille be in-
stalled for horizontal applications. Airflow should
not exceed the face velocity of the filter being
used. The factory installed filter should
then be removed from the unit.
To convert the unit to horizontal left, front ac-
cess, slide the coil out on the coil channel sup-
ports and rotate the complete coil 180 degrees.
Remove the factory installed baffle assembly
from the apex of the coil by using a 5/16"
nutdriver to remove the screws. For the
TEE3C40-65 units, there is a coil support tab at
the top of the coil connected to the case must be
removed first. Replace this baffle with the factory
supplied narrow coil baffle using the screws re-
moved previously. See Figure 11.
When instalfing the narrow coil baffle, make sure to
align the baffle up with the holes so NOT to puncture
the coil tubing.
d.
J
Figure 9
The coil is then inserted back into the cabinet on
the coil channels located near the center of the
unit. Do not reattach coil support tab. Also to-
tate the coil access panel 180 degrees and install.
The unit is now horizontal left with front access.
e. If the unit is suspended, it must be supported
from the bottom near both ends as well as the
middle to prevent sagging. The service access
must remain unobstructed. If the unit is sup-
ported along the length of the front and back
with rails, the air handler only needs to be sus-
pended at both ends. See Figure 8.
f. If the unit is not suspended it must be supported
as mentioned above and isolated carefully to
prevent sound transmission. Vibration isolators
(purchased locally) must be placed under the
unit.
g. It is always recommended that an auxiliary drain
pan be installed under a horizontal air handler
(See Condensate Piping) to prevent possible dam-
age to ceilings.
h. Isolate the auxiliary drain pan from the unit or
from the structure.
i.
Connect the auxiliary drain line to a separate
drain line (no trap is needed in this line) and ter-
minate according to national and local codes.
6 18-GEl 1D1-4
 Loading...