This document is an installation guide for a roof curb designed for medium foundation packaged rooftops, specifically for units ranging from 7.5 to 12.5 tons. The guide provides essential information for the proper assembly and installation of the roof curb, ensuring safe and efficient operation of the associated HVAC equipment.
Function Description
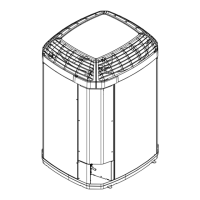
The roof curb serves as a foundational support structure for rooftop HVAC units, elevating them above the roof surface. This elevation is crucial for several reasons: it protects the unit from water accumulation on the roof, allows for proper drainage of condensate from the HVAC unit, and provides a sealed interface for supply and return air ductwork to pass through the roof. The curb is designed to integrate seamlessly with the roof structure, providing a stable and level platform for the heavy rooftop unit. It also facilitates the connection of ductwork, ensuring that conditioned air can be effectively distributed into the building and return air can be drawn back to the unit. The design accommodates various roofing materials and construction methods, making it versatile for both new construction and existing building installations. The curb's structure is engineered to distribute the weight of the rooftop unit evenly across the roof support members, preventing localized stress and potential damage to the roof.
Usage Features
The installation process for the roof curb is detailed to ensure a secure and level foundation for the rooftop unit. The curb package ships unassembled, including all necessary hardware and gasketing material. The installer is responsible for furnishing additional materials such as roof insulation, cant strips, flashing, and nails.
Key usage features during installation include:
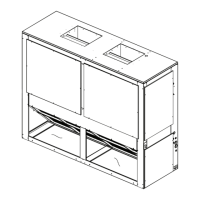
- Pre-assembly: The curb components (side rails, end rails, curb flanges, insulated block-off panels, gasketing material, and sheet metal screws) are pre-assembled before being placed on the roof. This modular design simplifies handling and positioning.
- Positioning and Leveling: The curb must be set in the proper position around the roof opening and meticulously leveled. Maintaining a maximum pitch of 1/16 inch per foot from the access side of the unit is critical for proper condensate flow. Diagonal measurements across opposite corners are used to verify squareness, ensuring the curb forms a true rectangle. Shimming may be required to achieve perfect leveling.
- Securing the Curb: The curb is fastened to the roof support members or roof deck using appropriate methods, such as tack welding or other suitable fasteners. For roof deck mounting, additional nailing plates are required below the curb flanges to provide extra support and minimize vibration.
- Roof Material Integration: The roofing material is brought up to the curb, and rigid insulation is placed around the curb and secured. Cant strips (e.g., 4"x4" wood cut diagonally in half) are installed, and roofing felts are pushed up under the lip of the curb's nailing strips and securely nailed. This creates a watertight seal between the curb and the roof.
- Ductwork Integration: The guide emphasizes the importance of proper ductwork installation. Supply and return air ductwork, whether flexible, metal, or fiberboard, must be hung from the curb flanges inside the curb walls, not installed over the top edges of the curb. This ensures that the ductwork is properly supported and does not interfere with the unit's seating. Ductwork must be fabricated to cover the openings for the return and supply sides of the unit, with flanges narrow enough to slide down inside the curb. All ductwork attaching to the curb must be in place and secured before the HVAC unit is set.
- Electrical and Piping Considerations: Any pipes or electrical conduits extending through the roof must be flashed with a sleeve and roof flange, extending a minimum of 8 inches above the roof surface, to maintain weather integrity.
- Clearances: Recommended clearances for single-unit installation are provided to ensure adequate serviceability, maximum capacity, and peak operating efficiency. Reducing these clearances can lead to condenser coil starvation or recirculation of warm condenser air.
Maintenance Features
While the guide primarily focuses on installation, several aspects contribute to the long-term maintenance and reliability of the roof curb and the overall HVAC system:
- Structural Integrity: The emphasis on confirming with a structural engineer that the roof structure is strong enough to support the combined weight of the roof curb, the unit, and any accessories is a critical preventative maintenance step. This ensures the long-term stability of the installation and prevents structural failures.
- Watertight Seal: The detailed instructions for integrating the roofing material, installing insulation, cant strips, and flashing are designed to create a durable, watertight seal. This prevents water ingress into the building, which is crucial for protecting the building structure and the HVAC equipment from water damage, a common maintenance issue. Regular inspection of this seal can help identify and address potential leaks before they become significant problems.
- Proper Drainage: The requirement for the curb to be leveled with a specific pitch ensures proper condensate drainage from the HVAC unit. This prevents water accumulation within the unit or on the roof, which can lead to corrosion, mold growth, and other maintenance issues.
- Ductwork Support: The instruction to hang ductwork from the curb flanges rather than resting it on the curb edges helps prevent stress on the ductwork connections and ensures proper airflow. This design minimizes the risk of ductwork sagging or detaching, reducing future maintenance needs related to airflow issues or energy loss.
- Accessibility for Service: While not explicitly detailed as a maintenance feature, the proper placement and clearances of the unit, as guided by the manual, inherently facilitate future service and maintenance. Adequate space around the unit allows technicians to access components for inspection, repair, and routine servicing without obstruction.
- Material Quality: The use of specific components and materials, such as gasketing and insulated block-off panels, contributes to the overall durability and thermal performance of the installation. Ensuring these materials are correctly installed helps maintain the system's efficiency and reduces wear and tear on the HVAC unit.
- Adherence to Codes: The guide stresses adherence to NEC, local/state/national electrical codes, and SMACNA recommendations for duct construction. Following these standards ensures that the installation meets safety and performance requirements, reducing the likelihood of electrical faults, structural issues, or inefficient operation that would require corrective maintenance.
- Damage Inspection: The instructions for immediate inspection upon receipt and reporting of any shipping or concealed damage are crucial for ensuring that only undamaged components are installed. This proactive approach prevents the installation of compromised parts that could lead to premature failure and increased maintenance costs.