This document is an installer's guide for a Start Control Kit, specifically for models BAYKSKT257, 258, 259, 260, 263, 265, and 266. The kit is designed to provide start assistance for a heating and air conditioning unit.
Function Description
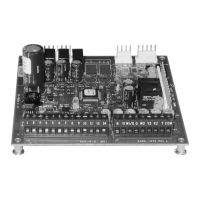
The Start Control Kit is an electrical component assembly that facilitates the initial start-up of a motor, likely a compressor, within an HVAC system. It typically includes a start relay and a start capacitor. The start relay temporarily connects the start capacitor into the motor circuit during the initial power-up phase, providing an additional boost of torque to overcome the motor's inertia and starting load. Once the motor reaches a certain speed, the start relay disconnects the capacitor from the circuit, allowing the motor to run on its main windings. This mechanism is crucial for motors that require high starting torque, especially under load, and helps to reduce the inrush current and stress on the motor and electrical system.
Important Technical Specifications
The guide does not explicitly list detailed technical specifications such as voltage, capacitance, or current ratings for the individual components (start relay, start capacitor). However, it provides critical information regarding the wiring connections:
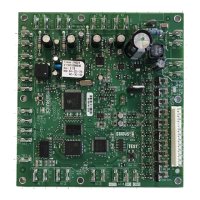
- Black/Blue Wire: Connects from CSR 5 to MS-T2.
- Orange Wire: Connects from CSR 2 to the RUN CAPACITOR-H TERMINAL.
- Brown Wire: Connects from the START CAPACITOR to CSR 1.
- Red Wire: Connects from the START CAPACITOR to MS-T1.
These wiring instructions are essential for proper installation and operation, ensuring that the start control components are correctly integrated into the unit's electrical system. The "CSR" and "MS" designations likely refer to specific terminals on the contactor, run capacitor, or motor windings of the main HVAC unit.
Usage Features
The Start Control Kit is an internal component of an HVAC unit, so its "usage features" relate more to its installation and integration rather than direct user interaction.
- Compatibility: Designed for specific BAYKSKT models (257, 258, 259, 260, 263, 265, & 266), indicating a tailored fit and electrical compatibility with these units.
- Installation Process: The guide outlines a clear, step-by-step installation process:
- Safety First: Emphasizes disconnecting power to the unit before any servicing, highlighting a critical safety measure.
- Access: Requires removing the cover panel on the control box compartment to access the installation area.
- Mounting: The kit assembly is secured within the control compartment using provided screws, as illustrated in Figure 1. The illustration specifies that the start relay must be assembled with the mounting tab to the right on all models, and the start capacitor should be assembled with its label out, resting on a dimple, with the mounting strap oriented and formed as shown. This attention to detail ensures correct physical placement and prevents interference or damage.
- Wiring: Detailed color-coded wiring instructions are provided, using quick-connect 1/4" flag terminals to connect to the contactor and capacitor, as illustrated in Figure 2. This simplifies the electrical connections and reduces the chance of errors.
- Reassembly: Instructions for replacing the control compartment panel in reverse order of removal.
- Power Restoration: Reconnecting power after installation is complete.
- Component Orientation: Specific instructions for orienting the start relay and start capacitor during mounting (e.g., "START RELAY MUST BE ASSEMBLED WITH THE MOUNTING TAB TO THE RIGHT ON ALL MODELS," "ORIENT AND FORM CAPACITOR MOUNTING STRAP AS SHOWN," "ASSEMBLE START CAPACITOR WITH LABEL OUT AS SHOWN," "CAPACITOR MUST REST ON DIMPLE"). These details are crucial for proper fit, function, and potentially for heat dissipation or vibration control.
Maintenance Features
As an electrical component, the Start Control Kit itself typically requires minimal direct maintenance beyond ensuring secure connections and proper operation. However, the guide implies certain maintenance-related aspects:
- Replacement Part: The kit is presented as an "Installer's Guide," suggesting it is either an initial installation component or a replacement part for an existing unit. Its modular nature allows for relatively straightforward replacement if the start relay or capacitor fails.
- Troubleshooting Context: While not explicitly a maintenance feature, the detailed wiring diagram (Figure 2) is invaluable for troubleshooting. If the unit fails to start or exhibits starting issues, an HVAC technician can use this diagram to verify the correct installation and functionality of the start control components.
- Durability (Implied): The use of quick-connect terminals and secure mounting suggests a design intended for reliable, long-term operation within the HVAC unit's environment.
- Safety during Service: The prominent "WARNING: HAZARDOUS VOLTAGE – DISCONNECT POWER BEFORE SERVICING" underscores the importance of safety protocols during any maintenance or replacement activities involving the kit.
In summary, the Start Control Kit is a vital auxiliary electrical assembly for specific Trane and American Standard HVAC units, designed to ensure reliable motor start-up. Its installation is guided by clear, step-by-step instructions focusing on safety, correct physical mounting, and precise electrical connections, making it an accessible component for qualified installers and technicians.