22
RT-SVX069A-EN
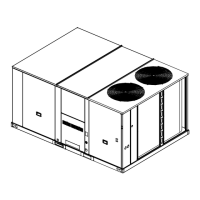
disconnect switch. This assembly is located in the
condenser section of the unit.
Both high and low voltage power can be routed
through the base or through the front corner post
where the disconnect enclosure is mounted. The
hole is sized for 1 1/2–in. conduit.
2. If the conduit required for your application is larger
than 1 1/2–in., remove the termination plate and
connect to the larger hole using field supplied
reducing washers.
3. Route the power wires and ground conductor
through conduit and into the bottom of a field-
installed disconnect switch. Connect the power
conductors to the lugs provided. Connect the
ground wire to the unit ground lug.
NNoottee:: Wire size for the length of run should be
determined using the circuit ampacity found
on the unit nameplate and the N.E.C.
4. Route low voltage (class II), control wiring through
hole in base of unit but not through high voltage
conduit. Feed control wiring through bushing
provided on side panel. Route wires through loose
wire ties provided.
5. Tighten the wire ties. Secure the excess wire bundle
under the wire ties in the outdoor section. Do not
leave excess wire in the electrical enclosure. Use
the unit wiring diagram to make the low voltage
connections.
Figure 15. Field wiring route
Through the Base Gas Utility
Option
This section contains the instructions for making field
connections to the Through the Base Gas Utility
Option.
Field Installed Connections
WWAARRNNIINNGG
HHaazzaarrddoouuss VVoollttaaggee ww//CCaappaacciittoorrss!!
FFaaiilluurree ttoo ddiissccoonnnneecctt ppoowweerr aanndd ddiisscchhaarrggee
ccaappaacciittoorrss bbeeffoorree sseerrvviicciinngg ccoouulldd rreessuulltt iinn ddeeaatthh oorr
sseerriioouuss iinnjjuurryy..
DDiissccoonnnneecctt aallll eelleeccttrriicc ppoowweerr,, iinncclluuddiinngg rreemmoottee
ddiissccoonnnneeccttss aanndd ddiisscchhaarrggee aallll mmoottoorr ssttaarrtt//rruunn
ccaappaacciittoorrss bbeeffoorree sseerrvviicciinngg.. FFoollllooww pprrooppeerr
lloocckkoouutt// ttaaggoouutt pprroocceedduurreess ttoo eennssuurree tthhee ppoowweerr
ccaannnnoott bbee iinnaaddvveerrtteennttllyy eenneerrggiizzeedd.. VVeerriiffyy wwiitthh aa
CCAATT IIIIII oorr IIVV vvoollttmmeetteerr rraatteedd ppeerr NNFFPPAA 7700EE tthhaatt aallll
ccaappaacciittoorrss hhaavvee ddiisscchhaarrggeedd..
FFoorr aaddddiittiioonnaall iinnffoorrmmaattiioonn rreeggaarrddiinngg tthhee ssaaffee
ddiisscchhaarrggee ooff ccaappaacciittoorrss,, sseeee PPRROODD--SSVVBB0066**--EENN..
WWAARRNNIINNGG
PPrrooppeerr FFiieelldd WWiirriinngg aanndd GGrroouunnddiinngg
RReeqquuiirreedd!!
FFaaiilluurree ttoo ffoollllooww ccooddee ccoouulldd rreessuulltt iinn ddeeaatthh oorr
sseerriioouuss iinnjjuurryy..
AAllll ffiieelldd wwiirriinngg MMUUSSTT bbee ppeerrffoorrmmeedd bbyy qquuaalliiffiieedd
ppeerrssoonnnneell.. IImmpprrooppeerrllyy iinnssttaalllleedd aanndd ggrroouunnddeedd
ffiieelldd wwiirriinngg ppoosseess FFIIRREE aanndd EELLEECCTTRROOCCUUTTIIOONN
hhaazzaarrddss.. TToo aavvooiidd tthheessee hhaazzaarrddss,, yyoouu MMUUSSTT ffoollllooww
rreeqquuiirreemmeennttss ffoorr ffiieelldd wwiirriinngg iinnssttaallllaattiioonn aanndd
ggrroouunnddiinngg aass ddeessccrriibbeedd iinn NNEECC aanndd yyoouurr llooccaall//
ssttaattee//nnaattiioonnaall eelleeccttrriiccaall ccooddeess..
IImmppoorrttaanntt:: All phases of this installation must comply
with NATIONAL, STATE, and LOCAL
CODES. In absence of local codes, the
installation must conform with American
National Standard-Z223.1a- National Fuel
Gas Code Latest Revision.
1. Field connections are made by first removing the
access panel for the heat section on the front of the
unit.
2. The gas piping assembly ships inside this section
and includes the shut-off valve, a pressure tap for
testing, and the necessary unions for field
connection. For through the base access, remove
the factory-provided cap from the base pan
opening. See Figure 16, p. 23.
3. Route field piping through this hole to the
dimension shown in Table 6, p. 23.
4. Place the assembly through the cabinet opening as
shown in Figure 16, p. 23 and make the union
connection to the field piping and to the gas train.
Refer to the “Heating Operation (for Gas Units) -
Standard Economizer,” p. 26 for startup
instructions.
IInnssttaallllaattiioonn