Installation
58 WSHP-SVX01Q-EN
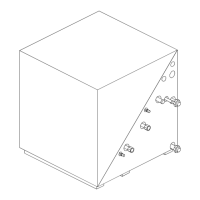
Supply/Return Pipe Connections
Connect the supply and return hoses to the water-inlet
(from supply) and water-outlet (to return) of the unit. For
vibration isolation, it is recommended that flexible steel
braided hoses be installed instead of hard piping the
equipment to the main loop system.
Cleaning and Flushing the Water Loop
After the piping system is complete, the flexible hose
connectors should be doubled back to complete the water
circuit external to the unit (avoiding trash settle-out in the
condenser). An extra pipe may be necessary to connect
the hose kits.
1. Water circulation system should be filled with clean
water using the water make up connections.
Note: Air vents should be open during filling.
2. With the air vents closed, start the circulating pump
and then crack the air vents to bleed off the trapped air,
assuring circulation through all components of the
system.
Note: Make up water must be available to the system to
replace the volume formerly occupied by the air
that is bled off.
3. With the air vented and the water circulating, the entire
system should be checked for leaks with repairs made
as required.
4. Operate the supplementary heat system (boiler)
making checks per manufacturer’s instructions. During
this operation, visual checks should be made for leaks
that may have occurred due to increased heat. Repair
as required.
5. Open the system at the lowest point for the initial blow
down (making sure the make up water is equal to the
water being dumped). Continue blow down until the
water leaving the drain runs clear, but not less than 2
hours.
6. Shut down pumps and supplementary heat system.
Reconnect the hoses placing the water-to-refrigerant
heat exchanger in the water circulating system.
Note: Vents should be open when the pumps and
supplementary heat system are shut down.
Field Installed Power Wiring
Verify that the power supply available is compatible with
the unit’s nameplate. Use only copper conductors to
connect the power supply to the unit.
Main Unit Power Wiring
A field supplied disconnect switch must be installed at or
near the unit in accordance with the National Electric Code
(NEC latest edition).
Location of the applicable electric service entrance for
HIGH (line voltage) may be found in the Dimensions
section of this manual.
The high-voltage connection is made at the 1K1 contactor
or 1TB1 power block inside the unit control box. See
Figure 57, p. 58. Refer to the customer connection diagram
that is shipped with the unit for specific termination points.
Provide proper grounding for the unit in accordance with
the local and national codes.
Figure 56. Supply/return pipe connections
RETURN
TO
LOOP
SUPPLY
FROM
CENTRAL
PUMP
AUTOMATIC BALANCING
HOSE KIT
WATER-IN
WATER-OUT
WARNING
Proper Field Wiring and Grounding
Required!
Failure to follow code could result in death or serious
injury. All field wiring MUST be performed by qualified
personnel. Improperly installed and grounded field
wiring poses FIRE and ELECTROCUTION hazards.To
avoid these hazards, you MUST follow requirements for
field wiring installation and grounding as described in
NEC and your local/state electrical codes.
Figure 57. Power wiring example
 Loading...