TK 56700-1-IM-EN
33
Installation Procedures
IImmppoorrttaanntt:: Safety precautions must be followed. Refer to UUnniitt IInnssttaallllaattiioonn HHaazzaarrddss in the SSaaffeettyy PPrreeccaauuttiioonnss section
of this manual before proceeding.
PPrreeffeerrrreedd IInnssttaallllaattiioonn MMeetthhoodd — Thermo King recommends the four (4) factory installed nut plates attached inside
the frame along with the correct length hex head grade 5 mounting bolts (installer supplied) be used when installing the
unit.
If your installation requires the nut plates be removed, see ““AAlltteerrnnaattee IInnssttaallllaattiioonn MMeetthhoodd”” on the next page.
IImmppoorrttaanntt:: Do not install any compressible washers or other materials between the unit and the truck!
1. Position unit into cargo box opening. Do not pull on the drain hoses or electrical wires during the installation.
2. From inside the cargo box, insert four (4) correct length mounting bolts (installer supplied) with four (4) 2.00” OD
flat washers (supplied) through the front wall of the truck box and into the unit’s mounting nuts.
a. Apply blue thread locker to all four (4) unit mounting bolts.
b. Tighten the mounting bolts evenly and then torque to 81.4 N•m (60 ft-lbs).
IImmppoorrttaanntt:: A minimum of 2 thread pitches must extend beyond the surface of the nut — more than 2 may damage
internal unit components.
3. Disconnect and remove lifting bar and eyebolts from unit.
4. Install exhaust extension tube pointing towards rear of truck and tighten bolt securely.
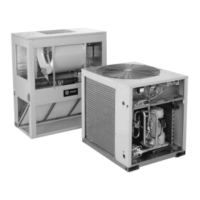
Figure 21. Typical Unit Installation Shown
IInnssttaalllliinngg UUnniitt

 Loading...