Do you have a question about the Trojan SHAPE 200 and is the answer not in the manual?
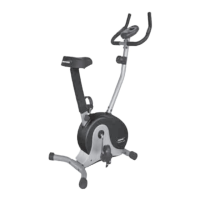
Attach front and rear stabilizers to the mainframe using bolts and nuts.
Assemble the seat to the seat tube and adjust height using the seat knob.
Connect sensor and tension cables, then attach handlebar post with screws and washers.
Connect tension cable to controller and install tension knob. Attach handlebar.
Attach handlebar, connect wires and sensor line to the computer, install batteries.
Install the left and right pedals to the crank, ensuring correct marking.
Explains the MODE, SET, RESET, and RECOVERY buttons for console control.
Details SCAN, SPEED, RPM, TIME, DISTANCE, and CALORIE display functions.
Explains how to use pulse sensors and the RECOVERY function for heart rate monitoring.
Defines aerobic exercise and its benefits for heart and lung fitness.
Discusses weight training as an essential part of exercise for toning and strengthening muscles.
Illustrates muscle groups developed by cycling and their role in aerobic workouts.
Advises starting slowly, setting realistic goals, and consulting a doctor.
Explains how to use heart rate to determine exercise intensity and target zones.
Outlines the three parts of a workout: warm-up, training, and cool-down.
Suggests workout frequency for maintaining or improving fitness.
Provides instructions and illustrations for five basic stretches.
Addresses issues like console not working, '0' error, and sensor problems.
Tips for accurate pulse reading and resolving dim LCD display problems.
Provides the definition for Body Mass Index (BMI).
Details what the warranty does not cover and the customer's waiver of other warranties.
Outlines the process for making warranty claims and specific parts not covered.
Steps to follow for reporting and fixing equipment faults, including home service.
Explains repair costs for items under and out of warranty, requiring quotes.