EasyManua.ls Logo

TrojanUV TrojanUVMax A User Manual

TrojanUV TrojanUVMax A
24 pages
To Next Page IconTo Next Page
Page #1 background imageLoading...
Page #1 background image
Un filtre à sédiments de 5 microns (valeur nominale) doit être installé en amont de (devant) tout système UV.
Ce produit a été conçu pour un usage intérieur uniquement. Assurez-vous que tous les composants sont
propres et secs.
Nettoyez régulièrement le manchon de quartz pour assurer une performance optimale.
Ne doit pas servir pour des utilisations à eau salée.
RENSEIGNEMENTS CLÉS :
Félicitations. En vous procurant ce système VIQUA, vous avez fait les premiers pas
vers une alimentation sécuritaire en eau potable. Recourant à la technologie UV la
plus avancée disponible aujourd'hui, ce système UV a été conçu pour fonctionner en
toute fiabilité pendant de nombreuses années avec un entretien minimal.
425 Clair Rd. W, Guelph, Ontario, Canada N1L 1R1
t. (+1) 519.763.1032 • sf. 1.800.265.7246 (Canada et États-Unis) • t. +31 73 623 8116 (Europe uniquement) f. (+1) 519.763.5069
courriel: info@viqua.com www.viqua.com
Sysme de purification d'eau aux rayons ultraviolets
Manuel de l'utilisateur
Modèles de base
A, B4, C4, D4, E4, F4
Modèles Plus
D4 Plus, E4 Plus, F4 Plus
(Modèles homologués
NSF 55 classe B ou non)
Date de l'installation :
Installé par :
de téléphone de l'installateur :
Numéro de série :
(Ce numéro se trouve sur l'étiquette sur le côté du bloc d'alimentation.)
A 5-micron (nominal) sediment filter must be installed upstream of (before) any UV system.
This product is for indoor use only. Keep all components clean and dry.
Clean the sleeve regularly for optimum performance.
Not for use in salt water applications.
KEY INFORMATION YOU SHOULD KNOW:
Congratulations. By purchasing this system, you have taken the first step in ensuring
safe drinking water. Designed using the most advanced UV technology available
today, your UV system is designed to provide you with years of trouble free
operation with minimal maintenance required.
425 Clair Rd. W, Guelph, Ontario, Canada N1L 1R1
t. (+1) 519.763.1032 • tf. 1.800.265.7246 (US and Canada only) • f. (+1) 519.763.5069 • t. +31 73 623 8116 (Europe only)
e-mail: info@viqua.com www.viqua.com
Owners Manual
Basic Models
A, B4, C4, D4, E4, F4
Plus Models
D4 Plus, E4 Plus, F4 Plus
(Non-certified and
NSF Standard 55
Class B Certified)
Ultraviolet Water Purification System
Date of installation:
Installed by:
Installer phone #:
Serial #:
(Found on label on side of Power Supply)
Question and Answer IconNeed help?

Do you have a question about the TrojanUV TrojanUVMax A and is the answer not in the manual?

TrojanUV TrojanUVMax A Specifications

General IconGeneral
BrandTrojanUV
ModelTrojanUVMax A
CategoryWater Dispenser
LanguageEnglish

Summary

Owner's Manual Introduction and Key Information

Key Information for Operation

Essential operational and maintenance points for the UV system.

Safety Instructions and Precautions

Electrical Safety: Grounding and GFCI

Requirements for safe electrical grounding and GFCI protection.

Safe Use of Extension Cords

Guidelines for selecting and using extension cords properly.

General Safety Guidelines

Core safety practices to prevent injury during system use.

Identify Your UVMax Model

Model Feature Comparison

Compares features and capabilities across different Trojan UVMax models.

System Specifications

General Model Specifications

Operating parameters, water quality requirements, and installation options.

NSF Certified Model Specifications

Flow rates, electrical data, and certifications for NSF models.

System Components Overview

Components for Model A

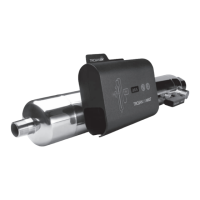
List of parts and their numbers for Model A.

Components for Other Models

Parts list and numbers for B4-F4 Plus models.

Component Part Identification

All Model Component Details

Comprehensive list of components and their part numbers.

Dimensions and System Layout

Physical Dimensions and Clearance

Diagrams and tables detailing system dimensions and lamp removal clearance.

Installation Guide

Component Function Descriptions

Explains the purpose of each numbered component in the installation diagram.

Installing the UV System: Initial Steps

Mounting and Plumbing Connections

Steps for locating, mounting, and connecting the system's plumbing.

Installing the UV System: Connections and Checks

Electrical Connections and Flow Direction

Covers grounding, sensors, flow restrictor, and final leak checks.

Disinfecting the Water Lines: Preparation

System Preparation and Disinfectant Introduction

Steps to prepare the system and begin the disinfection process.

Disinfecting the Water Lines: Bleach Contact

Water Flow and Bleach Sit Time

Procedures for flushing water and allowing bleach to sit in lines.

Disinfecting the Water Lines: Final Flushing

Complete Flushing and System Reset

Final steps for flushing bleach and resetting system timers.

Control Panel Operation and Indicators

Control Panel Buttons and Display

Explains the functions of the control panel buttons and display.

Understanding Indicator Lights

Guide to interpreting the meaning of different indicator light states.

Troubleshooting Common Issues

Problem/Cause/Solution Guide

A table detailing common symptoms, their causes, and recommended solutions.

Low UV Alarm Diagnostics

Troubleshooting Flowchart for Alarms

A flowchart to help diagnose and resolve low UV alarm conditions.

Sleeve Cleaning and Lamp Replacement

Cleaning the UV Sleeve

Instructions for cleaning the sleeve to maintain UV performance.

Lamp Replacement Overview

Information on lamp lifespan and when replacement is needed.

Sleeve Cleaning and Lamp Replacement: Removal

Removing and Cleaning the Sleeve Assembly

Steps for safely removing and cleaning the lamp and sleeve.

Sleeve Cleaning and Lamp Replacement: Reassembly

Reinstalling the Lamp and Sleeve

Instructions for correctly reinstalling the lamp and sleeve assembly.

Sleeve Cleaning and Lamp Replacement: Final Steps

Final Connections, Checks, and Reset

Completing the process with connections, leak checks, and timer reset.

Warranty Information and Claims

How to Make a Warranty Claim

Procedure for initiating and managing a warranty claim with the dealer.

Specific Warranty Coverage Details

Outlines the warranty periods for different system components.