WARNING:
ALWAYS
MAINTAIN A MINIMUM 2 INCH
"AIR
SPACE"
TO
COMBUSTIBLES.
Step
7A:
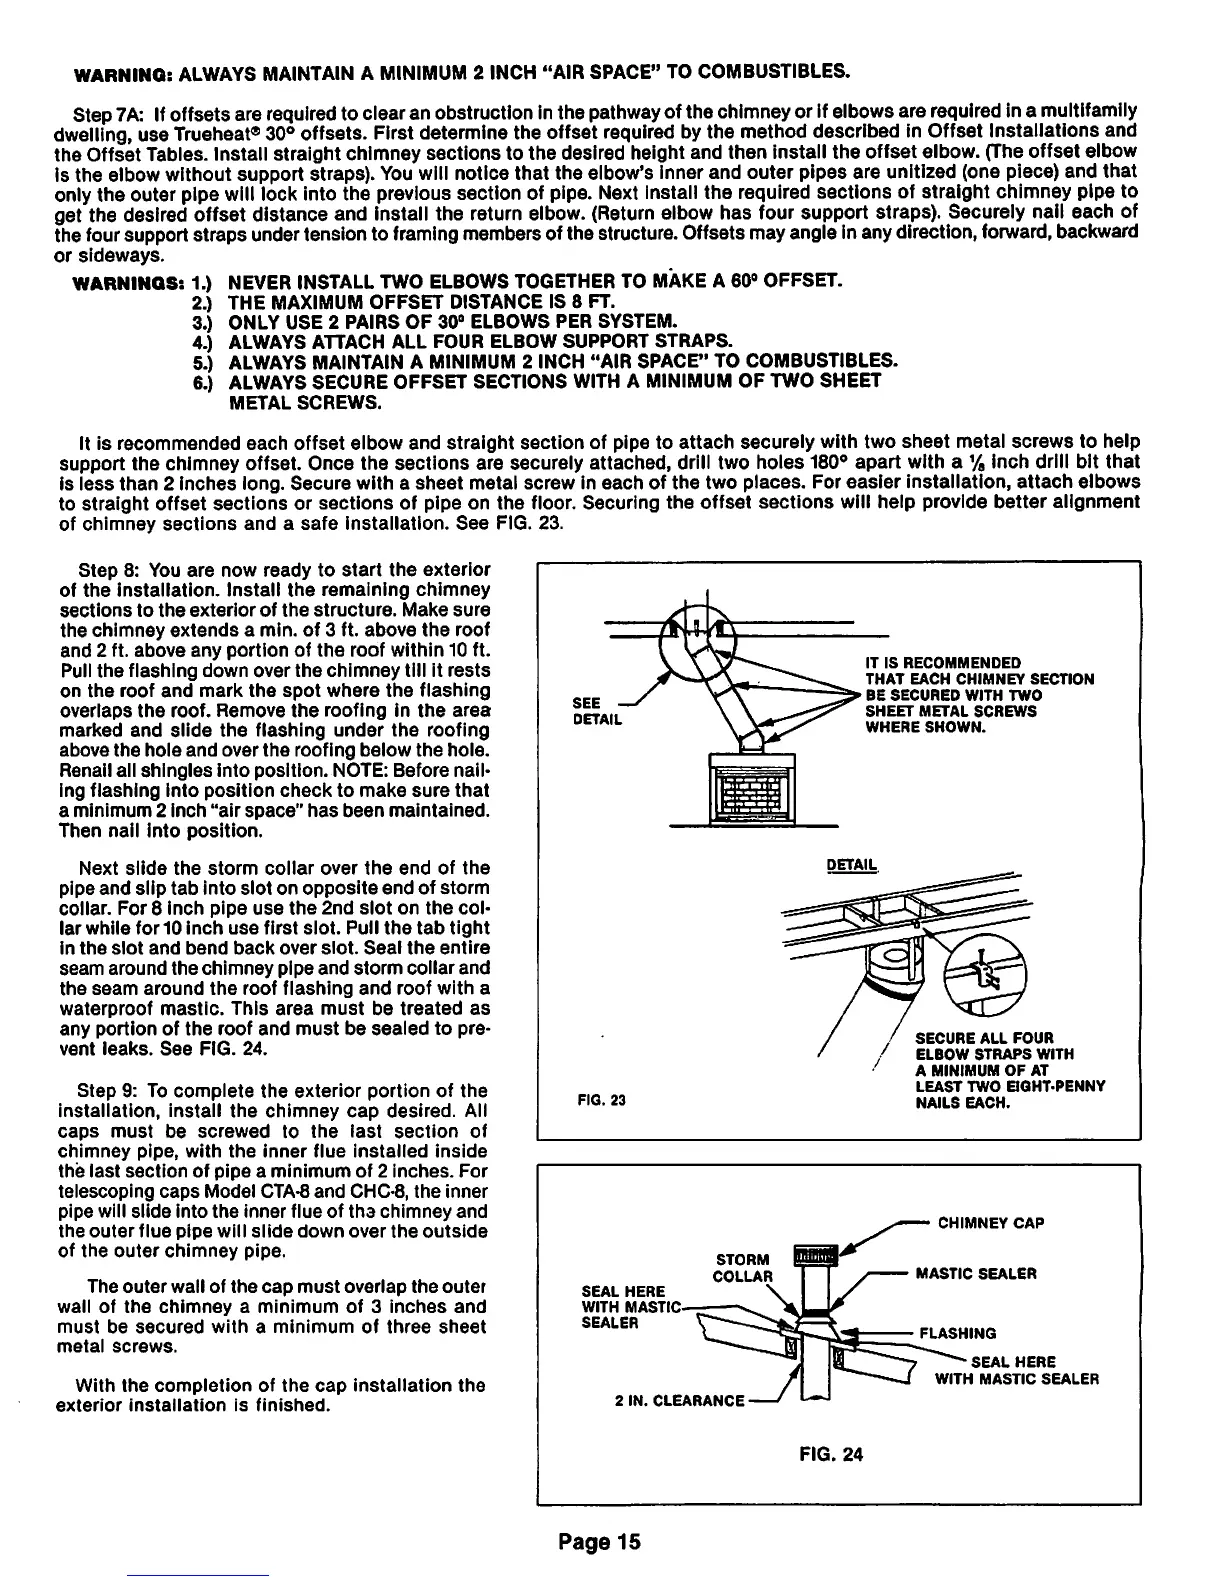
If
offsetsare
required
toclearan obstruction inthe
pathway
ofthe
chimney
orifelbowsare
required
ina
multifamily
dwelling,
use
Trueheat®
30° offsets. First determinethe offset required bythe method described in Offset Installations and
the Offset Tables. Install straight chimney
sections
to
the
desired height and then install
the
offset elbow. (The offset elbow
is the elbow without support straps).
You
will
notice that the elbow's inner and outer pipes are unitized (one piece) and that
only the outer pipe
will
lock into the previous section of pipe. Next install the required sections of straight chimney pipe to
get the desired offset distance and install the
return
elbow.
(Return
elbow
has four support straps). Securelynail each of
the foursupport straps undertension to framingmembers ofthe structure. Offsets mayangle inany direction,forward, backward
or
sideways.
WARNINGS: 1.) NEVER INSTALL TWO ELBOWS TOGETHER TO MAKE A 60s OFFSET.
2.) THE MAXIMUM
OFFSET
DISTANCE IS 8 FT.
3.) ONLY USE 2 PAIRS OF 30° ELBOWS PER SYSTEM.
4.) ALWAYS ATTACH ALL FOUR ELBOW SUPPORT STRAPS.
5.) ALWAYS
MAINTAIN
A
MINIMUM
2
INCH
"AIR SPACE" TO COMBUSTIBLES.
6.) ALWAYS SECURE OFFSET SECTIONS WITH A
MINIMUM
OF TWO SHEET
METAL
SCREWS.
It is
recommended
each
offset
elbow
and
straight
section
of pipe to
attach
securely
with two
sheet
metal
screws
to help
support
the
chimney offset. Once the
sections
are securely attached, drill two holes 180°
apart
with a % inch drill bit
that
is
less
than
2
inches
long.
Secure
with a
sheet
metal
screw
in
each
of
the
two
places.
For
easier
installation,
attach
elbows
to straight offset
sections
or
sections
of pipe on
the
floor. Securing
the
offset
sections
will help provide
better
alignment
of
chimney
sections
and
a
safe
installation.
See
FIG. 23.
Step
8: You
are
now
ready
to
start
the
exterior
of
the
installation.
Install
the
remaining
chimney
sections
to
the
exterior
of
the
structure.
Make
sure
the
chimney
extends
a min.
of
3 ft.
above
the
roof
and
2 ft.
above
any
portion
of
the
roof
within 10 ft.
Pull
the
flashing
down
over
the
chimney
till it
rests
on
the
roof
and
mark
the
spot
where
the
flashing
overlaps
the
roof.
Remove
the
roofing
in
the
area
marked
and
slide
the
flashing
under
the
roofing
above
the
hole
and
over
the
roofing
below
the
hole.
Renail all
shingles
into
position.
NOTE: Before nail
ing
flashing
into
position
check
to
make
sure
that
a
minimum
2
inch
"air
space"
has
been
maintained.
Then
nail
into
position.
Next
slide
the
storm
collar
over
the
end
of
the
pipe
and
slip
tab
into
slot
on
opposite
end
of
storm
collar.
For
8
inch
pipe
use
the
2nd
slot
on
the
col
lar
while
for
10
inch
use
first
slot.
Pull
the tab
tight
in
the
slot
and
bend
back
over
slot.
Seal
the
entire
seam
around
the
chimney
pipe
and
storm
collar
and
the
seam
around
the
roof
flashing
and
roof
with
a
waterproof
mastic.
This
area
must
be
treated
as
any
portion
of
the
roof
and
must
be
sealed
to
pre
vent
leaks.
See
FIG.
24.
Step
9: To
complete
the
exterior
portion
of
the
installation,
install
the
chimney
cap
desired.
All
caps
must
be
screwed
to
the
last
section
of
chimney
pipe,
with
the
inner
flue
installed
inside
the
last
section
of
pipe
a
minimum
of
2
inches.
For
telescoping
caps
Model
CTA-8
and
CHC-8,
the
inner
pipe
will
slide
into
the
inner
flue
of
tha
chimney
and
the
outer
flue
pipe
will
slide
down
over
the
outside
of
the
outer
chimney
pipe.
The
outer
wall
of
the
cap
must
overlap
the
outer
wail
of
the
chimney
a
minimum
of
3
inches
and
must
be
secured
with
a
minimum
of
three
sheet
metal
screws.
With
the
completion
of
the
cap
installation
the
exterior
installation
is
finished.
FIG.
23
SEAL
HERE
WITH
MASTIC
SEALER
STORM
COLLAR
2
IN.
CLEARANCE
-
Page
15
IT
IS
RECOMMENDED
THAT
EACH
CHIMNEY
SECTION
BE
SECURED
WITH
TWO
SHEET
METAL
SCREWS
WHERE
SHOWN.
DETAIL
FIG.
24
FOUR
ELBOW
STRAPS
WITH
A
MINIMUM
OF
AT
LEAST
TWO
EIGHT-PENNY
NAILS
EACH.
CHIMNEY
CAP
MASTIC
SEALER
FLASHING
SEAL
HERE
WITH
MASTIC
SEALER