INFORMATION AND SAFETY WARNINGS:
5. 1 Introduction
T his user manual will guide you through the functions and usages of our A290 smart lock .
It is important that you follow the instructions and regard all notes that appear throughout
this manual. Consult this manual before you attempt to use this lock . If you have any
questions that not answered by this manual or on need of non - routine service, please call
our customer service hotline or send FAQ to us.
5.2 Safety Warnings:
W hen reading this manual, note these icons: notes with the icon M ust be read,
General Usage
T his lock shall only be used as described in this manual.
Ve rify that all parts of the lock are accounted for. If any parts are missing, please contact
our service person.
T here is protective film on the front touch panel, if there are some scratches on the film,
please remove the film if you need.
P lease use 4 pcs AA batteries. Do not mix old and new batteries or other Z n/M n batteries.
Never insert objects into the lock other than batteries as described in this manual.
Ve rify all surfaces are flat and level before beginning installation, installation on doors
or surface with any types of deformity such as gaps or warping may cause the lock to
malfunction or fail to operate entirely.
Never apply any cleaner directly to any part of this lock . Only use clean water or mild
cleaner on a soft non - abrasive cloth when cleaning.
T he lock must be used with Tuyasmart APP. T he lock will function without the APP but
full functionality may only be achieved when the APP is on use.
Please read the manual carefully before use!
L imited 1 -year E lectronic Warranty L imited L ifetime Mechanical and F inish Warranty
This A290 product comes with a 1 -year L imited Warranty on E lectronic Parts and a L imited
lifetime. Mechanical and F inish Warranty against defects in materials and workmanship
under normal use to the original residential user. P roof of purchase and ownership is
required for the warranty to be in effect.
Any error or question in our manual or sales term, please feel free to contact with us.
For any wrong operation or installation to the user, we do not responsible for the duty.
For the damage caused by anthropic factor or inevitable reason, we do not pay for the loss
or maintain for free, please check our after sale service terms .
Please do not take apart the lock if you are not technician, if necessary, please make the
operations under the guide of technician.
Notice: there maybe a little difference for product pictures with real product, please
subject to our real products.
After changing the battery, please do not throw away the battery, kindly refund to recycle
bin in case of pollution!
PREPARING TO INSTALL
6. 1 Line D rawing
D raw a horizontal center line inside and outside the door at 1 meter from the ground. Fold the hole
template, make the handle center line align at the door horizontal center line, then d raw out the hole
lines at front and side.
D rawing Center Line
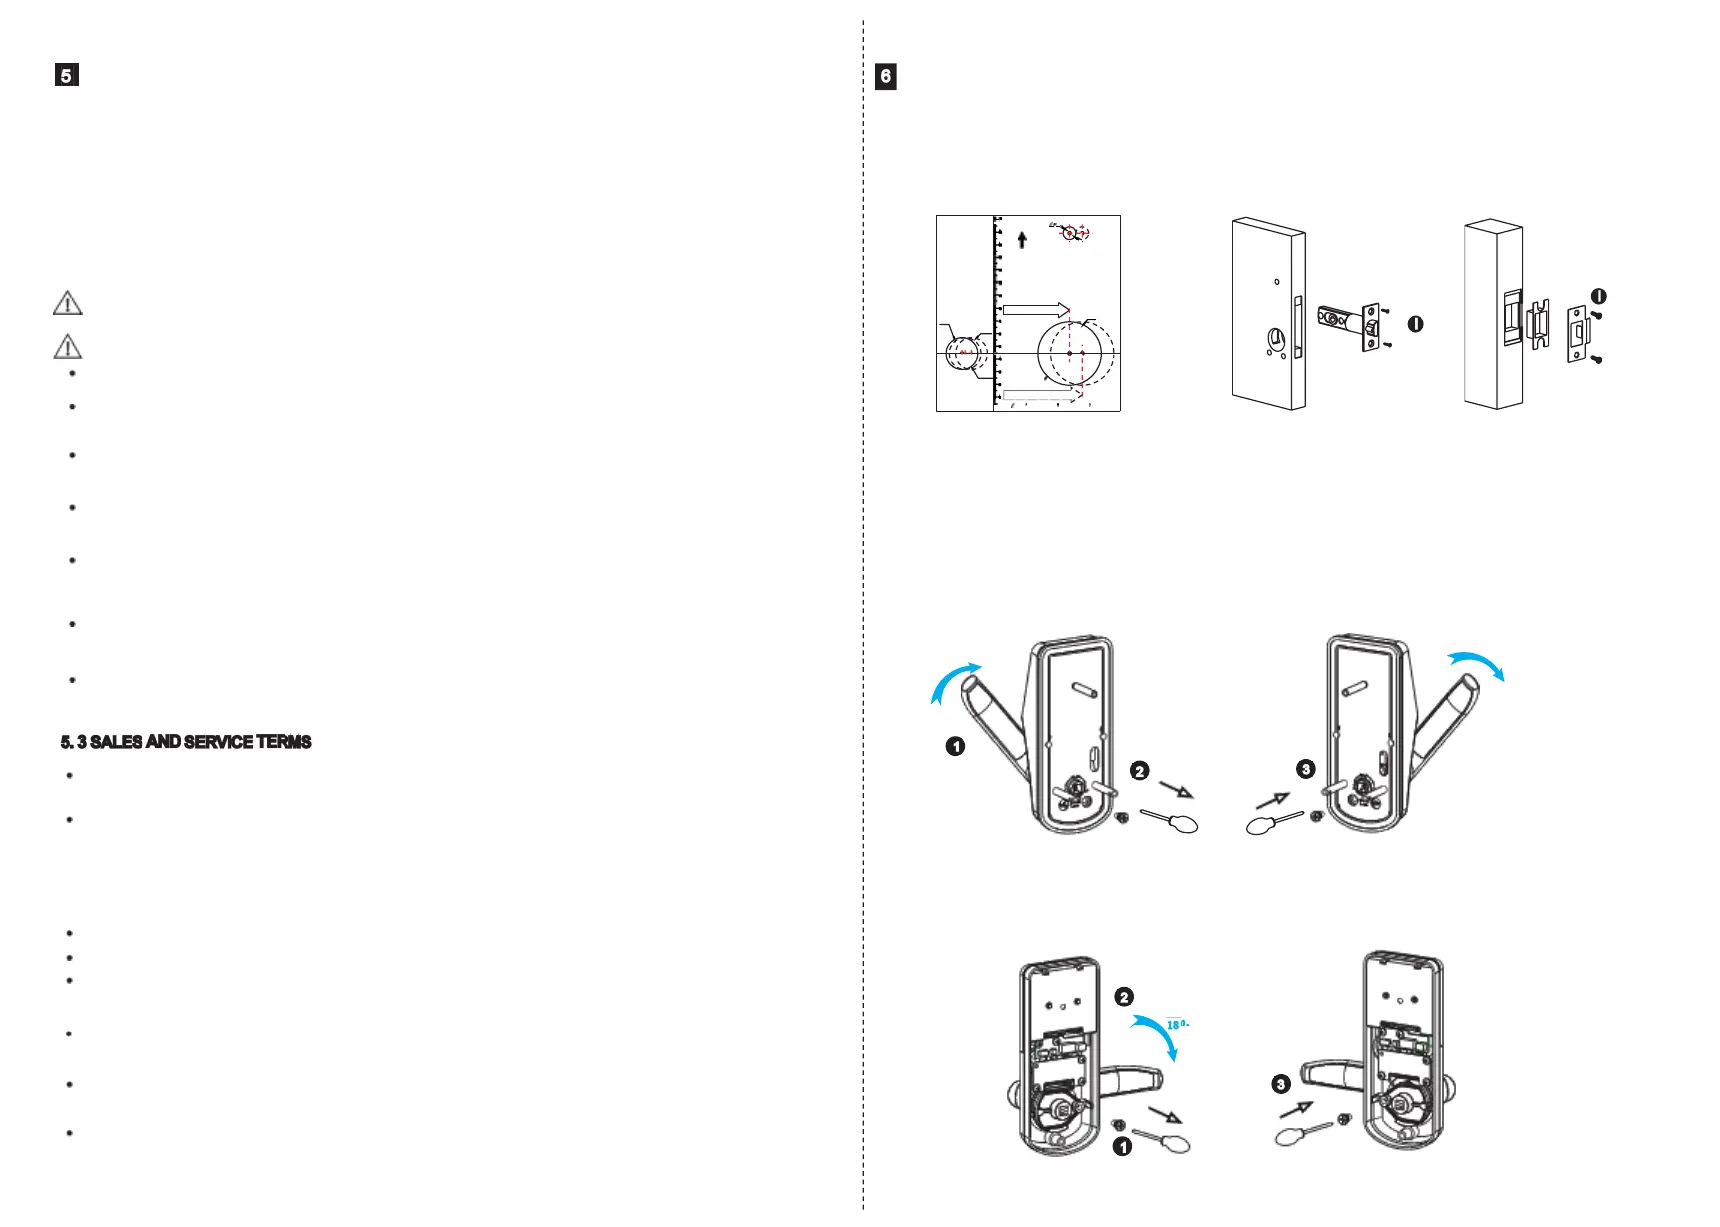
6 . 2 Adjust Direction
6. 2 . 1. Adjust from Right to Left Direction( For Sample)
1. 1 L ift upward the handle to 45 degree .
1.2
Use the allen key to take off the screw in the photo
.
1. 3 Tu rn the handle to 270 degree clockwise .
1.4 Tighten the screw in another side.
6 . 2 . 2 . Adjust from Right to Left Direction( Back Panel)
2 . 1 Use the allen key to take off the screw in the photo .
2
.
2 Tu rn the handle 180 degree counterclockwise
.
2
.
3 T ighten the screw in another side.
Tem plate - 60/70 # LATCH
In sta l lation Temp la te
Pl an till a de Ins ta la ci ón
Ш аб ло н уст а но в ки
설 치 템 플 릿
ﺕﯾ ﺑﺛ ﺗﻟ ﺍ ﺏ ﻟﺎ ﻗ
DO OR FRON T/ BACK
DOOR SIDE
ARROW UP
Di a m et er :1" [25 mm ]ho le
De pt h:4" [ 10 0 mm]
2"
[
50mm
]
FOLDALON G DO OR F RA ME ▶
" [7 0 MM ] Ba ck se
inches
1
understood and obeyed to prevent injury or damage to the lock .
D rill Hole with Template
Step 1
D rill hole for Strike
Step 3
1
3
4 "[ 45mm ]
Th ic k door
 Loading...