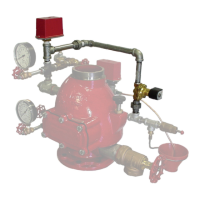
TFP1112_EN Page 7 of 10
valve’s low body drain valve, to bleed o
any excess water above the priming level.
Reclose the low body drain valve, return
system pressure to its normal value, and
then re‑open the Accelerator Control Valve.
Step 14.
Partially open the main control
valve. Close the main drain valve as soon
as water discharges from the drain connec‑
tion, and then completely open the main
control valve. The re protection system is
now ready for service.
NOTE
After placing a re protection system in ser‑
vice, notify the proper authorities and advise
those responsible for monitoring proprietary
and/or central station alarms.
Care and
Maintenance
The following procedures and inspections
should be performed as indicated, in ad‑
dition to any specic requirements of the
NFPA, and any impairment must be imme‑
diately corrected.
The owner is responsible for the inspec‑
tion, testing, and maintenance of their re
protection system and devices in compli‑
ance with this document, as well as with
the applicable standards of the National
Fire Protection Association (e.g., NFPA 25),
in addition to the standards of any author‑
ity having jurisdiction. The installing con‑
tractor or product manufacturer should be
contacted relative to any questions.
It is recommended that automatic sprinkler
systems be inspected, tested, and main‑
tained by a qualied Inspection Service.
The Model ACC‑1 Accelerator must be main‑
tained and serviced in accordance with the
following instructions:
NOTE
If an Accelerator is to be temporarily taken out
of service, then the proper authorities and all
personnel who may be aected must be noti‑
ed.
Before performing an alarm test, notify the
proper authorities and all personnel who may
be aected.
Before closing a re protection system main
control valve for inspection or maintenance
work on the re protection system that it con‑
trols, permission to shut down the aected re
protection system must be obtained from the
proper authorities and all personnel who may
be aected by this action must be notied.
Accelerator Inspection Procedure
It is recommended that the following Accel‑
erator inspection procedure be performed
at least annually, preferably in the fall or
winter of the year. This procedure must
also be used whenever ooding the system
would expose the water to freezing condi‑
tions.
Step 1. Verify that the Reset Knob is
screwed in.
Step 2. Close the system’s main control
valve and open the main drain valve to re‑
lieve the supply pressure to the dry pipe
valve.
Step 3.
Verify that the Accelerator Control
Valve is open.
Step 4.
Open the Inspector’s Test Connec‑
tion. Verify that the time to Accelerator trip
is essentially the same as in previous tests. A
momentary burst of air from the Automatic
Drain Valve indicates that the Accelerator
has tripped.
NOTE
As the system pressure is decreasing, check for
any sign of water being discharged from the
Accelerator Relief Port.
Step 5. Depress the plunger of the Auto‑
matic Drain Valve. A steady stream of ex‑
hausting air indicates that the Accelerator
has properly latched in the Tripped posi‑
tion.
Step 6. Close the Accelerator Control Valve
and the Inspector’s Test Connection.
Step 7. Clean out the Strainer at the Accel‑
erator inlet.
NOTE
A clogged strainer can prevent the Accelera‑
tor from properly tripping the dry pipe valve.
Step 8. Reset the Accelerator in accordance
with Steps 7 through 14 of the Setting Pro‑
cedure Section.
System Inspection Procedure
It is recommended that the following Ac‑
celerator and dry pipe valve inspection
procedure be performed at least annu‑
ally, preferably in the spring or summer of
the year. This procedure can only be used
whenever there is no danger that ooding
the system will expose the water to freezing
conditions.
Step 1. Verify that the Reset Knob is
screwed in.
Step 2. Open the Inspector’s Test Connec‑
tion. Verify that tripping of the Accelerator
operates the dry pipe valve and that water
is delivered out of the Inspector’s Test con‑
nection within the elapsed time required
by the authority having jurisdiction.
NOTE
As the system pressure is decreasing, check for
any sign of water being discharged from the
Accelerator Relief Port.
Step 3.
Reset the accelerator and dry pipe
valve in accordance with the Setting Proce‑
dure Section.
Trouble Shooting
Refer to the following subsections, as appli‑
cable. If the designated instructions do not
remedy the particular problem, refer to the
Accelerator Disassembly and Reassembly
subsection.
Water Discharge From Accelerator Relief
Port
Use the following instructions if water is
discharged from the Accelerator Relief Port
during a trip.
Step 1. Verify that the connection from the
Accelerator to the system piping is installed
in accordance with Step 4 of the Installation
Section. Correct if necessary.
Step 2. Investigate for and correct any con‑
dition which could result in an excessive
build‑up of drain back and/or condensate
water.
Step 3.
Review procedures which were
used to set the Accelerator. Failure to per‑
form Step 5 of the Setting Procedure can
permit a small amount of water to enter the
Pilot Chamber of the Accelerator.
Slow Fill of Dierential Chamber
Use the following instructions if the time to
ll the Dierential Chamber is longer than
the maximum value indicated in Step 11 of
the Setting Procedure Section.
Step 1. Check to see that the Accelerator
was reset per Step 8 of the Setting Proce‑
dure Section.
Step 2. Close the system’s main control
valve and open the main drain valve.
Step 3.
Check for any sign of external leak‑
age past the Accelerator Pressure Gauge,
Vent, and Restriction Access Plug connec‑
tions.
Step 4.
Check for any sign of external leak‑
age past the Reset Knob and Cover Gasket.
Step 5. Close the Accelerator Control Valve.
Step 6. Gently insert an M2 (3/32”) or small‑
er diameter probe into the Relief Port. If
the probe can be inserted more than 6 mm
(1/4”) then the Lever has not reset and the
Accelerator must be disassembled for inter‑
nal inspection. See the instructions for Ac‑
celerator Disassembly and Reassembly.
 Loading...