auxiliary drains in the system.Close
the auxiliary drain valves after water
ceases to discharge.Leave the Main
Drain Valve open.
4. Depress the plunger of the Automat-
ic Drain Valve to verify that it is open
and that the F470H Valve, as well as
the horizontal main, is completely
drained.
5. Remove the Handhole Cover and
thoroughly clean all interior parts of
the F470H Valve. Make certain that
the two 1/8 inch (3,2mm) diameter
pressure equalizing vents in the sys-
tem side of the Clapper are open.
Test the Clapper, Clapper Latch, and
Flange and Push Rod for freedom of
movement.Inspect the Clapper Fac-
ing for any sign of deterioration due
to age or chemicals in the water.
Replace worn ordamaged parts,ac-
cordingly.
6. Raise the Clapper and pivot the
Clapper latch to allow the Clapper to
be reseated. After reseating the
Clapper, release the Latch so that it
reseats on the Clapper.
7. Clean the Strainer in the Diaphragm
Chamber Supply connection by re-
moving the clean-out plug and
strainer basket.The Strainer may be
flushed out by momentarily opening
the Diaphragm Chamber Supply
Control Valve.
8. Open the Alarm Control Valve (Fig.
D), if it was closed to silence local
alarms.
It is recommended that the Alarm
Control Valve be wire sealed in the
open position with a No. 16 twisted
wire, the ends of which are secured
by a lead seal. The wire seal should
be looped through the hole in the
handle and tightly twisted around the
pipe nipple adjacent to the handle.
9. Reset the actuation system.
Manual Actuation — Push the oper-
ating lever up; however, do not close
the hinged cover at this time.
Wet Pilot Actuation — Replace op-
erated pilot sprinklers and/or reset
the manual control stations.
Dry Pilot Actuation — Replace oper-
ated pilot sprinklers and/or reset the
manual control stations. Re-estab-
lish dry pilot pneumatic pressure.
Electric Actuation — Reset the elec-
tric detection system in accordance
with the manufacturer’s instructions
to de-energize the solenoid valve.
NOTE
If the system is being set after a
fire and in order to prevent the
possibility of a subsequent opera-
tion of an overheated solder type
pilot sprinkler, any solder type pi-
lot sprinklers which were possibly
exposed to a temperature greater
than their maximum rated ambi-
ent must be replaced.
10. Open the Diaphragm Chamber Sup-
ply Control Valve and allow time for
full pressure to build up in the Dia-
phragm Chamber.
11. Operate (open) the Manual Control
Station to vent trapped air from the
Diaphragm Chamber. If necessary,
first open the hinged cover, and then
fully pull down on the operating lever.
SLOWLY close the operating lever,
by pushing it up, after aerated water
ceases to discharge from the Man-
ual Control Station drain tubing.
Close the hinged cover and insert a
new break rod in the small hole
through the top of the enclosing
box.
If wet pilot actuation is being used,
crack open the Inspector’s Test Con-
nection and any other vent valves, to
relieve trapped air. After the dis-
charge of air has stopped, close the
vent valves and the Inspector’s Test
Connection.
12. Inspect drain connections from the
Manual Control Station, Solenoid
Valve, Dry Pilot Actuator, and Alarm
Devices, as applicable. Any leaks
must be corrected before proceed-
ing to the next step.
13. Replace the Handhole Cover and
Gasket. Tighten all Handhole Cover
Bolts uniformly using a cross-draw
sequence.
14. Slowly open the Main Control Valve.
Close the Main Drain Valve as soon
as water discharges from the drain
connection. Observe the Automatic
Drain Valve for leaks. If there are
leaks, determine/correct the cause
of the leakage problem. If there are
no leaks, the F470H Valve is ready
to be placed in service and the Main
Control Valve must then be fully
opened.
NOTE
After setting a fire protection system,
notify the proper authorities and ad-
vise those responsible for monitoring
proprietary and/or central station
alarms.
-9-
VALVE TRIM
BILLS OF MATERIALS
NOTES:
1. WetPilotActuationTrim consists of
Items 1 through 38.
2. DryPilot ActuationTrim consists of
Items 1 through 38 plus Items D1
through D15.
3. Electric Actuation Trim consists of
Items 1 through 38 plus Items E1
through E5.
4. The nipples utilized in the trim ar-
rangements are Schedule 40 steel
per ASTM A53 or A135 and they are
threaded per ANSI B1.20.1 The fit-
tings are either malleable iron per
ANSI B16.3 or cast iron per ANSI
B16.4.
“Standard order” trim is provided
with black nipples and fittings: how-
ever, galvanized nipples and fittings
are available on “special order”.
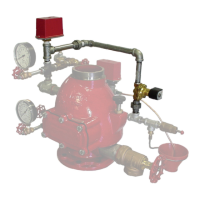
1 - 300 lb. Water
Pressure
Gauge (2 req’d)
2 - 1/4" Gauge
Test Valve
3 - Model F180
Manual Control
Station
4 - 2" Angle Valve
5 - 1/2" Ball Valve
(2 req’d)
6 - 1/2" Swing
Check Valve
7 - 1/2" Spring
Loaded Check
Valve
8 - Priming Supply
Restriction
9 - 1/2" Y-Strainer
10 - Model F793
Automatic
Drain Valve
11 - Drip Funnel
Support Plug
12 - Drip Funnel
Support
13 - Drip Funnel
14 - 3/32" Vent
Fitting
15 - 1/2" Angle
Valve
16 - 1/4" Tube,
30" long
17 - 1/2" Tube,
Connector
18 - 1/2" Tube,
24" long
19 - 1/4" Plug
20 - 1/2" Plug
21 - 3/4" Plug
22 - 1/2" Union
(5 req’d)
23 - 1/2" 90° Elbow
(3 req’d)
24 - 1/2" Tee (4 req’d)
25 - 1/2" x 1/4" x 1/2"
Tee (2 req’d)
26 - 1/2" x 1/2" x 3/4"
Tee
27 - 1/2" Cross
28 - 1/2" x 1/4"
Bushing
29 - 2" 90° Elbow
30 - 1/2" x 1-1/2"
Nipple
(16 req’d)
31 - 1/2" x 2"
Nipple
32 - 1/2" x 3" Nipple
33 - 1/2" x 5" Nipple
34 -1/2" x 7-1/2"
35 - 1/2" x 10-1/2"
Nipple for
4" valve,
1/2" x 12"
Nipple for
6" valve
36 - 1/4" x 4" Nipple
37 - 2 x 3" Nipple
38 - 2 x 4" Nipple
D1 - Model B-1
Dry Pilot
Actuator
D2 - 250 lb. Air
Pressure Gauge
D3 - 1/4" Gauge
Test Valve
D4 - 1/2" Globe
Valve
D5 - 1/4" Pressure
Relief Valve
D6 - 1/4" Plug
D7 - 1/2" Tube
Connector
D8 - 1/2" Tube,
30" long
D9 - 1/2" 90° Elbow
(2 req’d)
D10 - 1/2" x 1/2" x 1/4"
Tee (2 req’d)
D11 - 1/2" Tee (2 req’d)
D12 - 1/4" x 2" Nipple
D13 - 1/2" x close
Nipple (2 req’d)
D14 - 1/2" x 1-1/2"
Nipple (4 req’d)
D15 - 1/2" x 2"
Nipple (2 req’d)
E1 - 1/2" 90° Elbow
E2 - 1/2" Tube
Connector
E3 - 1/2" Tube,
30" long
E4 - 1/2" x 1-1/2"
Nipple
(2 req’d)
E5 - 24VDC Solenoid
Valve
 Loading...