EasyManua.ls Logo

U-Line H-9234 - User Manual

U-Line H-9234
8 pages
Print Icon
To Next Page IconTo Next Page
Loading...
PAGE 1 OF 8 0221 IH-9234
H-9234, H-9246
20 x 20' EVENT TENT
1-800-295 -5510
uline.com
PARTS
TOOL NEEDED
Sledge Hammer
(for H-9234)
Drop Cloth
(recommended)
Pole
6'8" Leg (LG) – Black x 8
9'4" Eave (EV) – White x 8
10'6" Full Rafter (FR) – Green x 4
14'4" Hip Rafter (HR) – Red x 4
Corner x 4
Steel Stake x 8
(for H-9234)
Barrel x 8
(for H-9246)
2" Ratchet
Strap x 8
Canopy Top x 1
8-Way Crown x 1 4-Way Side Tee x 4
Frame Pin x 48Base Plate x 8
Two Person Assembly
Recommended
SAFETY
IMPORTANT! Please read carefully
.
Keep away from all flame and heat sources.
Do not cook underneath or near canopy.
Do not store or use flammable liquids underneath or
near canopy.
Do not ignite or store fireworks underneath or near
canopy.
Do not use bleach to clean cover.
Do not dry clean cover.
Do not wash cover in washing machine or dry in
dryer. Hand wash with mild soap and water only.
Do not allow rain water, snow or ice to accumulate
on top of cover.
Do not hang or suspend anything from the frame,
grommets or truss system of the unit.
Remove rain water, snow and ice from canopy
cover.
NOTE:
This is a temporary structure and is
not recommended for use as a permanent
structure.
Question and Answer IconNeed help?

Do you have a question about the U-Line H-9234 and is the answer not in the manual?

U-Line H-9234 Specifications

General IconGeneral
BrandU-Line
ModelH-9234
CategoryTent
LanguageEnglish

Summary

Tool Requirements for Tent Setup

Tent Components List

Safety Guidelines for Tent Usage

General Safety Precautions

Instructions regarding flame, heat sources, flammables, and fireworks near the canopy.

Canopy Care and Maintenance

Guidance on cleaning, washing, and preventing water/snow accumulation on the canopy.

Structural Limitations Note

Clarifies the tent is a temporary structure, not for permanent use.

Tent Frame Assembly

Initial Frame Assembly Steps

Ensuring parts are present and connecting hip rafters to the 8-way crown with pins.

Connecting Full Rafters to Crown

Repeating the process to connect the four full rafters to the central 8-way crown.

Attaching Eave and Side Poles

Connecting eave poles to corner and 4-way side tee fittings around the frame.

Securing Legs with Ratchet Straps

Looping ratchet straps to the fittings at each leg location for later tensioning.

Unrolling and Positioning Tent Top

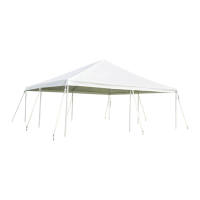
Spreading the canopy over the frame, creating an air cushion, and centering it.

Fastening Canopy Straps and Base Plates

Securing the canopy with alligator straps and attaching base plates to legs.

Leveling and Securing Downwind Side

Lifting the downwind side and attaching leg poles for stability during setup.

Raising Remaining Legs and Securing Canopy

Attaching the rest of the legs and tightening all alligator straps to the frame.

Tent Anchoring Methods

Securing Tent with Stakes

Instructions for placing stakes and attaching ratchet straps for anchoring the tent.

Securing Tent with Barrels

Detailed steps for assembling mounting plates and straps to barrels for ballast.

Tightening Ratchet Straps

Procedure for tightening ratchet straps to secure the tent to stakes or barrels.

Tent Takedown Procedure

Loosening Straps and Removing Ballast

Releasing ratchet straps and draining/removing barrels or stakes.

Disassembling Frame Legs

Removing side and remaining legs from the tent frame.

Unfastening Canopy Straps

Releasing alligator straps connecting the canopy to the frame.

Lowering and Folding Tent Top

Carefully lowering the canopy and folding it for storage.

Disassembling Frame Fittings

Taking apart corner, side tee, and center crown fittings by removing pins.

Final Stake and Ballast Removal

Removing all stakes and emptying water from barrels.