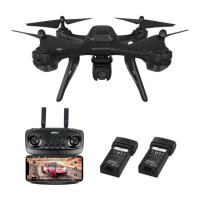
This document provides a comprehensive user manual for the UDIRC U59 drone, a GPS-enabled quadcopter designed for outdoor flight and aerial photography. It is suitable for users over 14 years old and emphasizes safety precautions, including staying away from rotating propellers and adhering to important safety guidelines. The drone features a 5G WiFi camera, requiring users to confirm their phone's compatibility.
Function Description
The U59 drone is equipped with GPS positioning, allowing for stable outdoor flight and advanced features such as automatic return and intelligent hover. It integrates a 5G WiFi camera for real-time video transmission and photo capture. The drone is controlled via a dedicated transmitter, which can also hold a mobile phone for FPV (First Person View) operation through the UDIGPS app.
Important Technical Specifications
Drone:
- Model: U59
- Camera: 5G WiFi (requires compatible phone)
- Positioning: GPS-enabled
- Battery: Li-Po (charging via original charging cable, 5V 2A adapter recommended)
- Propellers: A and B types, with specific installation requirements
- LED Indicators: Front LED (Green), Rear LED (Red)
- Landing Gear: Installable/disassemblable
- Storage: TF card slot for camera (TF card not included)
Transmitter:
- Battery: 4*1.5V AA Batteries (not included)
- Controls: Left stick (Go up/down, Counterclockwise/Clockwise turn), Right stick (Forward/Backward, Fly left/right), Gimbal Rotary Button, Power Switch, GPS Switch, Following Mode Button, Return Button, Speed Switch, Encircling Mode Button.
- Phone Holder: Integrated for mobile phone installation.
- Frequency Pairing: Manual pairing process with the drone.
APP (UDIGPS):
- Compatibility: IOS and Android systems.
- Features: Real-time video feed, photo/video capture, detailed operation instructions (via "HELP" section).
Usage Features
Ready Before Take Off:
- Battery Charging: The drone's Li-Po battery must be fully charged before use. Connect the original charging cable to the drone battery and a USB charging port (5V 2A adapter recommended). The indicator is red during charging and turns green when fully charged.
- Battery Installation/Disassembly: Push the battery into the slot until secure. To remove, press the battery lock and pull it out backward.
- Landing Gear Installation: Aim the landing gear frame to the body and place it correctly. Ensure the landing gear is close to the fuselage surface to maintain stability.
- TF Card Installation: Insert the TF card into the camera's slot, paying attention to the metal contact surface orientation.
- Transmitter Battery Installation: Open the battery cover, insert 4*1.5V AA batteries according to polarity, and close the cover.
- Mobile Phone Installation: Pull down the phone clip, place the phone in the upper and lower clamps, which will automatically secure it. Avoid clipping phone buttons.
Flight Operations:
- APP Connection: Download and install the UDIGPS app. Refer to the app's "HELP" section for detailed instructions.
- Frequency Pairing:
- Turn on the transmitter.
- Pull the left stick to the lowest position and release; the indicator light will slow flash, indicating transmitter is in frequency state.
- Long press the drone's power button for 2 seconds and place it on horizontal ground. After navigation lights turn on for 2 seconds, fuselage lights will flash, confirming successful connection. If the left light flashes and the right light is off, compass horizontal correction is needed.
- Compass Calibration:
- Rotate the drone horizontally until the transmitter sounds "di..." to complete level correction. When the left light is long bright and the right light flashes, enter vertical correction.
- Rotate the drone vertically until the transmitter sounds "di..." to complete vertical correction. All four navigation lights will spin and flash. This calibration is crucial for normal operation.
- GPS Signal Search: After successful frequency matching, the drone searches for GPS signals. The left blue indicator on the transmitter changes from flashing to long bright when GPS connection is successful. Without GPS, flight height defaults to about 4 meters.
- Unlocking the Drone: Push both left and right sticks inward to a 45-degree angle simultaneously. This will start the motors (unlocking). If the drone is not taking off, the motors will stop and lock. The drone can only take off when unlocked.
- Take Off: After unlocking, push the left stick up slowly to make the drone rise.
- Landing: During flight, push the left stick down slowly to land the drone.
Control Stick Operation:
- Left Stick:
- Up/Down: Go up/down.
- Left/Right: Counterclockwise/Clockwise turn.
- Right Stick:
- Up/Down: Forward/Backward.
- Left/Right: Fly to the left/right.
Advanced Flight Modes:
- Return: Press the "return" button on the transmitter. The drone will automatically return to the take-off point. The right stick cannot control the drone during return until it aligns with the take-off direction.
- GPS ON/OFF: GPS is on by default. Press the GPS switch button to turn it off (transmitter sounds "di", blue indicator off) or restart it. This function is only used when the motor is locked.
- Following Mode: Press the "following" button. The drone will follow the user based on the mobile phone's APP signal. Requires the drone and APP to be connected and mobile location services enabled. Maximum follow range is 300m from the take-off point.
- Encircling Mode: Press the "Encircling" button. The drone will fly in a default radius. Use the right stick to adjust speed and direction (clockwise/counterclockwise, narrow/enlarge radius). The left stick only controls height in this mode.
- Speed Mode Switch: Press "H/L" to cycle through speed modes:
- "H" (High Speed): Transmitter sounds "di" three times. Suitable for professional operation in outdoor wind resistance.
- "L" (Low Speed): Transmitter sounds "di". Suitable for beginners without wind.
- "M" (Middle Speed): Transmitter sounds "di" twice. Suitable for skilled operators in light breeze.
Camera Features:
- Gimbal Adjustment: Scroll the Gimbal button to adjust the camera angle (Tilting -90° to 0°).
- Photo: Press the "photo" button once. The transmitter will sound "di".
- Video: Press the "video" button to start recording (transmitter sounds "didi") and press again to stop and save.
- Filming Notes: Photos and videos are saved to the mobile picture library and drone TF card. Videos can be downloaded from the TF card to the phone via the APP. The APP needs authorization to read the phone gallery. Turn off drone power before removing the TF card. Corresponding playback software is needed to read aerial video on a computer.
Intelligent Features:
- Intelligent Hover: Uses flight control, visual system, and GPS coordinates to maintain a desired position, acting like a fixed camera in the air. Requires proper GPS connection. Atmospheric pressure or wind can affect stability.
Safety and Alarms:
- Low Battery Alarm (Transmitter): Transmitter sounds "di" three times. Replace batteries immediately.
- Automatic Return (Drone): Drone battery low, sounds "di" twice, indicator lights turn from long to bright. Drone returns to take-off point. Controllable range is 20 meters during return.
- Out of Range Alarm: Drone flies beyond max remote control distance, transmitter beeps "didi...didi...didi...". Fly drone back into range.
- Stuck Protection: If a propeller is stuck, LED lights fast flicker, motor stops. Reset left stick to lowest then middle position to unlock.
- Out of Control Protection: Flight control system automatically returns the drone to the return point if remote control signal is lost. The drone does not avoid obstacles during this return; users can set return altitude.
- Runaway Protection Mode Triggers: Transmitter off, flight distance exceeds effective range, obstacle between transmitter and drone, transmitter signal disturbed.
Maintenance Features
Parts Replacement:
- Propeller Replacement:
- Disassembly: Screw out the screw, then pull out the propeller.
- Installation: Ensure the propeller hole aligns with the motor hole, press down, then screw the screw.
- Important: Propellers are marked A and B. Install them on the corresponding motors (marked with A or B) to ensure normal operation.
Troubleshooting:
The manual includes a detailed troubleshooting table covering common issues such as:
- Controller indicator light off (low battery, incorrect battery installation).
- Failed pairing (interfering signal, mis-operation, damaged components).
- Drone under-powered or unable to fly (deformed propeller, low battery, incorrect propeller installation, improper calibration).
- Drone not hovering or tilting (deformed motor holder, gyroscope not reset, damaged motor).
- Drone indicator light off (low battery, expired battery, poor contact).
- Cannot see camera picture (interfering signal, damaged camera).
- Hard to control by cellphone (inexperience).
- Cannot altitude hold (deformed propeller, damaged motor, unstable atmospheric pressure).
- Cannot position hold (GPS not connected).
- Cannot find GPS signal (GPS module damaged, GPS module plug loose).
Important Notice:
- The company's products are continuously improving; designs and specifications are subject to change without notice.
- All information in the manual has been checked for accuracy; the company reserves the right of final interpretation for any printing errors.
Battery Disposal & Recycling:
- Wasted Lithium-Polymer batteries must not be placed with household trash. Contact local environmental/waste agencies or the supplier for proper recycling.
FCC Note:
- The device complies with Part 15 of FCC Rules, designed to provide reasonable protection against harmful interference.
- Users are advised to reorient/relocate receiving antenna, increase separation between equipment/receiver, or connect equipment to a different circuit if interference occurs.
- WARNING: Changes or modifications not expressly approved by the responsible party could void user's authority to operate the equipment.
- The device must accept any interference received.
- FCC Radiation Exposure Statement: The device meets general RF exposure requirements and can be used in portable exposure conditions without restriction.