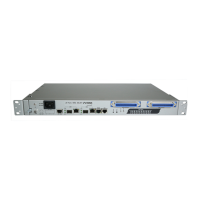
1 — Installation of the VX-MD4024
localhost:>enable //go to enable mode
localhost:%configure //go to configuration mode
localhost:(conf)#firmware write <FTP server ip address> <username>
<password> <filename> {image|bootloader} [noreboot]
//get files from FTP server and write to FLASH.
// The word “noreboot” in this command is optional. If you add it in the command,
you must reboot the system manually for the changes to take effect; otherwise the
system will reboot automatically once the firmware/bootloader is updated.
Perform software image or bootloader remote download.
firmware write <ip> <username> <password> <string> {image |
bootloader} [noreboot]
FTP server IP address
Type: Mandatory
Username
Valid values: 1 ~ 31 characters
Type: Mandatory
Password
Valid values: 0 ~ 31 characters
Type: Mandatory
Image path and filename
Valid values: 1 ~ 64 characters
Type: Mandatory
Perform remote download for the software image
Type: Mandatory
Perform remote download for the bootloader
Type: Mandatory
No Reboot after command commplete.
Must reboot system manually for the changes to take effect!
Type: Optional
Note: Getting file from FTP Server and writing to Flash ROM needs several minutes; you can
get latest status by using command ‘show firmware status’. During the Flash writing
process, you MUST NOT turn off or reset the system.
4. After system restarts, login the CLI again and use the ‘show firmware partition’ or ‘show
bootloader’ command to check if the software upgrade is successful.
In Web:
Please refer to VX-MD4024 Web Configuration Tool Guide.