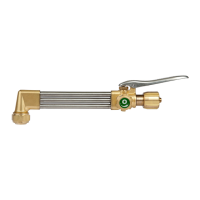
The document describes the Victor CA411-3 400 Series Medium Duty Cutting Attachment, Tip Series 3, a gas apparatus designed for cutting operations. This manual, 0056-3759, Revision AA, issued August 15, 2013, provides detailed information on parts, service, and repair procedures.
Function Description:
The Victor CA411-3 is a cutting attachment used with various fuel gases (with the proper tip) for medium-duty cutting applications. It is designed to provide a controlled flame for cutting metal. The apparatus facilitates the mixing of oxygen and a fuel gas to produce a high-temperature flame. The cutting lever allows for the control of cutting oxygen, enabling precise and efficient cutting. The design emphasizes user comfort and visibility, aiming to reduce operator hand fatigue and improve the overall cutting experience.
Important Technical Specifications:
The CA411-3 cutting attachment is part of the 400 Series and utilizes Tip Series 3. It is compatible with cutting tips ranging from #000 to #5, making it versatile for various cutting tasks and fuel gases. The overall length of the attachment is approximately 10 1/2 inches, with a height of about 2 5/8 inches and a width of 1 7/8 inches at the head, tapering to 1 3/8 inches at the handle connection. The 400 Series Head is designed at a 90-degree angle. The inlet nut is redesigned for improved grip, allowing for hand tightening. The inline stainless tubes contribute to better visibility and a reduced profile compared to triangular designs. The efficient Universal Head Mixer further reduces the torch profile for enhanced visibility.
Usage Features:
The CA411-3 incorporates several features to enhance usability and safety:
- Intuitive Knobs: The control knobs are color-coded and clearly marked with "increase/decrease" labels, making them understandable across different languages.
- Improved Stainless Lever: The cutting lever is made of stainless steel, designed to provide increased comfort and reduce operator hand fatigue during prolonged use.
- Versatility: The attachment is designed as "one torch for All Fuel Gases" when used with the appropriate tip, simplifying equipment needs for users working with different fuel types.
- Safety Warnings: The manual emphasizes the importance of reading and understanding all safety and operating instructions before use. It warns against using the apparatus without proper training and competent supervision, highlighting risks of fire, explosion, property damage, and operator injury if procedures are not followed. It also stresses that if the apparatus does not perform as usual or if difficulties arise, usage should cease immediately until the problem is corrected.
- Backfire, Sustained Backfire, and Flashback: The manual defines these critical safety terms. A backfire is a popping sound as the flame returns into the torch, potentially extinguishing or reigniting. A sustained backfire involves continuous burning within the torch, accompanied by popping, hissing, or whistling. A flashback is the return of the flame through the torch into the hose and even the regulator, potentially causing an explosion. In case of backfire or flashback, the user is instructed to immediately turn off the Oxygen Valve first, then the Fuel Valve, allow the torch to cool, and replace any damaged parts if the issue reoccurs.
Maintenance Features:
The manual provides comprehensive instructions for service and repair, including recommended tools, supplies, and step-by-step procedures for various components:
- Cleaning Procedures: Users are advised to contact their local chemical supplier for recommended cleaning solvents suitable for the metals in the product. A critical warning states that nonmetal components (seats, O-rings, dust seals, gaskets) should not contact cleaning solvents, as this can cause swelling and stress cracks. For these parts, a mild soap solution followed by thorough rinsing and drying is recommended. Any nonmetal parts that have contacted oil, grease, or petroleum-based substances must be replaced due to flammability risks in the presence of oxygen.
- Repair Kits: Specific repair kits are available for various parts, including the Control Valve (0390-0086), H.P. Oxy Valve (0390-0016), Cone End Assembly (0390-0087), 400 Series Head (0390-0089), and Gas Feed Tubes (0390-0091).
- Component-Specific Repair Instructions: Detailed steps are provided for repairing or replacing:
- Control Valve: Involves unscrewing the nut, applying Christo-Lube to threads, and tightening the assembly.
- Cutting Lever: Requires tapping out a roll pin, inspecting for wear, and reinserting a new roll pin if needed.
- H.P. Oxy Valve: Involves disassembling the valve, replacing O-rings, gaskets, and washers, and reassembling with Christo-Lube. A caution emphasizes discarding used O-rings, seat assemblies, gaskets, and washers each time the torch is reassembled.
- Cone End Assembly: Requires removing the cutting lever, placing the torch in a fixture, unscrewing the assembly, cleaning, and replacing O-rings. A warning highlights the necessity of two sealing O-rings to prevent pre-mixing of oxygen and fuel gases.
- 400 Series Head: Involves removing the tip and tip nut, heating gas feed tubes to liquefy solder, and using pliers to remove the head. Reassembly includes cleaning, positioning the new head, ensuring proper tube seating, soldering, and reaming the torch seat.
- Gas Feed Tubes: Requires removing various components, heating tubes to liquefy solder, and removing them with pliers. Reassembly involves cleaning, inserting new tubes, ensuring proper seating, and soldering.
- Leak Testing: Procedures are outlined for leak testing the gas regulator and the torch itself. For the torch, this involves connecting to oil-free air or dry nitrogen, inserting a plugged cutting tip, pressurizing hoses, submerging the torch in water, and checking for bubbles around connections and valve stem assemblies. If bubbles appear at the torch head, reaming the valve seating surface with an RT-33 tool is recommended.
- Flame Testing: Instructions for flame testing include removing the torch from water, purging water, connecting to oxygen and acetylene supplies, installing a cutting tip, adjusting pressures, purging gas lines, igniting the flame, adjusting to a neutral flame, and performing a "pop" test on a fire brick.
- Recommended Tools: A list of recommended tools includes various open-end wrenches (5/8", 9/16", 11/16", 1/2"), a 1" box-end wrench, a vise, a 5/32" drift punch, a small hammer, a Cone End Assembly Clamp RT-108, a brazing torch, pliers, 45% silver solder, silver solder flux, Loctite® #222 (0028-0081), Christo-Lube 129 (0034-0021), Hand Reamer RT-58, and an air hose. For testing, oil-free air or dry nitrogen supplies, oxygen and acetylene gas supplies, and a small water tank are needed.
The manual emphasizes that service or repair should only be performed by a qualified repair technician in strict accordance with applicable Part and Service bulletins for VICTOR manufactured products, as improper service, repair, or modification could result in product damage or operator injury. It also includes a California Proposition 65 warning about chemicals, including lead, known to cause birth defects or other reproductive harm, advising users to wash hands after handling.