Do you have a question about the Victron energy SmartSolar MPPT 75/10 and is the answer not in the manual?
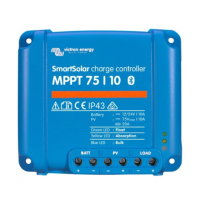
| Nominal Battery Voltage | 12/24V Auto Select |
|---|---|
| Maximum Charge Current | 10 A |
| Max. PV Open Circuit Voltage | 75 V |
| Efficiency | 98% |
| Self Consumption | 10 mA |
| Bluetooth | Yes |
| Operating Temperature | -30°C to +60°C |
| Enclosure Protection | IP43 |
| Protection | Over temperature |
| Temperature Compensation | -16mV/°C |
Important instructions for installation, operation, and maintenance to ensure safe use.
Guidelines for using appropriate cables and ensuring safe electrical connections.
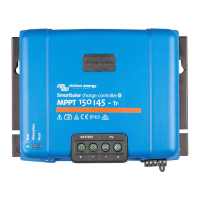
Details the voltage and current specifications for different MPPT models.
Explains how the charger automatically detects system voltage for optimal charging.
Highlights the fast MPPT tracking for maximizing energy harvest.
Discusses the high efficiency of the charger, exceeding 98%.
Covers protection against over-temperature, reverse polarity, and reverse current.
Details the capabilities of the VictronConnect App for monitoring and configuration.
Lists various display options for monitoring the solar charger's status.
Describes the VE.Direct port's function for communication and control.
Explains the load output feature for powering DC loads and its protection.
Describes the BatteryLife algorithm to prevent battery damage from shallow cycling.
Details how to create a virtual load output for higher current loads.
Explains the battery charging process and algorithms.
Covers the Bulk, Absorption, and Float charging stages.
Allows customization of charge algorithms via the VictronConnect App.
Describes periodic equalization charging for lead-acid batteries.
Explains how temperature affects charging and compensation.
Discusses the built-in sensor for temperature compensation.
Details the Smart Battery Sense for accurate temperature and voltage data.
Explains voltage sensing via VE.Smart network for compensation.
How to create a virtual remote on/off terminal.
Describes the optional WireBox for added safety and terminal protection.
Instructions for vertically mounting the solar charger for optimal cooling and safety.
Guidance on battery connection, fuse protection, and cable selection.
Requirements for PV array configuration, voltage, and panel types.
Details on battery and chassis grounding procedures.
Step-by-step instructions for making all electrical connections in the correct order.
How to connect the optional MPPT Control display via VE.Direct cable.
Overview of methods for configuring solar charger settings.
Using the VictronConnect App for full configuration and firmware updates.
Using the jumper link for specific load output configurations.
Configuring settings using the optional MPPT Control display.
Detailed explanation of all user-configurable settings.
Configuration options for battery voltage, charge current, and presets.
Settings to control the load output operation and behavior.
Configuration for automatic night lighting control.
Functionality settings for the VE.Direct TX port.
Functionality settings for the VE.Direct RX port.
Procedure for checking and updating the solar charger's firmware.
How to set up and use VE.Smart networks for data sharing.
Design notes and steps for creating and joining VE.Smart networks.
Process of powering up the solar charger and initial communication.
Details the battery charging cycle, including absorption time and tail current.
Configuration and function of automatic equalization for lead-acid batteries.
Recommended settings for LiFePO4 batteries.
Explanation of the LED status indicators for operation and faults.
How error codes are displayed and where to find a full list.
Using the VictronConnect App to monitor status, history, and errors.
Overview of the status screen and data displayed.
How to view historical data like solar yield and battery status.
How VictronConnect indicates active and historical errors.
Remote monitoring capabilities using GX devices and VRM portal.
Steps to diagnose why the controller is not powering up.
Performing a visual inspection for any physical damage.
Verifying battery voltage at the controller terminals.
How to check for and replace a blown fuse.
Reasons why batteries might not be charging and troubleshooting steps.
How to identify and fix reverse battery polarity connection.
Identifying reverse PV polarity and its signs.
Reasons for the charger stopping or reducing charge current.
Checking if the charger has been accidentally disabled.
Conditions for commencing and continuing PV charging.
Ensuring the battery voltage setting matches the system.
How external devices can control charging.
Troubleshooting lack of battery supply to the charger.
What happens when PV voltage exceeds the rated maximum.
Causes and remedies for undercharged batteries.
How excessive DC load can prevent battery charging.
Checking if charge voltages are set correctly.
How reduced charge current indicates a nearly full battery.
Diagnosing and compensating for voltage drop in battery cables.
Importance of equal ambient temperatures for charging.
Reasons for the system not reaching float stage.
Impact of incorrect temperature compensation settings.
Checking the "Max charge current" setting.
Dangers of overcharging and its causes.
How an incorrect battery voltage setting leads to overcharging.
Consequences of setting charge voltages too high.
Risks of equalization on unsuitable batteries.
How battery age or faults can lead to overcharging.
Troubleshooting issues related to the solar array and output.
Risks associated with high PV reverse current.
Reasons for lower than expected PV power generation.
Factors preventing the charger from reaching full output.
How battery voltage affects maximum PV output power.
Recommendation against mixing different PV panel types.
Causes and consequences of burned or melted PV connections.
Guidance on correctly connecting MC4 connectors.
Warning against using solar panels with optimisers.
Note on the absence of internal earth fault detection.
Checking for ground faults and single ground connection points.
Troubleshooting problems related to communication interfaces.
General troubleshooting for VictronConnect App issues.
Diagnosing issues with VE.Direct port communication.
Troubleshooting VE.Smart network communication problems.
Identifying and resolving common Bluetooth connectivity issues.
Addressing problems caused by incorrect settings or firmware.
How incorrect settings can cause unexpected behavior.
Note on limited support for 36V/48V battery voltages.
Steps to update firmware and resolve potential bugs.
Troubleshooting problems with the load output function.
Reasons why the load output may not be functioning.
Possible causes for the load output failing to power loads.
Ensuring accurate load output current readings.
Troubleshooting other operational problems.
Why using the charger without batteries is not recommended.
Why using the charger as DC/DC converter is not recommended.
Explanation for sand appearing from the unit, not covered by warranty.
Comprehensive technical data for all supported MPPT models.
Detailed dimensional drawings for the 75/10 and 75/15 models.
Detailed dimensional drawings for the 100/15 model.
Detailed dimensional drawings for the 100/20 model.
A comprehensive list and explanation of all possible charger error codes.